Don't like the adverts?  Click here to remove them

Handbrake rebuild

mjmcgowan

New Member
Joined
Dec 7, 2010
Messages
33
My handbrake has not been working for a while and no one has been able to get it working for any length of time below is the repairs we have carried out:

Australia - replaced pads, springs, clips and handbrake cable (aftermarket milner) the cable was slightly too long so we used some spacers, seemed to work for 9 months.

Colombia - Handbrake ceased and was missing shoe holding pins - fixed and worked for 3 months

South Africa - Replaced pins and hand brake cable (aftermarket milner) worked for a couple of weeks, toyota said was the cable being too long, had it shortened, but was too short, replaced with Toyota cable still too long... about two inches.... handbrake did not work since,

Turkey - Replaced pads and replaced pad return springs both sides, looks like the pads are not balanced and the right hand side is not to taught i.e the bell crank spring is not pulling on the main cable and the crank maybe a little ceased...

We are returning to the UK and need to have it fixed properly prior to an MOT,

Can anyone recommend which parts we should look at replacing... how to balance the pads correctly and has anyone else found either Milner or Toyota cable are too long from the outset?

Thanks for your help
 
Last edited:
Sorry, I don't know the answer. I'm just amazed to see someone who had a 90 (or 120) handbrake working for 9 months! I've never had one working for more than a week. The week including and immediately following the MOT.
 
There are many, many threads on repairing & adjusting the handbrake, the topic is as regular as "what oil" and "which tyres" :icon-rolleyes:.

I have got mine to work well, but it takes some modification to improve the mechanism.

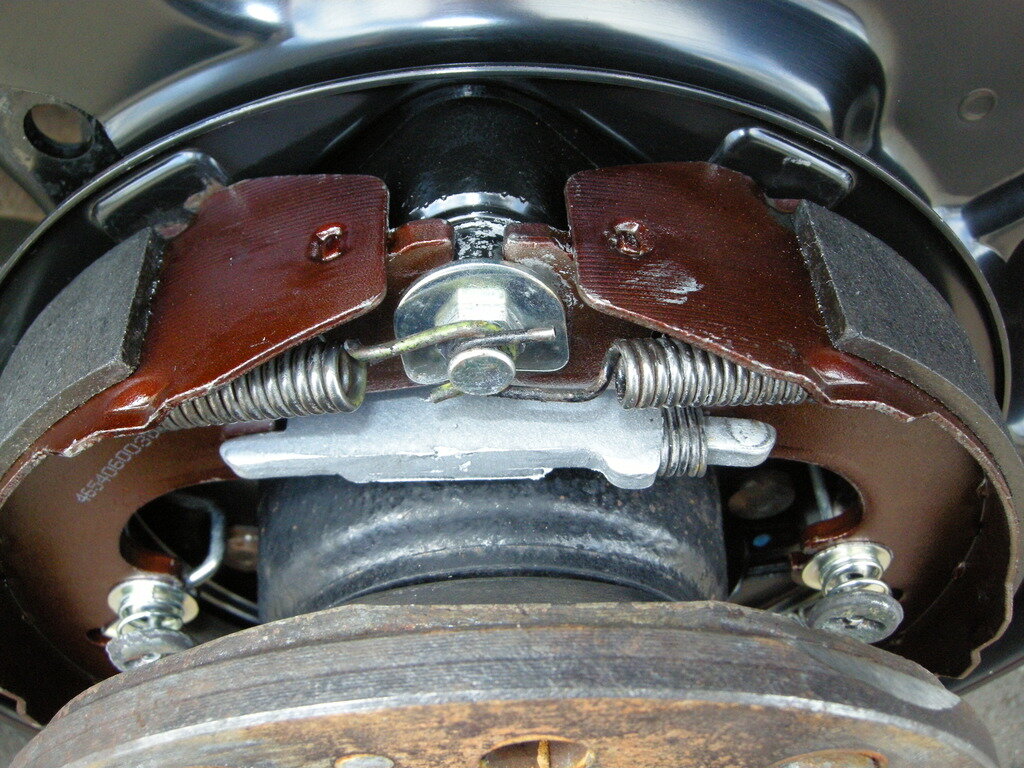
The basic problem is that the shoe adjustment is at the bottom but the action is at the top - and there is a torque multiplier in the form of a lever that spreads the shoes against a "Dog Bone" spacer (a compensator). This means that there is a lot of movement on the cables/bellcranks for very little movement at the shoes - and no adjustment at the top where it matters.

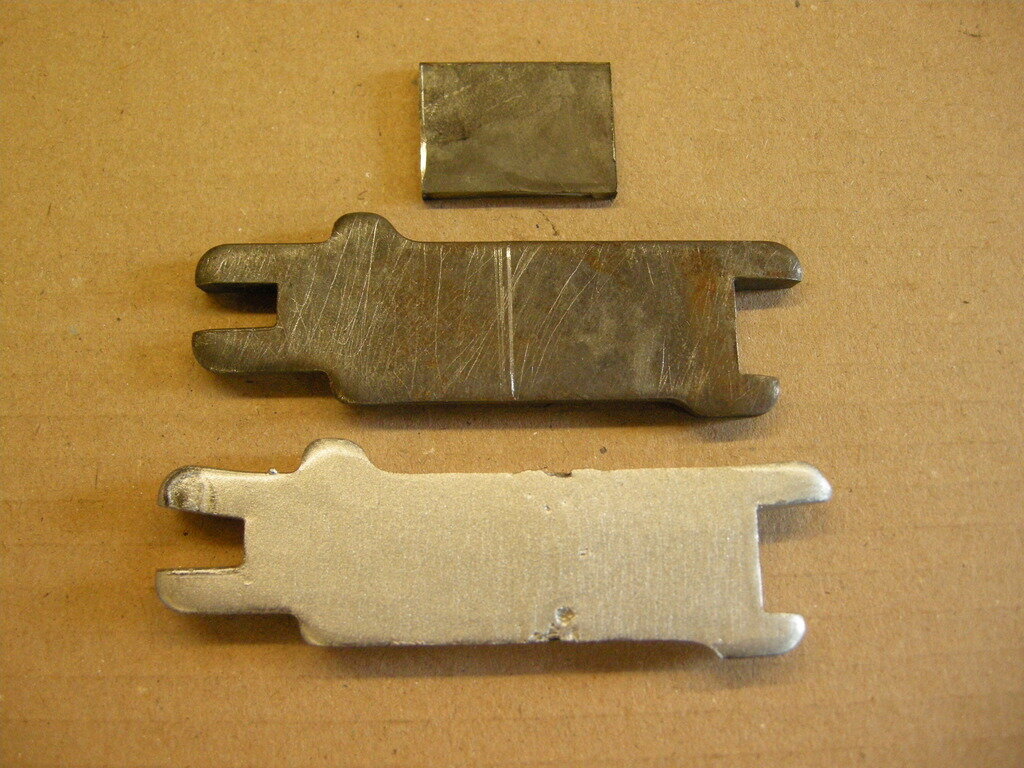
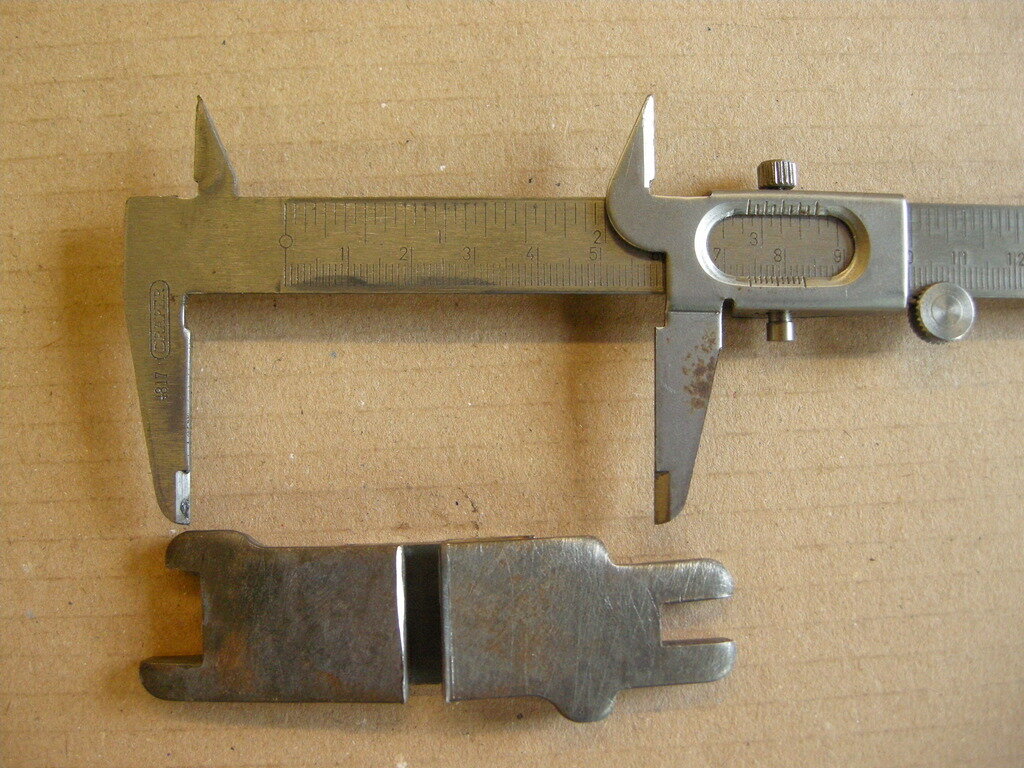
I measured mine carefully then cut the "Dog Bones" in half and welded them to a plate, making them 5mm longer. This meant that the top of the shoes are just touching the drum when everything is adjusted and the cable movement is much reduced. After this the force on the shoes was much greater with only about five clicks at the handbrake lever. I have had no problems since (but the linkages DO HAVE TO BE REQULARLY LUBRICATED).

It is now possible to buy longer "Dog Bone" compensators so you don't have to go cutting and welding yourself - Chris posted a link to the supplier recently, I'll see if I can find it.

Original Dog Bone above, modified one below:

DSCN4176_zpsnknl4v5r.jpg


DSCN4177_zpscckv80ca.jpg


DSCN4184_zpspfvm7mmy.jpg


I also found the Milners Handbrake Cable to be too long and also had to make a spacer for the handbrake lever end.

The cable is attached to a swinging lever on the back of the axle (left/right drum compensator) make sure that moves freely. I re-built it with decent bushes and stainless bolts.

Bob.
 
I measured mine carefully then cut the "Dog Bones" in half and welded them to a plate, making them 5mm longer.
my mechanic has suggested building up the inside of the "H" with weld , something he has done on old Renaults
 
Stan at theoverlander.org can supply the longer dog bones :)
 
There are many, many threads on repairing & adjusting the handbrake, the topic is as regular as "what oil" and "which tyres" :icon-rolleyes:.

I have got mine to work well, but it takes some modification to improve the mechanism.

The basic problem is that the shoe adjustment is at the bottom but the action is at the top - and there is a torque multiplier in the form of a lever that spreads the shoes against a "Dog Bone" spacer (a compensator). This means that there is a lot of movement on the cables/bellcranks for very little movement at the shoes - and no adjustment at the top where it matters.

I measured mine carefully then cut the "Dog Bones" in half and welded them to a plate, making them 5mm longer. This meant that the top of the shoes are just touching the drum when everything is adjusted and the cable movement is much reduced. After this the force on the shoes was much greater with only about five clicks at the handbrake lever. I have had no problems since (but the linkages DO HAVE TO BE REQULARLY LUBRICATED).

It is now possible to buy longer "Dog Bone" compensators so you don't have to go cutting and welding yourself - Chris posted a link to the supplier recently, I'll see if I can find it.

Original Dog Bone above, modified one below:

View attachment 42875


View attachment 42876


View attachment 42877


I also found the Milners Handbrake Cable to be too long and also had to make a spacer for the handbrake lever end.

The cable is attached to a swinging lever on the back of the axle (left/right drum compensator) make sure that moves freely. I re-built it with decent bushes and stainless bolts.

Bob.
Thanks for all the info, Toyota are having a go at the mod above this morning, is the total length of your 8cm? and is this the same length as the ones provided by Stan?
 
Don't like the adverts?  Click here to remove them
Is the total length of your 8cm? and is this the same length as the ones provided by Stan?

Its the distance between the base of the notches that matters - which appears to be 74mm from my photos. The shoes should JUST clear the drum when the adjustment is at ZERO.

I have never seen one of 'Stan's' offerings, so can't comment.

Toyota are doing this - I'm amazed :icon-surprised:.

Bob.
 
Its the distance between the base of the notches that matters - which appears to be 74mm from my photos. The shoes should JUST clear the drum when the adjustment is at ZERO.

I have never seen one of 'Stan's' offerings, so can't comment.

Toyota are doing this - I'm amazed :icon-surprised:.

Bob.

Im even more amazed, i showed them you photos above and stated 8cm, they went off and worked on it, came back and said they had it at 7.5cm... All working now :)

They spent in total about 14 hours getting it fixed and only charged a few hours labour... they really did want to see it fixed with the senior manager even getting their hands dirty...

Thanks for all the help
 
We set out in 2010 to drive from the UK to Australia, we made it there in late 2011, after working a bit we decided to continue to NZ and then over to the US and down to Argentina...

We then had the choice of shipping home or to South Africa and drive the rest of the way, so we drove up East Africa back to Europe...

Just on the way back through eastern Europe...

Its taken a little longer than we told our family when leaving, nearly 6 years.. we drove around 120,000 miles, had 3 flats and have so far been to 66 countries...

If you're interested in our trip / pics this is our FB page https://www.facebook.com/MyOverlandAdventure/ , and website http://myoverlandadventure.com/...

Still thousands of pictures to go through....
 
There are many, many threads on repairing & adjusting the handbrake, the topic is as regular as "what oil" and "which tyres" :icon-rolleyes:.

I have got mine to work well, but it takes some modification to improve the mechanism.

The basic problem is that the shoe adjustment is at the bottom but the action is at the top - and there is a torque multiplier in the form of a lever that spreads the shoes against a "Dog Bone" spacer (a compensator). This means that there is a lot of movement on the cables/bellcranks for very little movement at the shoes - and no adjustment at the top where it matters.

I measured mine carefully then cut the "Dog Bones" in half and welded them to a plate, making them 5mm longer. This meant that the top of the shoes are just touching the drum when everything is adjusted and the cable movement is much reduced. After this the force on the shoes was much greater with only about five clicks at the handbrake lever. I have had no problems since (but the linkages DO HAVE TO BE REQULARLY LUBRICATED).

It is now possible to buy longer "Dog Bone" compensators so you don't have to go cutting and welding yourself - Chris posted a link to the supplier recently, I'll see if I can find it.

Original Dog Bone above, modified one below:

View attachment 42875


View attachment 42876


View attachment 42877


I also found the Milners Handbrake Cable to be too long and also had to make a spacer for the handbrake lever end.

The cable is attached to a swinging lever on the back of the axle (left/right drum compensator) make sure that moves freely. I re-built it with decent bushes and stainless bolts.

Bob.

Bob, in your first picture of the dog bones, is it the indent on the left side of the dog bone that needs to be built up with weld if doing it this way? I don't want to cut them in half.

Cheers
 
Is it the indent on the left side of the dog bone that needs to be built up with weld if doing it this way? I don't want to cut them in half. Cheers

I would build up the side with the narrower slot and the longer 'fingers' - just for stability. The side on the left of my first picture as you say.

Longer is longer, so it doesn't really matter providing the 'dog bone' doesn't slip off the shoe/torque multiplier arm.

Bob.
 
I would build up the side with the narrower slot and the longer 'fingers' - just for stability. The side on the left of my first picture as you say.

Longer is longer, so it doesn't really matter providing the 'dog bone' doesn't slip off the shoe/torque multiplier arm.

Bob.

Cheers for confirming that, I know what I'll be doing the weekend now :)
 
Back
Top