Don't like the adverts?  Click here to remove them

'SWAMPY' MY 02 LWB 3.0 D4D GX Colorado

Just to continue Ian's Hijack, I lost the locking nut key to a set of mcgard nuts once - I emailed them a couple of photos of the nuts on the car & they sent me out a new key. I can't be sure but they may not have even charged me :wtf:

Worth a punt though... :icon-cool:
Crikey :shock: That does not sound very secure :icon-exclaim:


Truck is looking great Ste :thumbup:
Cheers Gav :thumbup: I'm really pleased with her :icon-biggrin: She could do with a serious T-cut and polish though as she has some pretty bad pin striping along her flanks :whistle: :icon-smile:
 
Last edited:
:what: Stopped using locking wheel nuts ages ago for that reason... Waste of time IMHO :o
 
Stopped using locking wheel nuts ages ago for that reason... Waste of time IMHO :o

I don't blame you m8, pleased I went with the Trilocks now and not the McGuards if all you need do is send them a photo for the locking wheel nut key of locking wheel nut for any alloy wheels one fancies the look of!! With modern tech you could take the photo and get the key ordered and paid for before you got to the end of the road :laughing-rolling: I'm going to give Trilock a call on Tuesday and see if they'll provide the same service?! I do hope not!
Yep, me too, after I saw just how easy it was to remove mine.
Surely some form of locking wheel nut is better than none! The ones that I've bought for Swampy are not infallible, but they've come out on top in a couple of tests that I've read. They are not only one of the hardest to get off, but are noisy to remove requiring drilling & grinding causing almost certain damage to the wheel and taking more than 120 seconds each to get off!
 
Last edited:
I would rather have a locking wheel nut then none, I've removed plenty when I've been stuck (lost the key) so know how easy it is to remove them, some easier than others. However having them there means people are likely to think twice before doing anything. The standard toyota 3 pin locking wheels nuts look impossible to remove, has anyone ever removed these without the key?
 
This is what was said in the comparison report by AutoExpress with regards to the Evo Trilock wheel nuts, these are the ones that come with all LC's that I've seen with locking wheel nuts.

The Trilock nuts can claim to have pioneered the spin shroud – they have been around for a very long time. Although they’re relatively low-tech when compared to the Evo MKV or McGard, they are very effective when space is limited. Even on an alloy wheel, it took a fair bit of noise to defeat them. However, a professional thief would be able to use the keying weakness to overcome these Evo products.

Read more: http://www.autoexpress.co.uk/accessories-tyres/42534/evo-trilock#ixzz30mrTGRAs

and what they say about the ones that I bought for
Swampy.

Built to make wheel thieves weep, the MKV bolts seem to have changed slightly, as the all-important spin shrouds are now straight rather than convex in shape as previously. Whatever our expert applied - whether it be violence, cunning, stealth or lots of noise - it all came to no avail, as the bolts stayed firmly in place. He also thought key copying would take skills that are beyond the average crook.

Read more: http://www.autoexpress.co.uk/accessories-tyres/42531/evo-mkv-trilock#ixzz30msjkOSx

I think that it's safe to say that there are locking wheel nuts and there are locking wheel nuts, but not all are made the same :) ;)
 
Don't like the adverts?  Click here to remove them
Getting away from locking wheel nuts for a mo' :)

I fitted the 6mm strut top spacers that I removed from off of Fiery onto Swampy today. If I was braver I would have ordered myself the Old Man Emu (OME) 2882 from coil springs and the (OME) 90004 Nitrocharger Sport Struts that I so really really want for the front end. Hence my thread 'Where to buy Old Man Emu suspension from in the UK?'

http://www.landcruiserclub.net/foru...-to-buy-Old-Man-Emu-suspension-from-in-the-UK

Till that day comes I thought I may as well fit the old strut top spacers :)

IMG_9563_zps22b4c463.jpg


IMG_9564_zpsc11fd582.jpg


IMG_9565_zps3e9587b5.jpg


IMG_9566_zpsa33c6948.jpg


IMG_9568_zpsc4a66bef.jpg


IMG_9569_zpsd21cea62.jpg

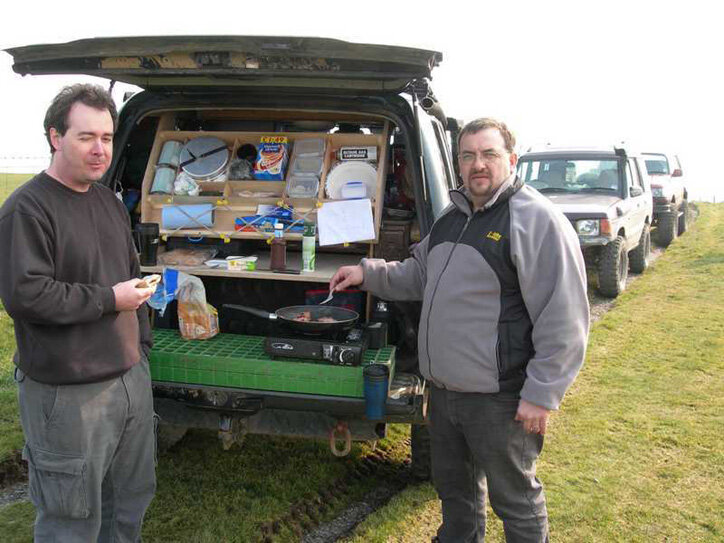
I also had a play around with my camping kitchen items as I would like them all to be more to hand in the future. I remember seeing a photo of a truck on here some time back that had some kind of roof mounted camping kitchen organizer that just folded up out of the way when not in use. I seem to think that it was one of Jon's vehicles :)


IMG_9570_zpsec36af2f.jpg
 
Last edited:
It was Jon's green 80 that had the drop down shelf Steve :icon-cool:
 
It was Jon's green 80 that had the drop down shelf Steve :icon-cool:
I think that we both remember correctly there Gav :) Infact I've managed to track down a photo of the 'Drop Down Kitchen Shelf' and a photo of Jon's younger brother :laughing-rolling:

02-12-23-001.JPG

Ooops no that's not the one!

06-10-15-013.JPG

Noop, nor this one!! It's difficult to imagine that this is the same chap that we all know today really :) ;)

Ah, here it is :) :) :)

07-11-02-583.JPG
 
I have a quick question if i could please, what is the purpose of the spacers, apart from the obvious but i cant see 6mm making a big height diffrence, mine sits slightly front down and wouldnt mind levelling it a bit if i could, cheers and love the thread, always a good read.

Mick
 
I have a quick question if i could please, what is the purpose of the spacers, apart from the obvious but i cant see 6mm making a big height difference, mine sits slightly front down and wouldn't mind leveling it a bit if i could, cheers and love the thread, always a good read
I could type for an hour or more on this subject, but in summary, you would expect to get a little under twice the thickness of the spacer in lift. So from a 6mm top strut spacer I would expect about 10 to 12mm of lift. They in fact gave me a little more, but I've put this down to the fact the Swampy's front struts have 10mm strut cup spacers already fitted compressing the spring a little. When I had Fiery without the strut cup spacers fitted I spent a weekend fitting a 20, 15, 10 and 6mm strut top spacer in turn and each time recorded a lift just under twice the thickness of each of the spacers. It turns out that strut top spacers are fine when over 5/6mm in thickness if used on standard suspension with standard length struts, but a truck with an aftermarket performance suspension kit fitted you quickly run into trouble binding the lower ball joint as you are effectively increasing the length of the strut with a top strut spacer and thus lowering the droop. My findings with the Ironman suspension set up was that a 5mm top strut spacer was the thickest I'm happy to fit to my already modified suspension due to the limiting factor of the OE bottom ball joint. The 5/6mm thick spacer has another benefit in that you can fit up to a 6mm thick top strut spacer without having to replace the OE strut top fixing bolts for longer ones and so can be fitted without the need for a spring compressor and the inevitable complex hunt for longer bolts. I've mentioned two thicknesses of top strut spacer in respect of a 5mm and a 6mm, this is because the max thickness spacer that one can fit whilst using the OE bolts and still have some thread showing through the top of the nut is 6mm. The max thickness of top strut spacer I found that worked for me with the Ironman suspension set up taking the droop to the max before bottom ball joint issues was 5mm. So the spacers that I fitted yesterday were in fact 5mm thick and not 6mm.

Hope this helps answer you question Mick :)
 
Last edited:
Thanks for the reply buddy, i have ironman +2" as well so will go with a 5mm spacer to just even the two ends out a bit, thanks again.

Mick
 
Thanks for the reply buddy, i have ironman +2" as well so will go with a 5mm spacer to just even the two ends out a bit, thanks again
It's certainly one of the quickest and cheapest suspension mods you can do. It took me less than 90min to fit the two spacers yesterday :)

I have some dimensions here that may help you :)

imggovconform145_zps977db37c.jpg
 
Yep brilliant, i will make thw spacers up so your measurements will save me having to strip one side and then make em. Cheers buddy.

Mick
 
I can get you OME stuff cheap Steven, but the freight might be expensive. :icon-biggrin:

Happy to get you prices if you send me some part numbers. :thumbup:
 
cheeky bugger but some good memories go with those pictures so thanks for the trip down memory lane :icon-cool: The drop down kitchen worked pretty good for that 80 but an ordinary drawer has suited the last 2 builds better.
 
Steven - Swampy is looking good :thumbup: I'm looking forward to seeing her in action at Lincomb.
Thank you Scott :) I'm looking forward to giving her some action at Lincomb myself :) ;)

I can get you OME stuff cheap Steven, but the freight might be expensive. :icon-biggrin:

Happy to get you prices if you send me some part numbers. :thumbup:
I shall PM them straight over dude ;) Are they going to fit into your hand luggage though m8 :icon-question: :lol:

cheeky bugger but some good memories go with those pictures so thanks for the trip down memory lane :icon-cool: The drop down kitchen worked pretty good for that 80 but an ordinary drawer has suited the last 2 builds better.
Had a quick read through the thread that I nicked the photos from and all about the fox again :)

'Rise and Fall of an 80' by Jon Wildsmith http://www.landcruiserclub.net/foru...nd-fall-of-an-80?highlight=kitchen+shelf+drop
 
A pair of springs should be OK, just the shocks wed have to post. :icon-wink:
 
I checked and set the SWR on the ol' CB twig :)

Got 1.5 on Ch20

IMG_9589_zps73bb8f73.jpg


IMG_9590_zpsab5d4f89.jpg

1.1 on Ch1

IMG_9591_zps35833257.jpg


IMG_9596_zps67bfcfa1.jpg

And 1.6 on Ch40

IMG_9597_zpsf1705f54.jpg


IMG_9598_zps2a3c4473.jpg

I also had a check with a mighty big earth attached to see if it made any difference?! Nowt, no difference at all!

IMG_9599_zpsaafb1a88.jpg

IMG_9600_zpscacd3a50.jpg


IMG_9601_zpsda9b19ec.jpg

I did however need to chop a fair bit off the twig to get the SWR down! Each time I cut a bit off it got better and better and the readings between Ch1 & Ch40 got closer and closer :) I decided it was best to stop before I had no aerial let though :lol:

IMG_9602_zpsbbc1c125.jpg


IMG_9603_zpseb135713.jpg
 
Last edited:
Back
Top