Don't like the adverts? Click here to remove them
You are using an out of date browser. It may not display this or other websites correctly.
You should upgrade or use an alternative browser.
You should upgrade or use an alternative browser.
A beginner services the 80 series front axle
- Thread starter ByronJ
- Start date
ModelMakerMan
Well-Known Member
- Joined
- Jun 25, 2011
- Messages
- 599
- Country Flag
Shame the knuckles don't unbolt we'd have worked out how to Teflon coat them by now
If you are you mean the swivel balls then yup its really silly that they arent replacable but I still think this is the best option for getting them better than new: http://www.landcruiserclub.net/foru...nuckle-rebuild?p=365065&viewfull=1#post365065
Worked well on mine and they are still shiny and smooth with no leakage at all yesterday when I sold it. Hopefully we will get some feedback from the new owner to see how they hold up to the conditions in Kenya.
ByronJ
Well-Known Member
- Joined
- Jul 7, 2012
- Messages
- 365
- Country Flag
If you are you mean the swivel balls then yup its really silly that they arent replacable but I still think this is the best option for getting them better than new: http://www.landcruiserclub.net/foru...nuckle-rebuild?p=365065&viewfull=1#post365065
Worked well on mine and they are still shiny and smooth with no leakage at all yesterday when I sold it. Hopefully we will get some feedback from the new owner to see how they hold up to the conditions in Kenya.
Wow! That is a cracking job you made of those swivel balls.
ByronJ
Well-Known Member
- Joined
- Jul 7, 2012
- Messages
- 365
- Country Flag
As I have had grease migrate into my differential it has been suggested that I take a look at the bronze bushes on the stub axle for wear. The bushes look ok but when I slide the stub axle onto the CV shaft there is no hint of a snug fit at all. In fact it is happily rattles around, I assume it should feel snug?
This truck is mainly going to be used for overlanding (lots of dust) and some green laning. Is anyone able to offer advice as to I whether should use the Milner supplied needle bearing upgrade or stick with the original bush from Toyota? Thanks.
Byron
This truck is mainly going to be used for overlanding (lots of dust) and some green laning. Is anyone able to offer advice as to I whether should use the Milner supplied needle bearing upgrade or stick with the original bush from Toyota? Thanks.
Byron
Knucklehead
Well-Known Member
- Joined
- May 28, 2013
- Messages
- 412
Both the bronze insert and where the bearings/hub sit on the stub were stuffed on mine so binned them and replaced with the roller bearing version. +40k miles on them since rebuild with no issues although I don’t do heavy off-roading.
Last edited:
- Joined
- Mar 1, 2010
- Messages
- 5,685
A friend of mine put a Perkins 2.2 diesel engine in his 1980 Range Rover. Then he had to put stronger springs on because the Perkins engine was much heavier than the original RR one. He did not do offroading. He hit a pothole and disaster. The bolts holding the swivel ball to the axle tube sheared. The slicing action of these two pieces cut straight through the driveshaft. With no adequate support the wheel and hub failed around and ripped off most of the drivers side bodywork. Although the Toyota axle swivel hubs cannot be replaced at least the assembly is very strong.
Don't like the adverts? Click here to remove them
ByronJ
Well-Known Member
- Joined
- Jul 7, 2012
- Messages
- 365
- Country Flag
Both the bronze insert and where the bearings/hub sit on the stub were stuffed on mine so binned them and replaced with the roller bearing version. +40k miles on them since rebuild with no issues although I don’t do heavy off-roading.
Thanks for the info Dave. I shall go with the roller bearing version. Hoping to put it all back together this weekend, if the parts all arrive...
Knucklehead
Well-Known Member
- Joined
- May 28, 2013
- Messages
- 412
No worries. Take your time, bin any worn parts and you will be good. Think you will be surprised how much better the ole girl drives after the effort.
ByronJ
Well-Known Member
- Joined
- Jul 7, 2012
- Messages
- 365
- Country Flag
Disaster - stub axle threads damaged
I punched out the old bearings without too much trouble and asked the local garage to press in the bearings and bushes for me. This they did in just a few minutes. All looking good I thought.
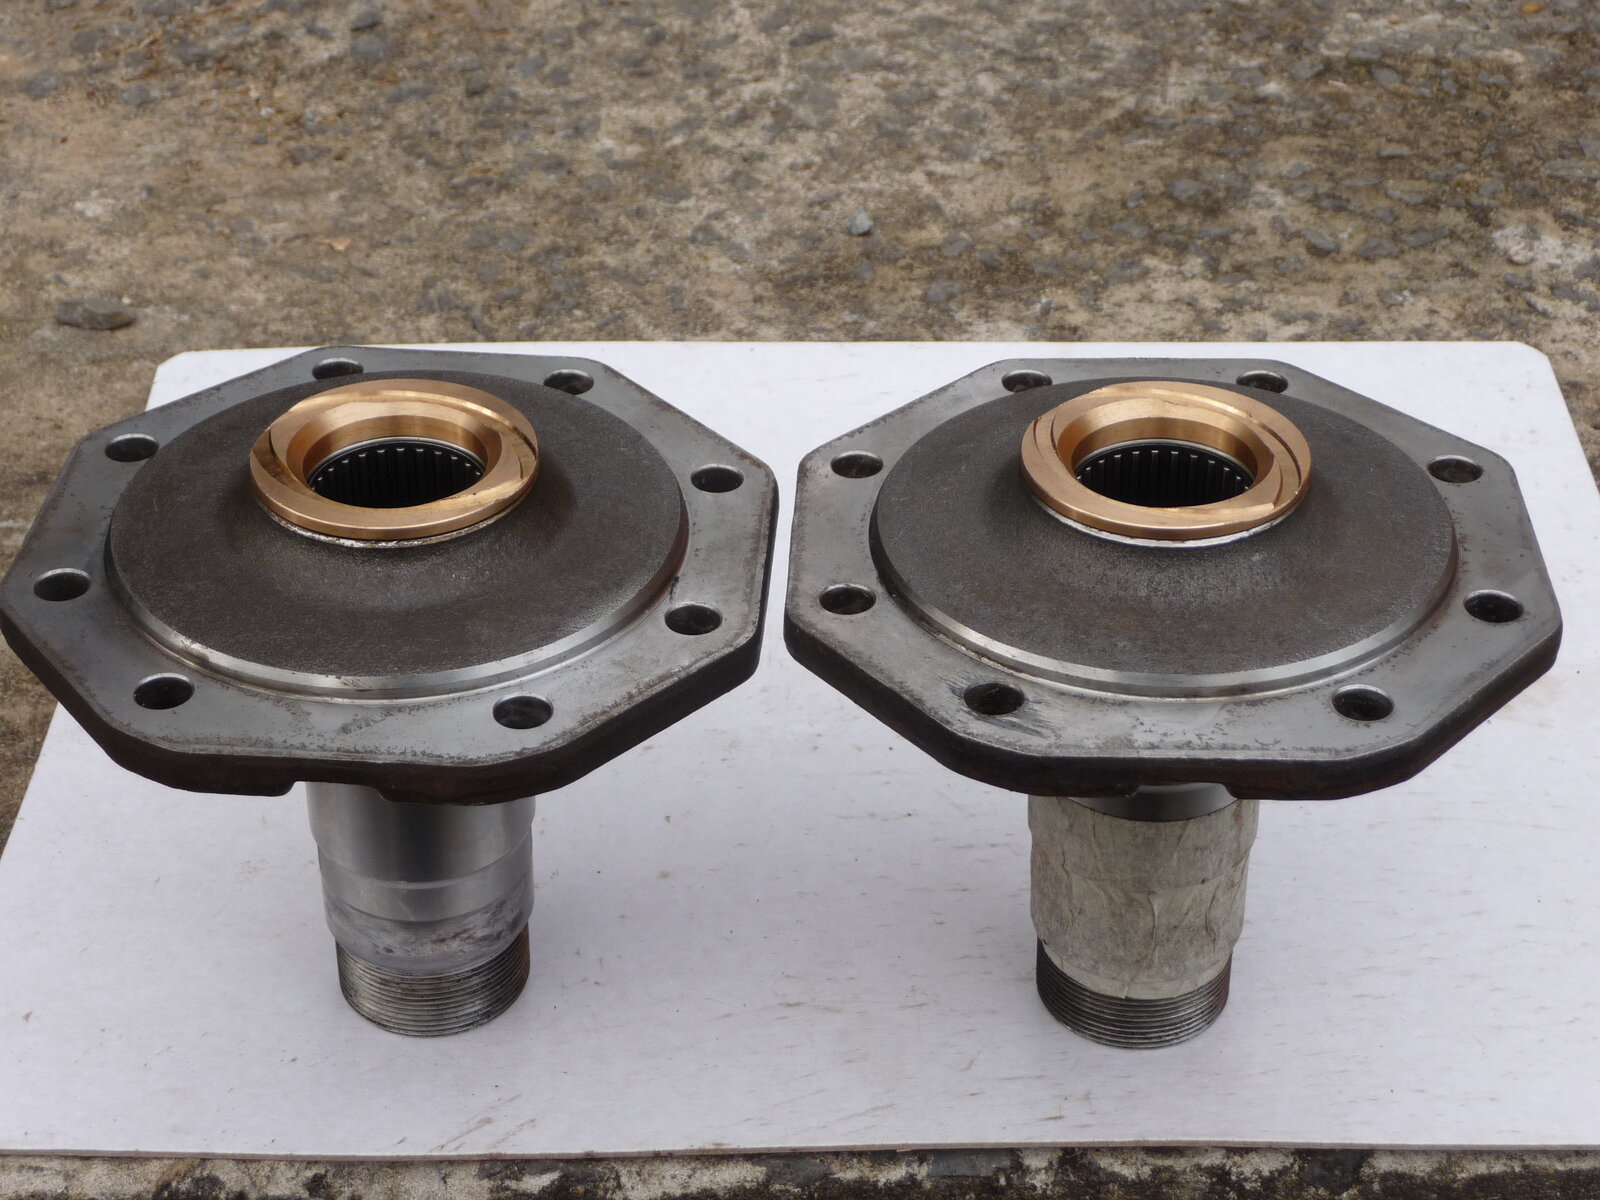
This afternoon I got as far as installing the first hub before I found the problem. I could not get the 54mm nut onto the hub... Further inspection showed the start of the threads have been damaged. When they pressed in the bearings they must have used considerable force and consequently crushed the beginning of the threads .
.
I managed to clean up one side but the other is proving a real problem. I am going to remove the stub axle and see what I can do with it in a vice. First a cup of tea...
I would be grateful for any advice.
I punched out the old bearings without too much trouble and asked the local garage to press in the bearings and bushes for me. This they did in just a few minutes. All looking good I thought.

This afternoon I got as far as installing the first hub before I found the problem. I could not get the 54mm nut onto the hub... Further inspection showed the start of the threads have been damaged. When they pressed in the bearings they must have used considerable force and consequently crushed the beginning of the threads
I managed to clean up one side but the other is proving a real problem. I am going to remove the stub axle and see what I can do with it in a vice. First a cup of tea...
I would be grateful for any advice.
Ecoman
Well-Known Member
- Joined
- Sep 8, 2010
- Messages
- 1,896
- Country Flag
First piece of advice is to go and kick to arse of the mechanic who pressed the bearing in. Poor work that they never properly supported the stub axle before using the press
Second is to see if you can clean up the threads with a fine file (if possible?).
Second is to see if you can clean up the threads with a fine file (if possible?).
ModelMakerMan
Well-Known Member
- Joined
- Jun 25, 2011
- Messages
- 599
- Country Flag
- Joined
- Mar 1, 2010
- Messages
- 5,685
"A beginner presses in the bearings" i.e. the garage. .
.
Thread files do work, just be careful with them. Another trick is to take a nut (one of the old spare ones that I'd have replaced  ) and use a hacksaw - take blade, put through nut and back onto saw and make a series of cut across the thread around the inside track of the nut. Remove the blade. These cuts can help you to pick up on the damaged thread. Instead of just having one point where the nut can start you now have several. Essential that you are square onto the thread and turn it ANTI clockwise first so you aren't screwing it on. Feel for any slight clicks where the slots are dropping off the start of the thread. Then turn clockwise.
Works most of the time. A bit of oil on the threads won't go amiss.
 ) and use a hacksaw - take blade, put through nut and back onto saw and make a series of cut across the thread around the inside track of the nut. Remove the blade. These cuts can help you to pick up on the damaged thread. Instead of just having one point where the nut can start you now have several. Essential that you are square onto the thread and turn it ANTI clockwise first so you aren't screwing it on. Feel for any slight clicks where the slots are dropping off the start of the thread. Then turn clockwise.
Works most of the time. A bit of oil on the threads won't go amiss.
ByronJ
Well-Known Member
- Joined
- Jul 7, 2012
- Messages
- 365
- Country Flag
All sorted
Thanks for the advice guys. I had never heard of a thread file. It looks like a useful bit of kit and I shall treat myself to one in the near future. Thanks for the info MMM.
The good news is that once I had removed the stub axle and placed it in the vice I could see that the very first thread had been squashed in two places. Carefully I used a variety of tools (fine file, saw, punch ) to clear this thread. After an hour or so I was able to spin the nuts on with no trouble. I learnt an important lesson today... I shall pop down and have a 'chat' with the mechanic (he owns the garage) on Monday. Funny thing was, as he handed back the axles, he said "See Byron I can do some jobs without a sledge hammer". Reckon the hammer would have been the better option
  .
.
Amazingly, this same weekend another friend dropped by and said "I have taken out hundreds of windscreens, I will do yours no problem" Ten minutes later he informed me that the windscren was out but was "a bit cracked". It is FUBAR. Ah well. What a weekend .
.
Byron
Thanks for the advice guys. I had never heard of a thread file. It looks like a useful bit of kit and I shall treat myself to one in the near future. Thanks for the info MMM.
The good news is that once I had removed the stub axle and placed it in the vice I could see that the very first thread had been squashed in two places. Carefully I used a variety of tools (fine file, saw, punch
Amazingly, this same weekend another friend dropped by and said "I have taken out hundreds of windscreens, I will do yours no problem" Ten minutes later he informed me that the windscren was out but was "a bit cracked". It is FUBAR. Ah well. What a weekend
Byron
ByronJ
Well-Known Member
- Joined
- Jul 7, 2012
- Messages
- 365
- Country Flag
CV Joints
Having pulled out the shafts to change the innner oil seal I noticed that the Toyota CV joint I had in a box appeared to be beefier than the Milners I had installed. Side by side they look like this:
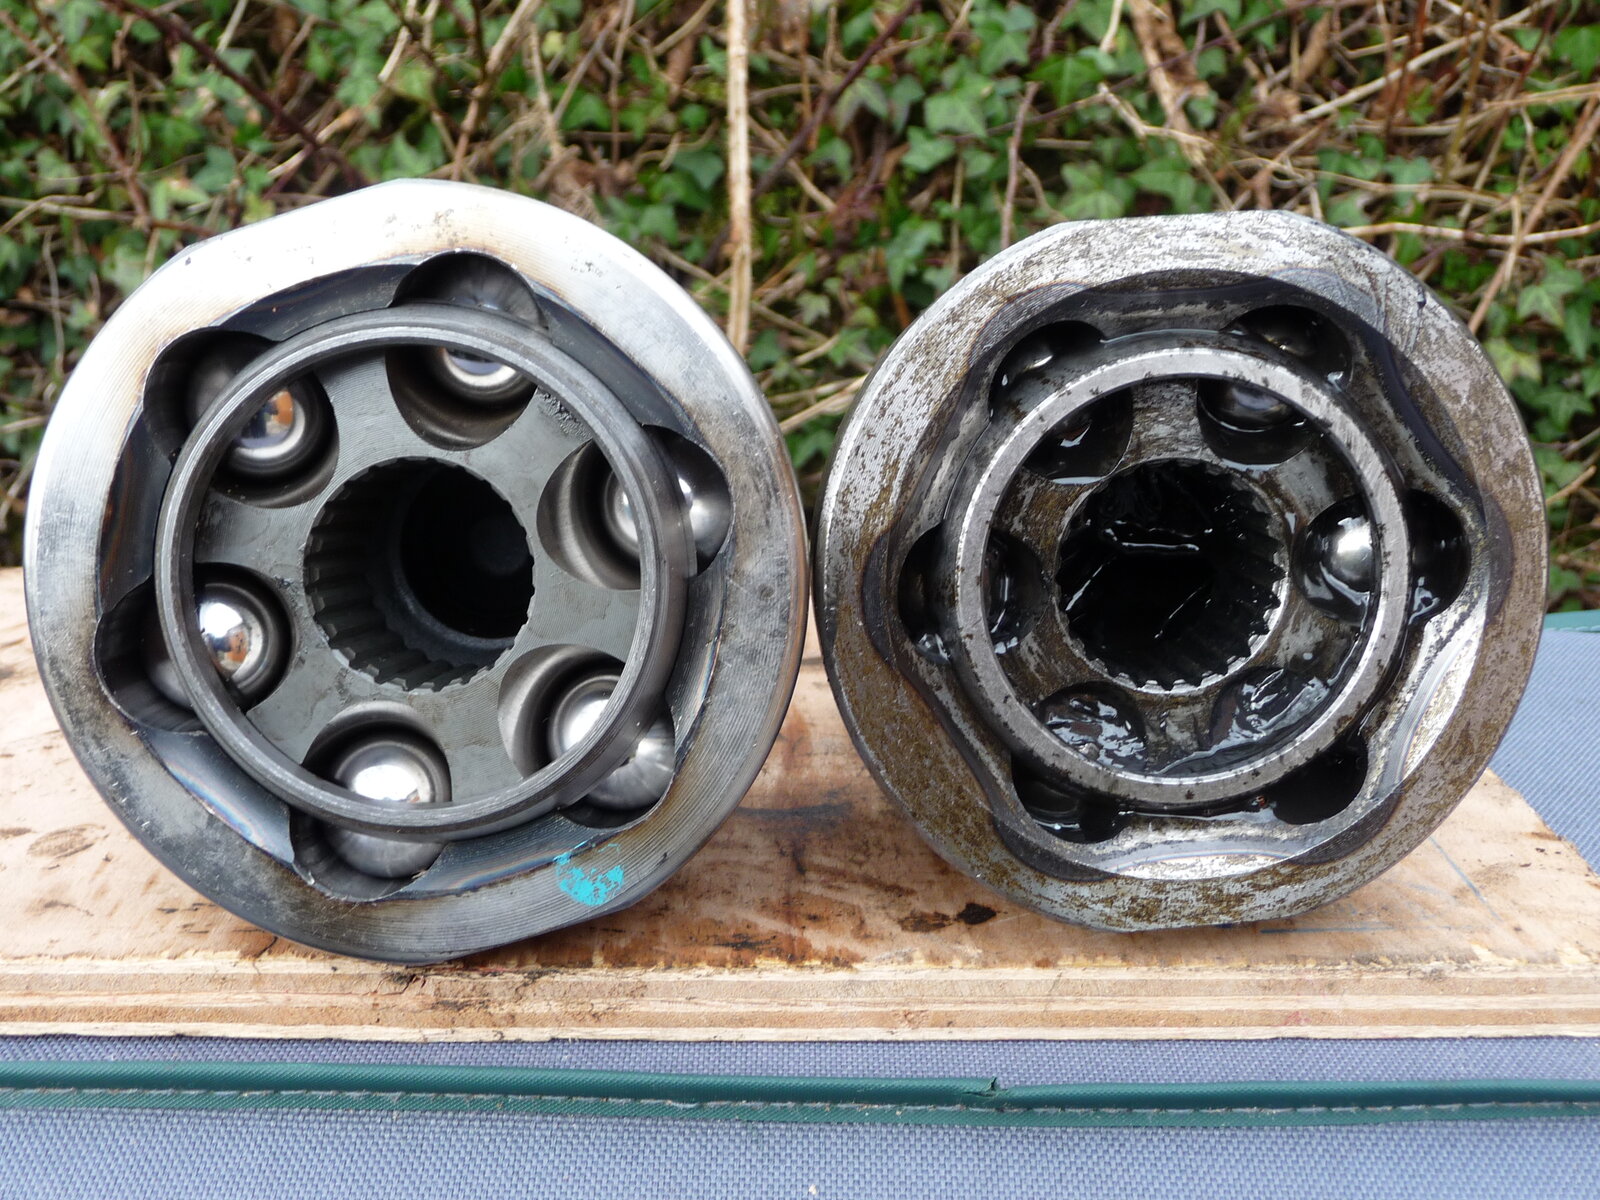
So although the Milner CVs were giving no problems I pulled them off the shafts and replaced them with the brand new Toyota CVs I had bought on a whim . They were a very good price...
Having pulled out the shafts to change the innner oil seal I noticed that the Toyota CV joint I had in a box appeared to be beefier than the Milners I had installed. Side by side they look like this:

So although the Milner CVs were giving no problems I pulled them off the shafts and replaced them with the brand new Toyota CVs I had bought on a whim
ByronJ
Well-Known Member
- Joined
- Jul 7, 2012
- Messages
- 365
- Country Flag
Minor panic for a minute...

You should see the Longfield ones!
Unfortunately I think that you have ordered the wrong ones there though. Look, I can probably use them so if you send them over, I'll send you the 'right' ones. OK?

ByronJ
Well-Known Member
- Joined
- Jul 7, 2012
- Messages
- 365
- Country Flag
Flushing muck from the front axle and differential
Other jobs took precedent but eventually I got around to re-assembling the front axle. The offside (short shaft) went on with no trouble but after assembling the nearside (long shaft) all went well until the very end when I attempted to place the circlip on the CV shaft. I could not pull the shaft forward as it appeared to be jammed in the stub axle .
.
On closer inspection I could see the shaft was not parallel inside the stub axle but angled upwards and hence jammed solid. With a sinking heart I wondered if the stub axle had been bent slightly when the new bearing and bush were pressed in. Hard to believe but I could think of no other reason for the problem. I stripped it all back down but could not see any damage to the shaft.
After much heart searching I ordered two new stub axles off Milner for delivery before 12:00 the next day as the truck had to be back on the road by Friday morning at the latest. After a series of phone calls I eventually had the new shafts in my hand at 16:30 on Wednesday... An hour or so later I had assembled the axle again only to find exactly the same problem. The CV shaft was jammed in the brand new stub axle in exactly the same way. To say I was flummoxed is a big understatement.
This time, however, there was no suspicion that the stub axle was damaged. I studied the axle, desperately trying to understand what could be happening. Then, almost in a daze, I placed the heel of my hand on the end of the CV shaft and pushed down hard. With no fuss at all the shaft aligned itself in the stub axle. It was simply that the whole assemble was slightly 'kinked' at the CV joint (perfectly normal) and a small shove placed all the bits into alignment. I did not know whether to be very happy that all was well or to be mad at myself for wasting money on two new stub axles. Ah well I am sure I shall find a use for them.
I finished asssembling the axle, filled the differential and transfer box with oil and set off for a drive. The truck did feel perkier (I guess all the sludge in the differential was putting up resistance) and there is no noise at all from the differential . Brakes were a bit odd for the first few miles (grease on the discs I guess) but soon settled down.
As suggested earlier I shall run the truck for a hundred miles or so and change the differential oil again. With luck this should clear up most of the muck left in the axle due to the earlier failing of the seals.
I have also wondered about filling the differential with diesel and running the truck up on axle stands to spin the differentialand give everything a good wash. Then drain the diesel and refill with oil. That would go a long way to cleaning out any remaining muck and, after all, if I dropped the differential I would probably clean it up with diesel anyway. Does anyone have any views on whether filling the differential with diesel for a flush like this is a good or a plain daft idea?
Other jobs took precedent but eventually I got around to re-assembling the front axle. The offside (short shaft) went on with no trouble but after assembling the nearside (long shaft) all went well until the very end when I attempted to place the circlip on the CV shaft. I could not pull the shaft forward as it appeared to be jammed in the stub axle
On closer inspection I could see the shaft was not parallel inside the stub axle but angled upwards and hence jammed solid. With a sinking heart I wondered if the stub axle had been bent slightly when the new bearing and bush were pressed in. Hard to believe but I could think of no other reason for the problem. I stripped it all back down but could not see any damage to the shaft.
After much heart searching I ordered two new stub axles off Milner for delivery before 12:00 the next day as the truck had to be back on the road by Friday morning at the latest. After a series of phone calls I eventually had the new shafts in my hand at 16:30 on Wednesday... An hour or so later I had assembled the axle again only to find exactly the same problem. The CV shaft was jammed in the brand new stub axle in exactly the same way. To say I was flummoxed is a big understatement.
This time, however, there was no suspicion that the stub axle was damaged. I studied the axle, desperately trying to understand what could be happening. Then, almost in a daze, I placed the heel of my hand on the end of the CV shaft and pushed down hard. With no fuss at all the shaft aligned itself in the stub axle. It was simply that the whole assemble was slightly 'kinked' at the CV joint (perfectly normal) and a small shove placed all the bits into alignment. I did not know whether to be very happy that all was well or to be mad at myself for wasting money on two new stub axles. Ah well I am sure I shall find a use for them.
I finished asssembling the axle, filled the differential and transfer box with oil and set off for a drive. The truck did feel perkier (I guess all the sludge in the differential was putting up resistance) and there is no noise at all from the differential
As suggested earlier I shall run the truck for a hundred miles or so and change the differential oil again. With luck this should clear up most of the muck left in the axle due to the earlier failing of the seals.
I have also wondered about filling the differential with diesel and running the truck up on axle stands to spin the differentialand give everything a good wash. Then drain the diesel and refill with oil. That would go a long way to cleaning out any remaining muck and, after all, if I dropped the differential I would probably clean it up with diesel anyway. Does anyone have any views on whether filling the differential with diesel for a flush like this is a good or a plain daft idea?
Last edited:
ByronJ
Well-Known Member
- Joined
- Jul 7, 2012
- Messages
- 365
- Country Flag
Some final thoughts
Servicing the front axle was my first big job on my Cruiser and despite my mistake with the stub axles I enjoyed myself. I would like to say a big 'THANK YOU' to the members who have posted on this topic for all the excellent information thay have shared and in particular to those who chipped in to offer encouragement and guidance via this thread.
As a beginner there was one bit of assembly that I found a little tricky (or should I say sticky). The spindle gasket, spindle, dust cover, gasket and dust seal are all held in place by the same set of bolts and the first time I assembled them I got in a bit of a mess. That Moly grease is sticky, gloopy stuff . Due to my 'problem' with the stub axle I ended up removing and replacing the stub axle a good few times
  . Old hands at this will no doubt cope with ease but I found the following approach very helpful:
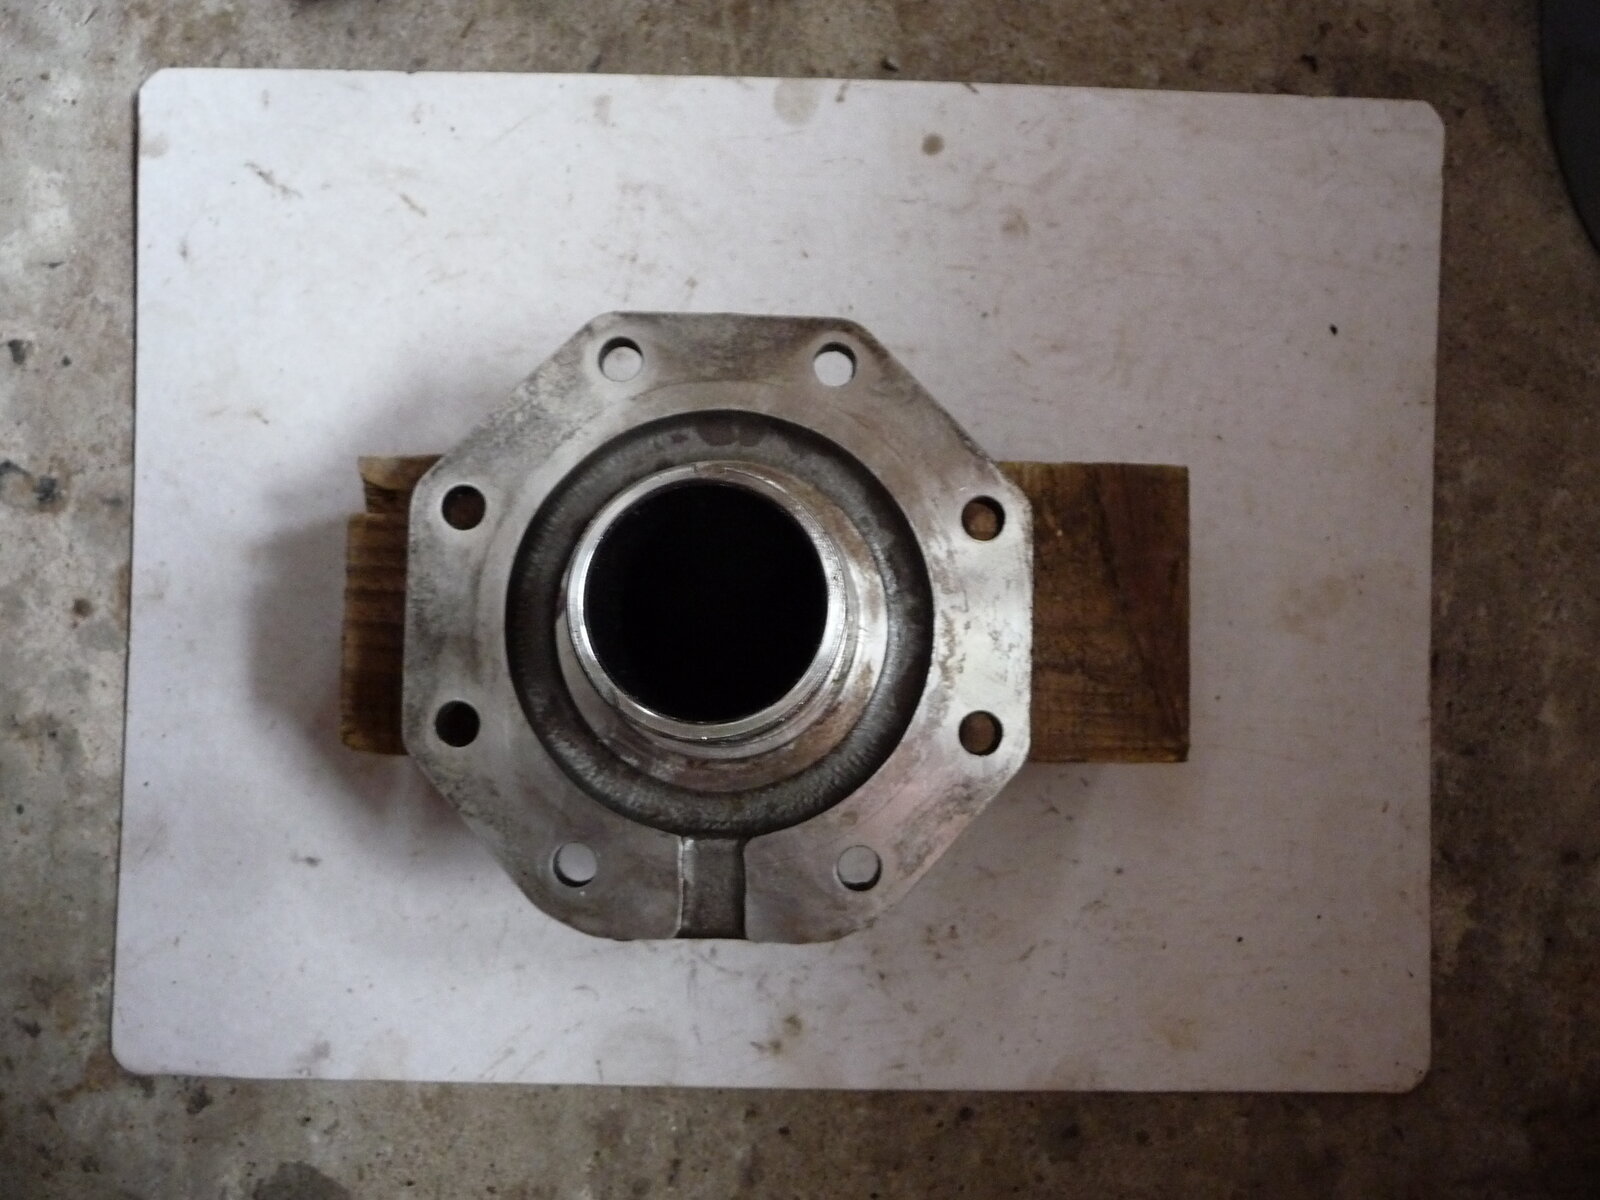
Place the stub axle (without its gasket) face down on a wooden block with the slot for the thrust and star washers facing away from you like so (this means the chanel cut in the stub axle flange is nearest you).
Place the dust cover and gasket on the spindle (note that the holes are not evenly spaced so all parts can only be assembled in the correct orientation)
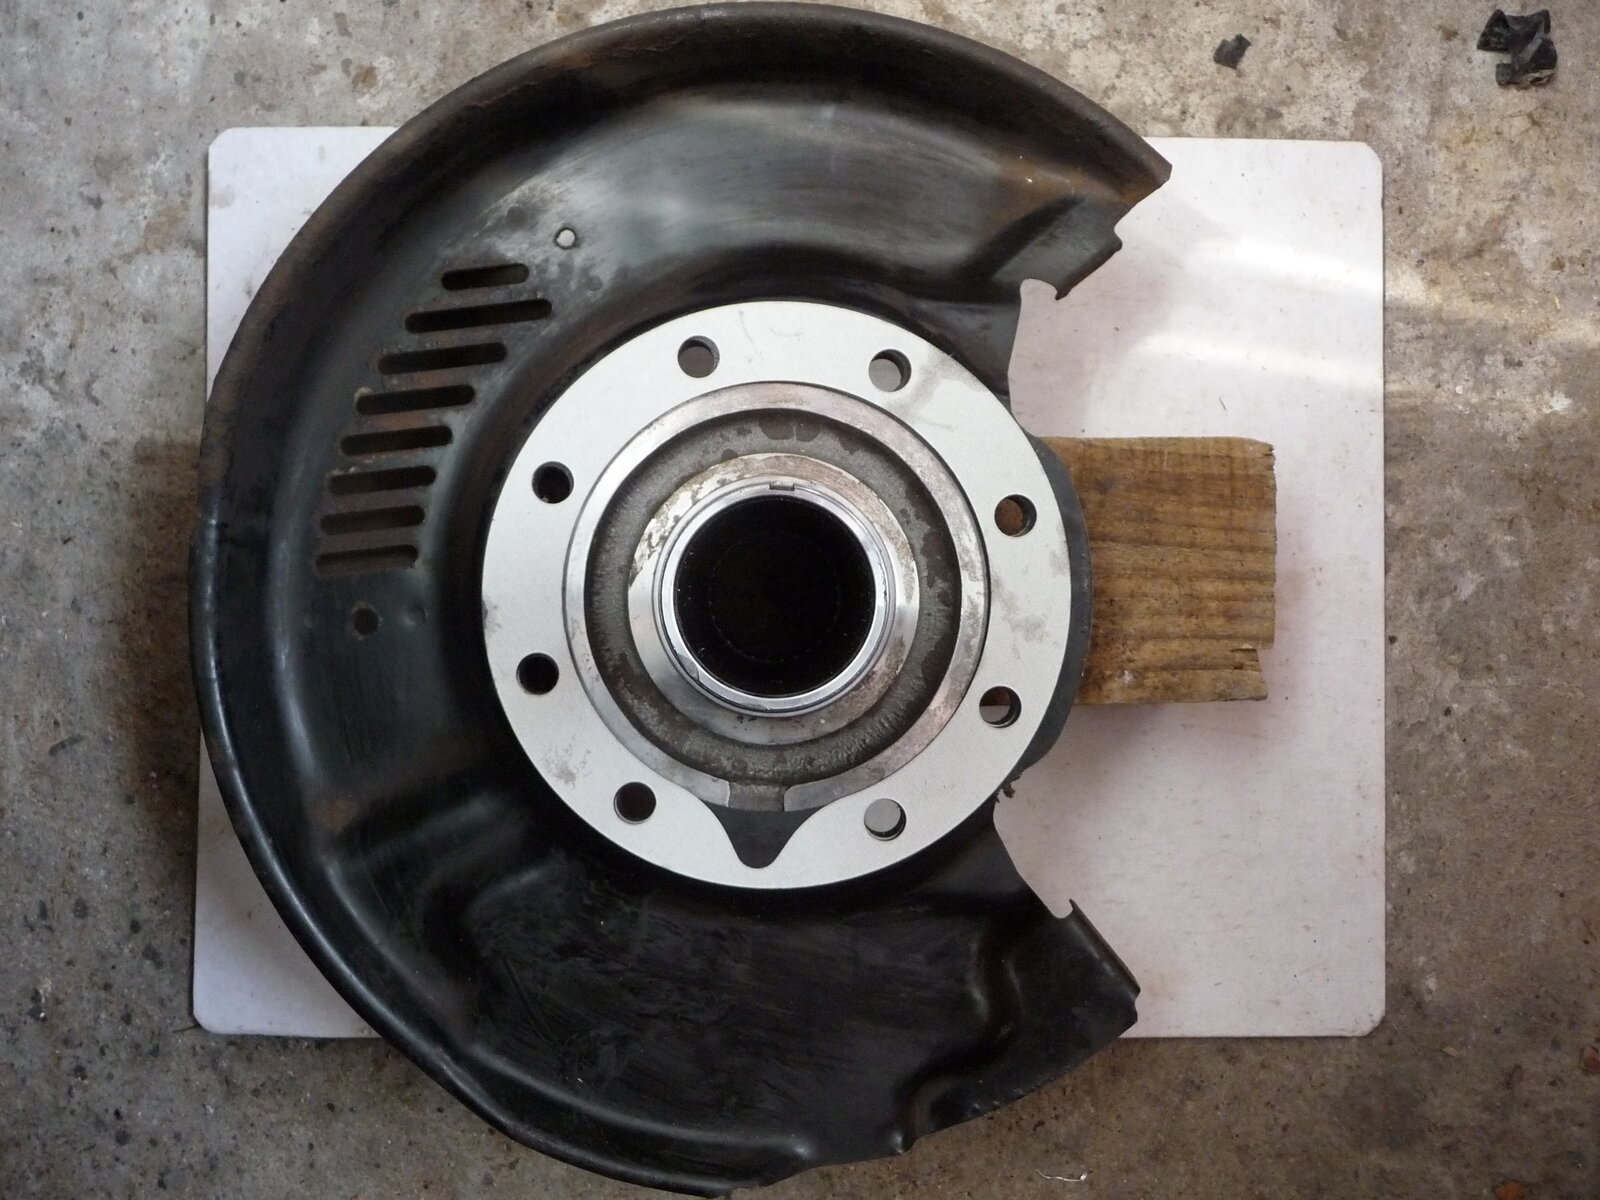
Note the slot taken out of the gasket needs to be opposite the slot on the spindle shaft. Saves spinning it around trying to get it to fit...
Add the dust cover and pop two bolts in to hold everything in alignment. There is a small hole on the dust cover which needs to be next to the slot in the spindle axle.
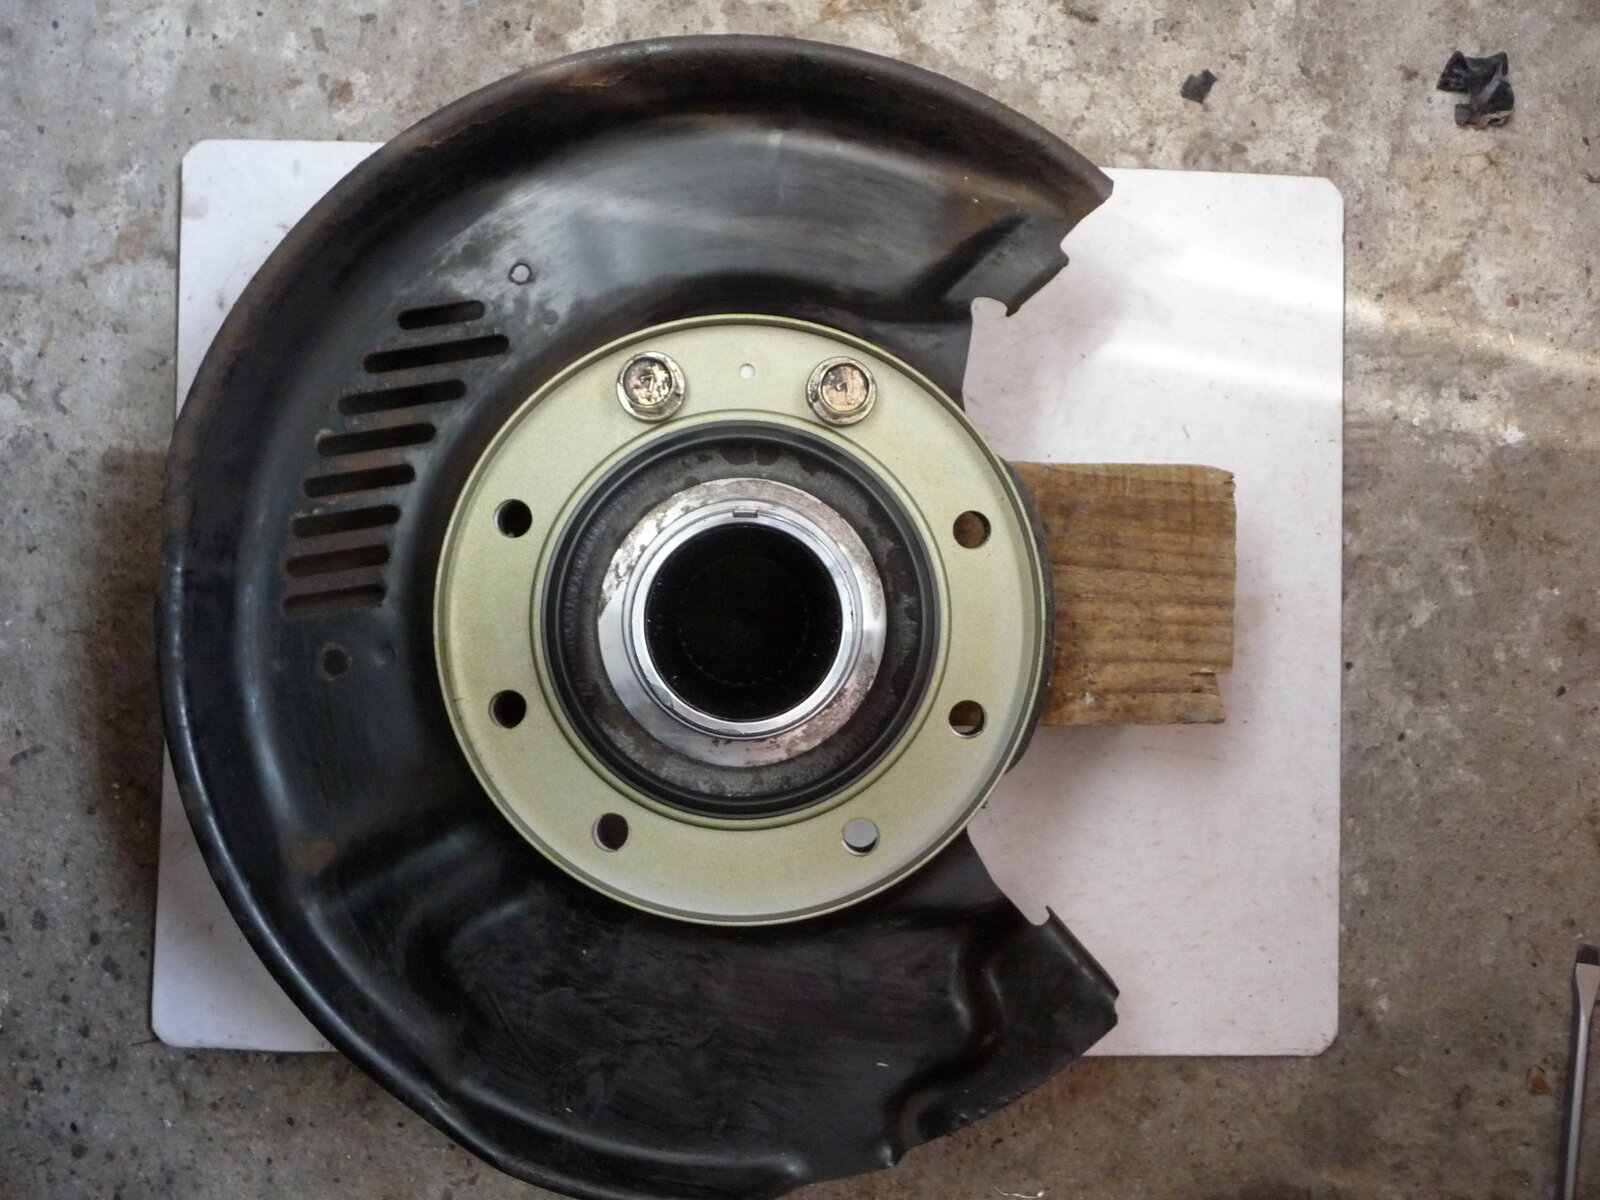
Then pick up the stub axle in one hand close to the bolts to hold them in place. smear a little Moly grease on the spindle face and place the gasket into position. Offer the whole lot to the knuckle and bolt into place.
Servicing the front axle was my first big job on my Cruiser and despite my mistake with the stub axles I enjoyed myself. I would like to say a big 'THANK YOU'
 to the members who have posted on this topic for all the excellent information thay have shared and in particular to those who chipped in to offer encouragement and guidance via this thread.
As a beginner there was one bit of assembly that I found a little tricky (or should I say sticky). The spindle gasket, spindle, dust cover, gasket and dust seal are all held in place by the same set of bolts and the first time I assembled them I got in a bit of a mess. That Moly grease is sticky, gloopy stuff
 . Due to my 'problem' with the stub axle I ended up removing and replacing the stub axle a good few times
 Place the stub axle (without its gasket) face down on a wooden block with the slot for the thrust and star washers facing away from you like so (this means the chanel cut in the stub axle flange is nearest you).

Place the dust cover and gasket on the spindle (note that the holes are not evenly spaced so all parts can only be assembled in the correct orientation)

Note the slot taken out of the gasket needs to be opposite the slot on the spindle shaft. Saves spinning it around trying to get it to fit...
Add the dust cover and pop two bolts in to hold everything in alignment. There is a small hole on the dust cover which needs to be next to the slot in the spindle axle.

Then pick up the stub axle in one hand close to the bolts to hold them in place. smear a little Moly grease on the spindle face and place the gasket into position. Offer the whole lot to the knuckle and bolt into place.


