fridayman
Well-Known Member
Yesterday I changed my right outer CV joint in an effort to cure a full lock clunk (see dedicated "clunk" thread). As I was already part way into the job it occurred to me that the job is a lot easier than I expected and I should put up some pics. I had already started when I thought about this there are some pics/steps missing, but nothing tricky to worry about.
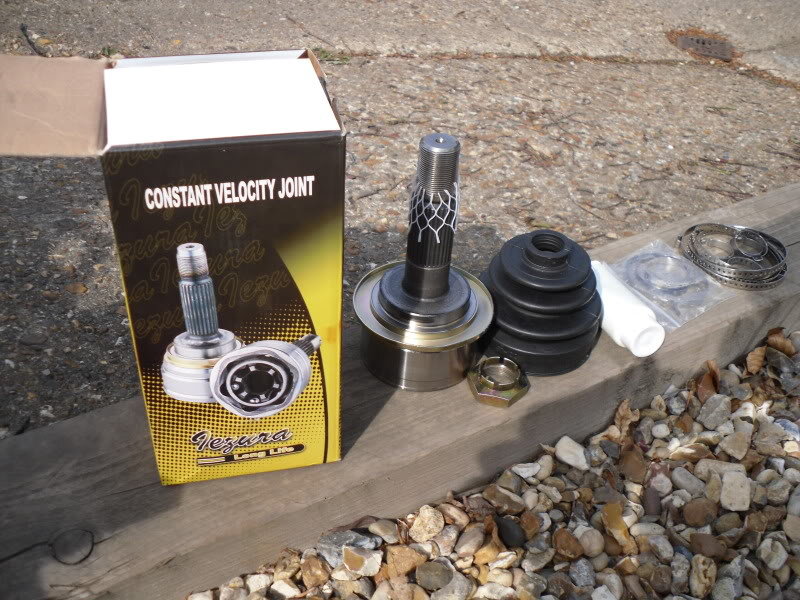
I ordered a CV kit off ebay that came with CV, boot, CV boot straps, axle nut (that I didn't use), and CV grease. I also bought a tub of CV grease at Halfords.


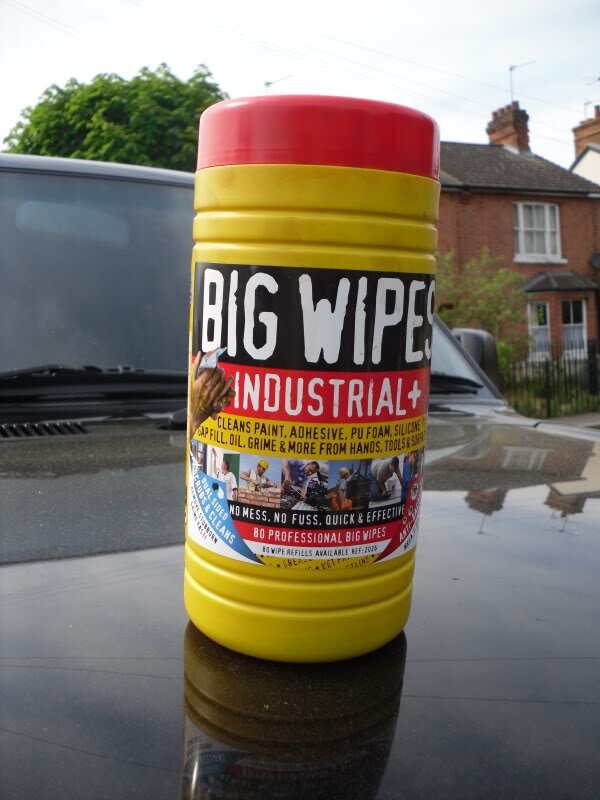
And the job can get quite messy so I had some degreaser wipes at hand, as well as a roll of the blue paper towel. The new textured Big Wipes are excellent.

Then on with the job...
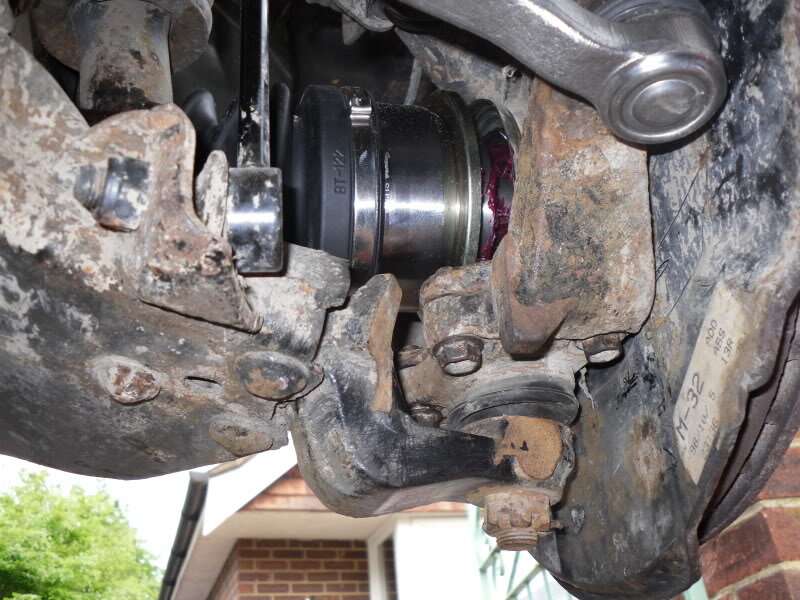
I jacked the car up on the chassis rail just behind the front wheel so that the wheel/suspension could drop, then took the wheel off. Also take the hub dust cap off and you will see the 36mm nut with a split pin - take these off too. Sorry, no pics of this.
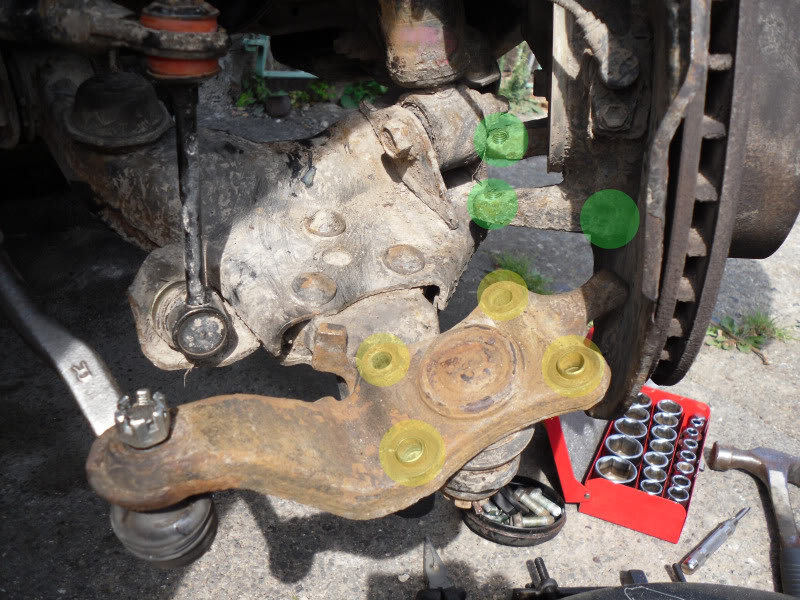
Some people split the lower ball joint next, but the split pin in mine had rusted in there and I just wasn't in the mood for the ball ache") So I removed the four bolts that hold the lower steering knuckle (I think that is what it is called - the bit that the ball joint sits in). MUCH easier!
So I removed the four bolts that hold the lower steering knuckle (I think that is what it is called - the bit that the ball joint sits in). MUCH easier!

You can then tap the axle end with a copper hammer to push it back in through the hub. When it is loose enough you can swing the hub up and to the side. This pic is actually of the new joint when I was putting it back together, but it will look like this:

Here you can also see the where the 4 bolts where that I undid:

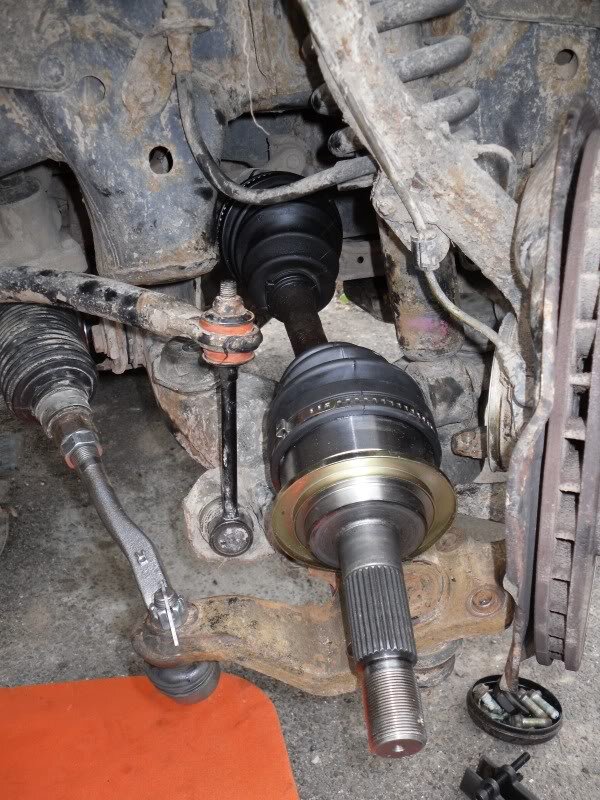
Next, undo the large cv boot strap on the inner joint. There are many different types of boot strap and some are easier to remove than others. Mine was very easy to remove - I just bent to tabs back and then lifted the end and it came loose:

Now you should be able to pull the drive shaft out, but have a container directly under the inner joint as I had a LOT of gloopy "grease" run out. I say grease, but it didn't look like grease at all.

With axle removed here:

Things got very messy for the next 20 minutes... and I went through a lot of paper towels, wipes and diesel. Here is my cleaning kit:

With most of the grease removed you should see a spring clip holding the inner joint on to the axle. I managed to get it off with some circlip pliers without damaging it, but some people do snap them trying to get them off. I ordered a hand full of spares from Milners just in case.
This is the axle with the joint removed:

And this is the joint cleaned up:

This joint will only go onto the axle one way, so no need to worry about which way it goes back on.
The boot strap on the outer CV was not as easy to remove and required special tools number 1 and 2 (hammer and chisel).

The grease in this joint looked a bit better than the inner, but still not what I would call good.

With the inner joint and both boots removed, and the whole lot cleaned up:

To separate the CV from the axle I used the pipe trick. I got my wife to video it using my digital camera so that I can share this amazing trick with everyone (and look cool on the interweb), but I had failed to notice her turning the camera on its side... When I try and rotate it back I end up with a 800Mb file. Best thing is just go onto youtube and search "pipe trick". The pipe trick did cause a little bit of damage to the end of the axle that hit the ground and some of the teeth, but not enough to worry about.

Next time I will just drill a hole through the bottom of the pipe and put a bolt through there to stop the axle actually hitting the ground. This will make sense if you have seen the pipe trick.
Here is the old and the new CV:

Note that the "cheaper" CV does not come with a dust seal like the Toyo item. This week I will find out if I can get the seal separately (I could not get the old one off the old CV).
Time to put it all back together again, and it started with a puzzle... The new CV came with a new circlip that goes into the groove on the end of the drive shaft. This is what stops the CV from sliding off the axle. It can be a tricky little bugger to compress while pushing the axle into the CV joint. I ended up using a cable tie to compress it, then slipped the axle in up to the cable tie and gave it a quick whack with the medium hammer. Worked 2nd time - I was too gentle with the hammer first time and the clip slipped out of the cable tie.

I filled the joint with CV grease before I put the axle back in, and then I added some more grease...

Outer boot went back on, and some more grease in the boot for good measure. I used some new boot straps from the local motor factors (these need a special crimping tool - £15), except the smaller straps they gave me were too small, so I used a cable tie.

Should be fine as the boot has 2 small ridges that sit in a groove on the axle.
Then inner boot back on followed by the inner joint & spring clip and several dollops of CV grease.

And some more grease in the inner joint housing...

At this point I almost forgot to fit the inner CV boot strap.
The rest was just putting it all back together in reverse order again. Easy as!
I ordered a CV kit off ebay that came with CV, boot, CV boot straps, axle nut (that I didn't use), and CV grease. I also bought a tub of CV grease at Halfords.
And the job can get quite messy so I had some degreaser wipes at hand, as well as a roll of the blue paper towel. The new textured Big Wipes are excellent.
Then on with the job...
I jacked the car up on the chassis rail just behind the front wheel so that the wheel/suspension could drop, then took the wheel off. Also take the hub dust cap off and you will see the 36mm nut with a split pin - take these off too. Sorry, no pics of this.
Some people split the lower ball joint next, but the split pin in mine had rusted in there and I just wasn't in the mood for the ball ache
You can then tap the axle end with a copper hammer to push it back in through the hub. When it is loose enough you can swing the hub up and to the side. This pic is actually of the new joint when I was putting it back together, but it will look like this:
Here you can also see the where the 4 bolts where that I undid:
Next, undo the large cv boot strap on the inner joint. There are many different types of boot strap and some are easier to remove than others. Mine was very easy to remove - I just bent to tabs back and then lifted the end and it came loose:
Now you should be able to pull the drive shaft out, but have a container directly under the inner joint as I had a LOT of gloopy "grease" run out. I say grease, but it didn't look like grease at all.
With axle removed here:
Things got very messy for the next 20 minutes... and I went through a lot of paper towels, wipes and diesel. Here is my cleaning kit:
With most of the grease removed you should see a spring clip holding the inner joint on to the axle. I managed to get it off with some circlip pliers without damaging it, but some people do snap them trying to get them off. I ordered a hand full of spares from Milners just in case.
This is the axle with the joint removed:
And this is the joint cleaned up:
This joint will only go onto the axle one way, so no need to worry about which way it goes back on.
The boot strap on the outer CV was not as easy to remove and required special tools number 1 and 2 (hammer and chisel).
The grease in this joint looked a bit better than the inner, but still not what I would call good.
With the inner joint and both boots removed, and the whole lot cleaned up:
To separate the CV from the axle I used the pipe trick. I got my wife to video it using my digital camera so that I can share this amazing trick with everyone (and look cool on the interweb), but I had failed to notice her turning the camera on its side... When I try and rotate it back I end up with a 800Mb file. Best thing is just go onto youtube and search "pipe trick". The pipe trick did cause a little bit of damage to the end of the axle that hit the ground and some of the teeth, but not enough to worry about.
Next time I will just drill a hole through the bottom of the pipe and put a bolt through there to stop the axle actually hitting the ground. This will make sense if you have seen the pipe trick.
Here is the old and the new CV:
Note that the "cheaper" CV does not come with a dust seal like the Toyo item. This week I will find out if I can get the seal separately (I could not get the old one off the old CV).
Time to put it all back together again, and it started with a puzzle... The new CV came with a new circlip that goes into the groove on the end of the drive shaft. This is what stops the CV from sliding off the axle. It can be a tricky little bugger to compress while pushing the axle into the CV joint. I ended up using a cable tie to compress it, then slipped the axle in up to the cable tie and gave it a quick whack with the medium hammer. Worked 2nd time - I was too gentle with the hammer first time and the clip slipped out of the cable tie.
I filled the joint with CV grease before I put the axle back in, and then I added some more grease...
Outer boot went back on, and some more grease in the boot for good measure. I used some new boot straps from the local motor factors (these need a special crimping tool - £15), except the smaller straps they gave me were too small, so I used a cable tie.
Should be fine as the boot has 2 small ridges that sit in a groove on the axle.
Then inner boot back on followed by the inner joint & spring clip and several dollops of CV grease.
And some more grease in the inner joint housing...
At this point I almost forgot to fit the inner CV boot strap.
The rest was just putting it all back together in reverse order again. Easy as!