
About to fit reversing sensors and a rear camera - a slightly sophisticated set up via an 8 pin soft relay with a dash switch. So that I can switch from camera and sensors on truck to camera and sensors on bike rack- a set up that works a treat on the Campervan. However, where is the best place for. 12v reverse feed. I’ve looked at the cables that run under the trim under the drivers door. But which of those carries power to the reversing lights.? Any suggestions
Don't like the adverts? Click here to remove them
You are using an out of date browser. It may not display this or other websites correctly.
You should upgrade or use an alternative browser.
You should upgrade or use an alternative browser.
Best Place for Reverse + feed
- Thread starter Adrianlle
- Start date
Tractionman
Well-Known Member
- Joined
- Oct 11, 2013
- Messages
- 2,978
- Country Flag

Stating the obvious, what's wrong with removing a rear light and picking up the reverse light feed there ?
N/S would be favourite, as there is also a 30amp and 10amp live feed in the cubby that houses the jack, as karl200 on here informed me. I realise your switch would be at the front which involves running cable, but no more than if you picked up feed at front and ran to back.
N/S would be favourite, as there is also a 30amp and 10amp live feed in the cubby that houses the jack, as karl200 on here informed me. I realise your switch would be at the front which involves running cable, but no more than if you picked up feed at front and ran to back.
Wish I’d known about the live feeds in the jack cubby! As it is, I’ve got my switched plus and ground sorted at the switch/relay end up front and was just trying to avoid laying a cable all the way from the rear light cluster to the relay. But as I’ve got the spare cable it’s no big deal and the obvious way to go. Am I right in thinking that the rear lamp cluster is held in place by the 2 10mm nuts visible when the rear door is opened?
Tractionman
Well-Known Member
- Joined
- Oct 11, 2013
- Messages
- 2,978
- Country Flag
Yeah, we all try to avoid long cable runs, especially for voltage drop or the amount of trim removed.
You are correct in removing the 2 bolts hidden by the door, then the light unit slides/pulls towards you, as standing at rear. There are 2 small plastic clips on the body that hold the side of the light, hence the sliding rearward motion I refer to. Do not try and twist or lever the unit outwards at the side, you will break the clips.
My lights were particularly tight removing and I had to carefully but firmly pull and GENTLY jiggle the light units, then they came off with a rush, but there is excess cable to the loom there. Good luck.
Tractionman
Well-Known Member
- Joined
- Oct 11, 2013
- Messages
- 2,978
- Country Flag
More thoughts on that, you may not have to remove the light, in that jack cubby is lots of wiring, which is below the light and inside that area where the towing relay and all the connections are. Look there first.
When I installed my reverse camera I cheated and used a wireless one to avoid a long cable run! As Tractionman has advised, I just took the reverse feed directly from the light - and thats all mine needed! If you need to pick up the signal in the front though, you could probably trace it through from the wiring diagrams in the Haynes!
Don't like the adverts? Click here to remove them
Tractionman
Well-Known Member
- Joined
- Oct 11, 2013
- Messages
- 2,978
- Country Flag
Luvvin that Karl. haha
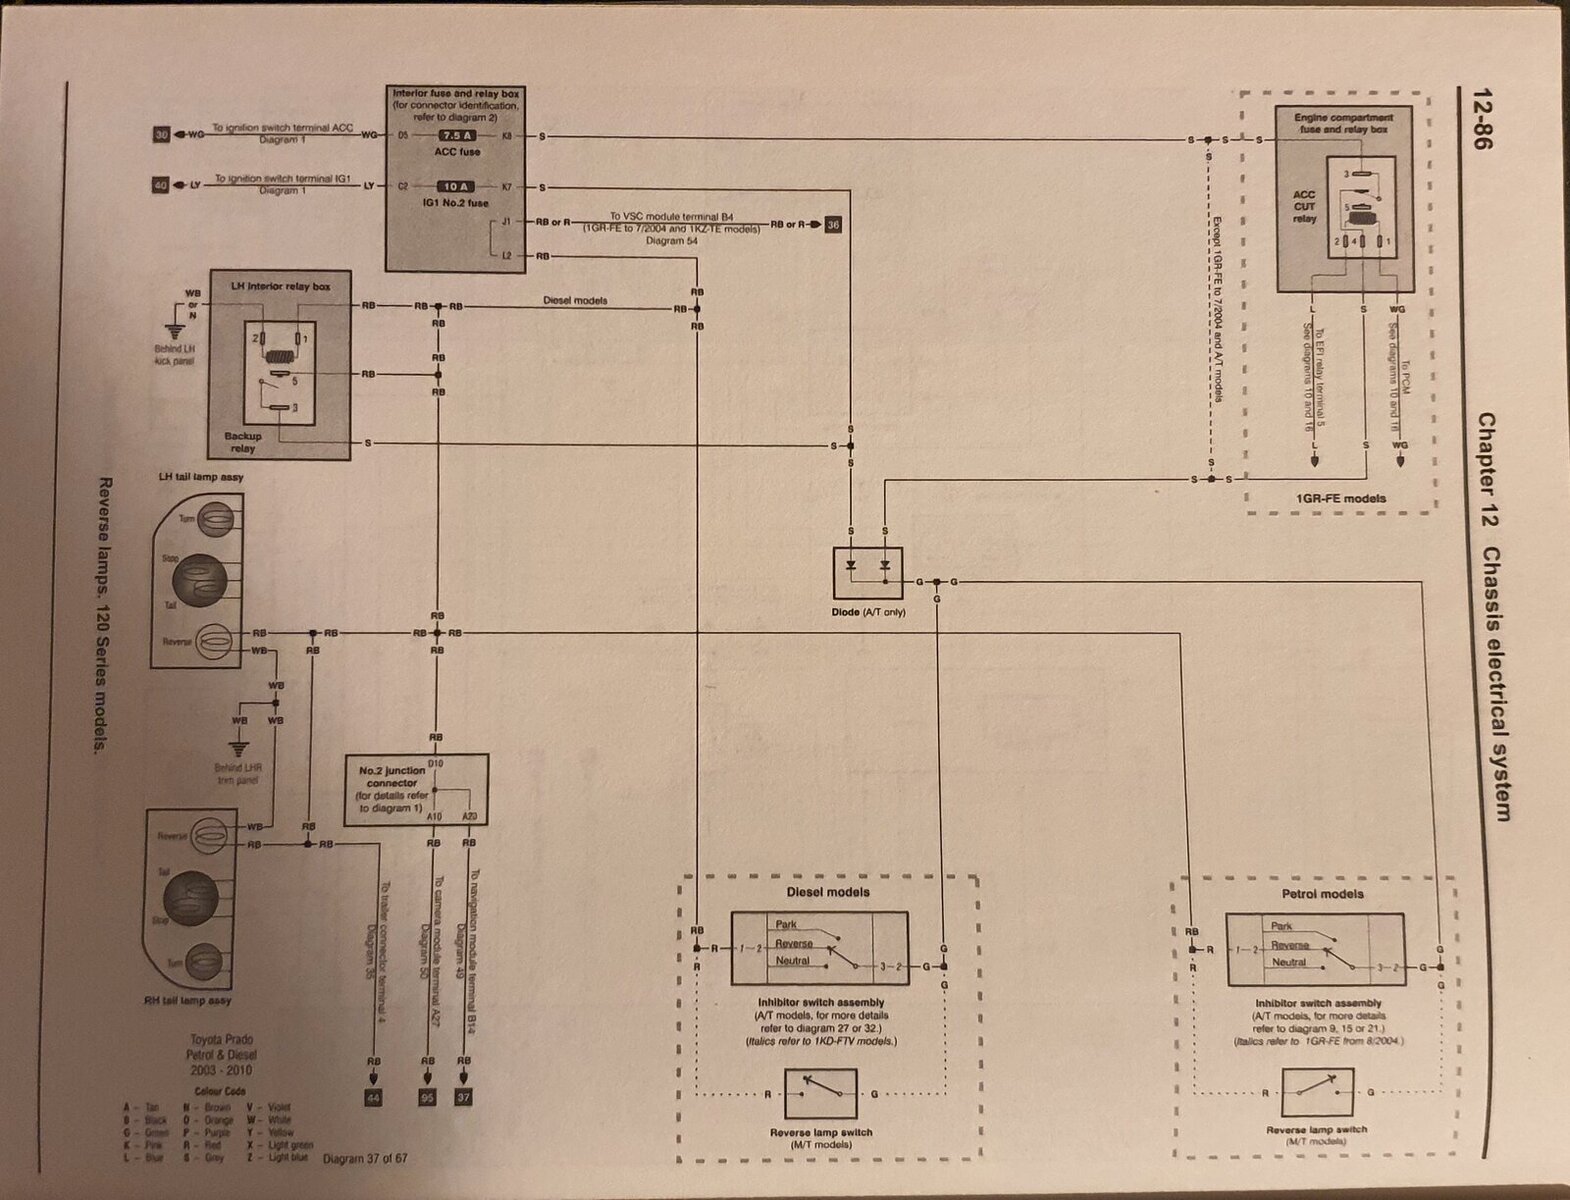
Just had a quick look, in case you need the feed from the front to detect reverse.
Looks like its in junction box 2 which is behind the radio; look for fourth connector down (2D), pin 10 which is on the end. Should be a red and black wire!
Looks like its in junction box 2 which is behind the radio; look for fourth connector down (2D), pin 10 which is on the end. Should be a red and black wire!
Attachments


That’s all b helpful so thank you. Front end all wires up but it will be next week before I connect the reverse deed and fit the camera and reversing sensors. When I did the Campervan ( Sprinter based) I kept putting it off because of the need to remove the bumper. As it turned out that was a piece of cake and there were even mark points inside the bumper for drilling the sensor holes. Similar anxiety over taking the rear bumper off the LC and then drilling it with hole cutter. So hoping that too turns out to be as straightforward !
Tractionman
Well-Known Member
- Joined
- Oct 11, 2013
- Messages
- 2,978
- Country Flag
Don't want to put a damper on your enthusiasm mate, but be prepared for a bit of hassle with the effects of the R word. When I removed mine some bolts snapped and 2 out of 2 of the bolt on brackets were sieves, which tore on bolt pressure applied, which resulted in replacement, other brackets are welded with captive nuts. Some bolts you can see from under, and I squirted them for several days before trying.
Make sure you have a plan b if it all goes tits up. The brackets had to be ordered from Mr T, about 3 days, and I used the wife's car to pick up. If you have problems once bumper is off, vehicle is effectively off the road, due to lights, indicators still in bumper. Hope it goes well.
Make sure you have a plan b if it all goes tits up. The brackets had to be ordered from Mr T, about 3 days, and I used the wife's car to pick up. If you have problems once bumper is off, vehicle is effectively off the road, due to lights, indicators still in bumper. Hope it goes well.
Tractionman
Well-Known Member
- Joined
- Oct 11, 2013
- Messages
- 2,978
- Country Flag
Cant add anything useful to that, except now I know why Karl fitted wireless !
Hang in there as he or someone else will be along, cos he obviously had to mount his camera, but I don't know where or how.
Hang in there as he or someone else will be along, cos he obviously had to mount his camera, but I don't know where or how.
I mounted the camera on top of the numberplate on the back door - mine has the spare is underneath, so the numberplate is central. Not sure where the best place to mount it would be if the spare is on the back.....?
Rear bumper -- cant comment on that, I've had the front one off but not the back!
Rear bumper -- cant comment on that, I've had the front one off but not the back!
I’ve got the position of the camera sorted - in the tailgate replacing one of the number plate lamps with a combined camera/ lamp. But I also want to fit 4 parking sensors in the rear bumper. So any further advice on ease / difficulty of removing rear bumper to drill sensor holes? Thanks.
Thanks. That’s v helpful especially the template for sensor positions. The diagram showing all the clips and bolts holding in the bumper looks a bit daunting though! I will have a crawl around underneath and have a think. I wonder now that I have the template positions whether the bumper can be slackened off from underneath enough to get a hand up underneath to feel if there are any obstructions. . If not risk drilling the holes without taking the bumper off and fish for the cables the other side then!
Tractionman
Well-Known Member
- Joined
- Oct 11, 2013
- Messages
- 2,978
- Country Flag
How will you fit the sensors to the bumper with it on, and then of course wire each one. ?
Assuming you will fit 4, then you will be wiring 4, and with the bumper on there is minimum room for 'fishing' a
You can't just slacken things off to gain more room, as bolted/ clipped top bottom and sides, and in any case if you could slacken off, you would be undoing the bolts, right ?
Mine came with the sensors factory fitted, and they are not accessible with the rear bumper on.
The fixing bolts and plastic side clips are all accessable obviously, which is quite straight forward.
I had no trouble with that, and I had no previous experience/ help in removing the bumper.
The problems MAY start, as said previously, depending on the degree the bolts are seized .
The underside of mine was showing rust at that stage, having spent it's life in Scotland, so maybe mine was worse than some, but once you start and if bolts/ brackets start snapping, you are committed.
Sorry for all the doom and gloom, just my own experience.
Which bolts gave you the trouble from memory? So that I can give them a good squirt of wd40 over several days. I think it would be safer taking it off. Not least because when I wiggle my fingers under the bumper where the middle 2 sensors would go , the inside of the plastic bumper is virtually hard up against the Towbar. That puzzles me as I had been expecting to find a space there Wondering if room for the sensors protruding inside of bumper. Only way to be sure I think is take the bumper off.
Tractionman
Well-Known Member
- Joined
- Oct 11, 2013
- Messages
- 2,978
- Country Flag
All of 'em really, some you cant see to squirt. Having said that if you remove the plastic ' plugs' in the rear carpet trim to expose the bolts that go through body welded brackets with captive nuts, you could squirt all around the heads and hope some will find it's way down the threads. IIRC, 3 out of 5 snapped, + the other 2 bolt on brackets, as said before. There should be 2 metal straps supporting the bottom of the bumper, bolted to the rear chassis x member. My bolts snapped, and straps rotten, so carefully drilled out, but in doing so it was difficult to drill upside down with restricted space, and I goosed the threads big time.
I drilled these out bigger to accommodate riv nut type fixings with new larger bolts to suit, with new straps I made.
There is a large piece of polystyrene between bumper and rear x member as a cushion/ shock pad, that restricts room too, for wiring, and a further bolt with a plastic cap, holding the rear door stay that needs undoing. The side clips popped apart without too much trouble, just awkward.
That came out easy, woohoo !
The factory fitted sensors are right angled, because of restricted room.
Make sure Mr T is open in lockdown, before you start. The last lockdown came after I ordered my brackets, they came in and my local parts guy there rang and said come and get them ASAP, were closing.
He very kindly arranged to leave them in the grit bin, as everyone was gone when I got there.
Apart from those I had everything else, so I was lucky. Good luck with it.
Had the same issues removing rear bumper the first time; top bolts were not too much of an issue but the bottom ones were corroded solid. Luckily for me the straps were not too corroded so ended up snapping the heads off all the bolts when I tried to release them. Not too big a deal for the bottom ones as once bumper removed drilled out the old bolts and recapped, but as traction man said there’s not too much room when lying on your back underneath.
Not sure what rear camera you have, I got a small round one so looks very similar to the sensors and was able to mount it in the centre of the bumper.

Not sure what rear camera you have, I got a small round one so looks very similar to the sensors and was able to mount it in the centre of the bumper.