Don't like the adverts?  Click here to remove them

FZJ80R from Devon

not sure if these are of any help.
rear suspension bushes.png
chassis.png
 
Air bags are a cool idea but I have replaced quite a few at work and always worry if it splits then you are pretty much stuck with it slammed, on landy's and also the x5 (think they are the same if I remember correctly), they just twist and unclick like a bayonet fitting to keep them seated, have the airbags you bought got a similar looking connector at the bottom?

Could you make an adaptor that sits in the stock cup, say cut the top and bottom spring coil off your stock springs then weld that to the correct mount for the airbag?

If it does work you will have a super silky ride, we will all be jealous!
 
Chapel Gate - yes thanks, great help, I couldn't find that 2nd diagram, but it shows the dish part 51593 as a separate part, that's the bit I need to remove, I wonder how it is held on? hopefully with spot welds that I can drill from underneath!
 
Dan - on the range rover L322 airbag it is more like a lorry airbag, the top and bottom are like a platform, the bottom is retained with a screw that fits into a lug, for this I will just enlarge the hole in the bottom spring platform, I will cut the lug shorter so it doesn't hit the axle, and I may make a circular metal plate to spread the load on the piston.

20181015_073728.jpg


The top of the airbag is held in with an R clip round the lug that sticks out the top. So I could just enlarge the bolt hole that the bump stop bolts to to 29mm, put the lug through and then fit the r clip.

20181015_073741.jpg


Unfortunately the airbag is slightly too tall, if I did this it would be at minimum height, but luckily the distance from minimum to ride height is about the same as the depth taken up by the dish part that holds the bump stop.

So if I can remove that, I can add a flat metal plate for the top of the airbag to sit against, and use the r clip to retain it.

That's the plan anyway.

As for air bags splitting, I suppose they could but I would just do the same as when I change a lorry airbag, kink or block the pipe to the leaking airbag, and inflate the other one to a higher pressure. You would still have the front suspension holding you level, and also your anti roll bars would help keep level as well. The advantage over a coil spring is that to change an airbag is much easier, you don't need a jack or a spring compressor. You just let the truck to minimum height, block the air pipe and remove the retaining fixings. Inflate the other airbag. Change the spring. Put a bit of air in it to get it in the mounts. Put your retaining clips on. Then let it back down and reconnect your air pipe.

Bet you change just as many coil and leaf springs at work as airbags, we certainly do anyway.

It's not for everyone though, I think for serious off roading you would be much better off with coil springs as they are simpler, and you would either fit a spring to cope with either fully loaded (like for an expedition) or completely empty (like a punch challenge truck).

If I wanted to level the truck because I wanted to be able to tow and also have the back of the truck full of heavy gear, I think the spring assistor airbags would be the answer.

But for me I want airbags so you can raise or lower the ride height, and adjust the pressure to cope with heavy or light loads, easy to carry spare becuse they are smaller and lighter than coil springs, also you get on board air tank which you can use to do your tyre pressures (ideal for drifting), but mostly because I like the idea of it!
 
Ah ok, maybe the one's I was thinking of were on a newer discovery or something, I try not to pay too much attention to land rovers that come in work ha ha. You are right I do change a similar amount of springs etc I think it's just the amount of times I have jumped in any air ride landy and had to wait a couple mins for the air to fill up before I can move it, but like you say they are over complicated systems and those bags you have do look nice and simple so i'm sure you will sort it :thumbup:

I do like the sound of having air on-board, what sort of compressor are you going to use? Are you going to adapt a truck compressor and run it off the engine or use an electric one?
 
20181022_161647.jpg


Very oily

20181022_161639.jpg


And very heavy

20181022_212437.jpg


A nice bath

20181022_195252.jpg


And time for bed

20181022_195241.jpg


They call this recycling I think

20181022_204015.jpg


Didn't do well on the exam

20181022_203500.jpg


20181022_204345.jpg


Red lead eh? Got loads of that.

20181022_204435.jpg


Here's the remains of some Toyota red lead

20181022_204754.jpg


But here we only have Mole Valley Farmers red lead

20181022_204811.jpg


So borrowed some yellow oil paint from next door

20181022_210030.jpg
20181022_210040.jpg


To really confuse things

20181022_210507.jpg


20181022_210452.jpg


20181022_210458.jpg
20181022_210510.jpg


And some touch up paint which smells like nail varnish. 20181022_195306.jpg
 
Don't like the adverts?  Click here to remove them
Keep it up Richard. These posts always intrigue me. To the point of bemused interest!:thumbup:
 
Should be dead easy. All comes in a nice box.

20181024_153152.jpg


Drive flange just slides off by hand. No puller needed.

20181024_154814.jpg


20181024_154821.jpg


Marked and measured the positions of the adjusters.

20181024_155534.jpg


20181024_155543.jpg


20181024_160413.jpg


20181024_160430.jpg


20181024_160419.jpg


20181024_160603.jpg


20181024_160539.jpg


The side bearings for the diff are quite worn with ditches you can feel with fingernail

20181024_161440.jpg


20181024_160911.jpg


When I cut the roller cages off the bearings to use the inner race as a press tool, the inner races are just as bad.

Removing the pinion

20181024_162356.jpg


Seal out, the fan bit is the oil pump, it flicks oil down two tubes than are cast into the diff.

20181024_162530.jpg


Outer race of outer bearing pitted.

20181024_162540.jpg


20181024_164659.jpg


You don't need a shop press, just a puller set, but it's a bit quicker.

20181024_185107.jpg


Back together with new bearings, assembled without crush tube.

20181024_214559.jpg


Preload 1Nm

20181024_214616.jpg


Changing side bearings.

20181024_234331.jpg


Set backlash and side bearing pre load. Then pinion preload is checked and subtracted from total preload.

Contact pattern check.

20181025_000504.jpg


20181025_000453.jpg


20181025_000634.jpg


No good. Toe contact. Move pinion away from ring gear. How do we do that? Strip the whole lot and start over with a thinner shim behind the bearing on the pinion.
 
Last edited:
Ahh, I've been there so many times. it's a bit of a faff, but I've done two where it was bang on with the very first shim. Pure luck. Although the FSM tells you to there is no need at all to mark the bearing caps. They only go on one way and on one side - for a locker version like this. For a non locker version they are different completely.

Before I send you my shim library Rich, just measure the one you to to make sure I've actually got some thinner ones or else it's out with the sheet of wet and dry.
 
I marked it all before I initially took it apart because I wanted to set it back the same to see if it would be close - actually the ring gear side adjuster ended up in the same position, but the drive pinion side adjuster was 3 notches away outwards, so not possible to tighten to the original setting. I don't think it would be possible to just buy the bearings from Roughtrax and fit them in to the same settings, perhaps if you were really lucky, but you would need DTI, micro torque gauge etc anyway.

Putting the diff together is actually quite a nice job, but very time consuming and you have to triple check everything, and keep it very clean as a tiny bit of grit would mess up the measurements.

Anyway, here is the Pinion spacing washer, it has a chamfer on the inside lip which is quite hard to detect, I can't even see it, only feel it.

It is 2.06mm thick.

20181025_201645.jpg
 
Oh that really is up at the thick end then. Yes I certainly have thinner ones than that.
 
Ground the plate washer down to about 2mm and rebuilt. It appears the contact has moved slightly more to the centre but has definitely moved further down into the trough between the teeth.

20181025_224725.jpg


20181025_224532.jpg


20181025_224541.jpg
 
I've had exactly the same pattern on a used diff Richard. I've struggled to get it to move at all. It seems that once they have gone out of spec and been run a while, the contact points are effectively damaged for want of a better phrase. I have managed to shift the pattern on occasions but at that point the set up was just plain wrong with the ring and pinion actually hitting each other. You might get the mark to shift, but it probably won't look like a nice text book smear. This is why all the rebuilds I do now have new ring and pinions in them. I'll get those shims off to you today unless you want to keep sanding!
 
Please send the shims, I would rather keep the sanding to a minimum!
 
20181026_184839.jpg


20181026_184721.jpg


Built again with the same shim to check I am getting consistent results. The more pressure you can put on the diff when you do the contact pattern check the clearer the pattern. I used a lever bar to act as a brake.

20181026_185010.jpg


Pair of 'SST's' to adjust the side bearing adjusters, just 8mm bolts welded into a bit of flat and cut off. Much easier to adjust now.

20181027_115613.jpg


A puller I got from eBay to see if I can get in to pull the nose bearing without stripping the diff.

20181027_115657.jpg


1.5mm jaws, it seems fairly good quality and has a bearing on the front of the threaded part which will keep it central. I scratched it with a Stanley knife blade it is made of hard steel. I will try it on Monday see if it works.
 
Yes it's important to have a bit of drag on the diff when you pattern it. When in service, the pattern will climb slightly as everything flexes a bit.
 
1.70 shim (smallest)

20181030_114334.jpg
20181030_114323.jpg


But the pattern still seems way to far in on the ring gear. So it's very odd. I can only think something else could be wrong.

Either the bearings are a different size,
Or the outer race of the pinion bearing is not far enough into the housing... But it seems like it is.
 
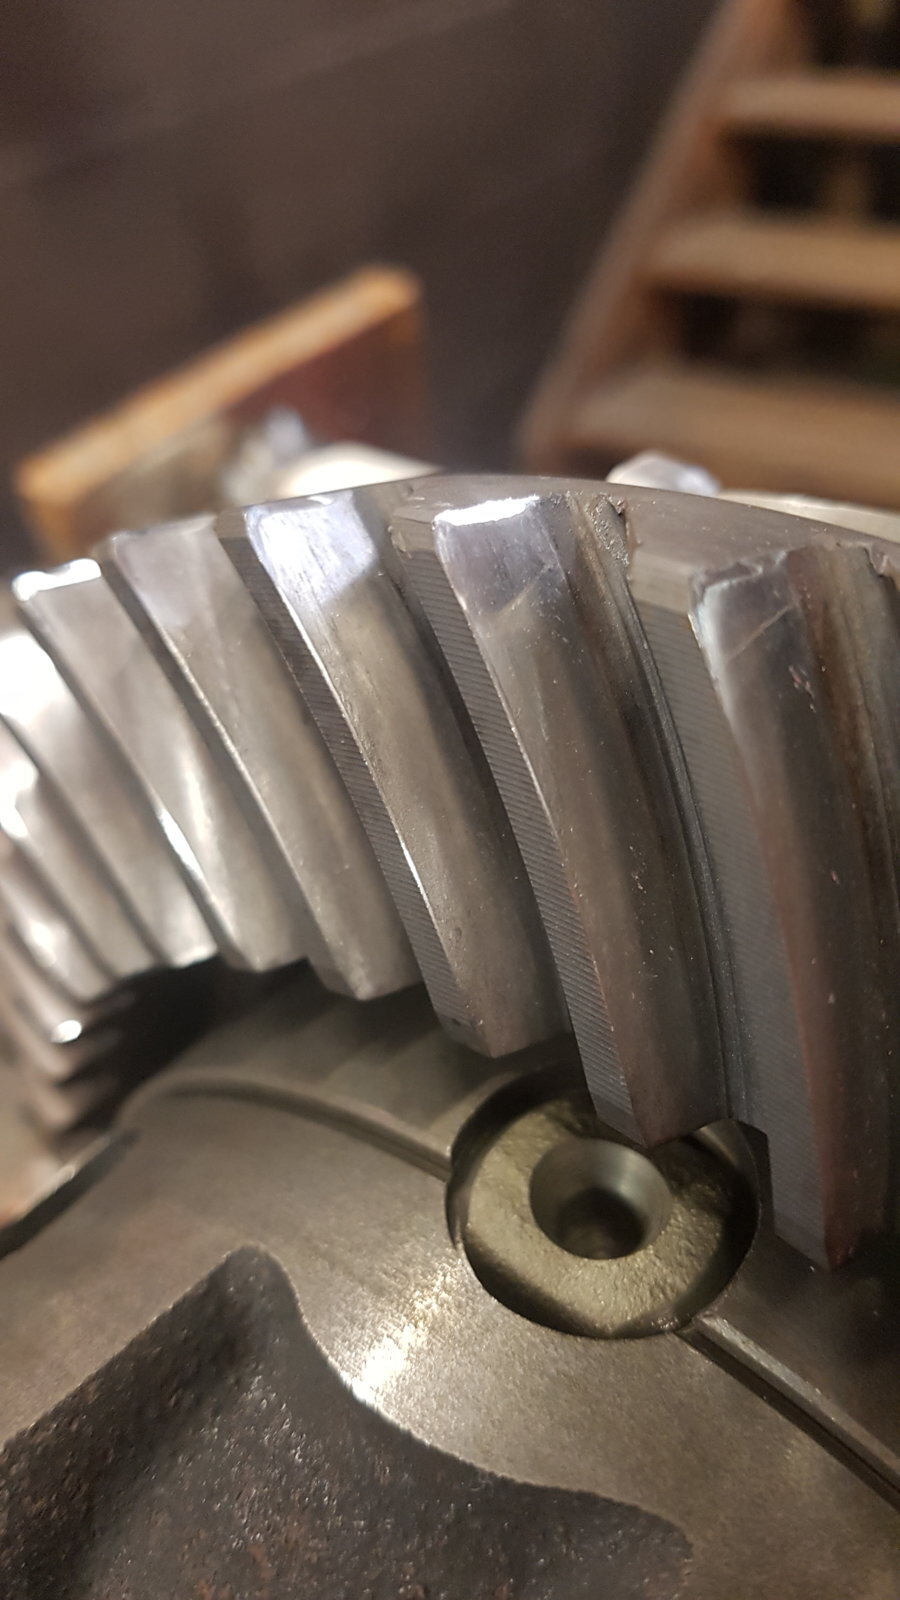
So after some more builds and strip downs, I could never get a very good pattern from the diff. All I cpuld get was the 'ghost' of a pattern and some defined edges. I think if the gears are worn enough to be noisey and the pinion bearings are worn out, it is unlikely to get a good pattern as there is a very slight dish worn into the gears.

I refitted the diff and it is just as noisey really, be interesting to see if it improves as the gears are held in the correct position, perhaps it will wear back flatter...?

For comparison here is a diff from a 7.5t lorry that has come back from repair, the contact pattern is much clearer.

20181120_175126.jpg


50p piece shows the diff is much bigger than Land Cruiser, but it has exactly the same adjustment set up. There is very little if any preload on the bearings though.

20181120_175159.jpg


Still not very clear on this side

20181120_175141.jpg


But clearer here.

That's enough of diffs for the time being.
 
Back
Top