Don't like the adverts?  Click here to remove them

100-Series Inner Sill replacement

BobMurphy

Well-Known Member
Joined
Mar 1, 2010
Messages
1,958
Country Flag
scotland
Any bodywork specialists out there ??

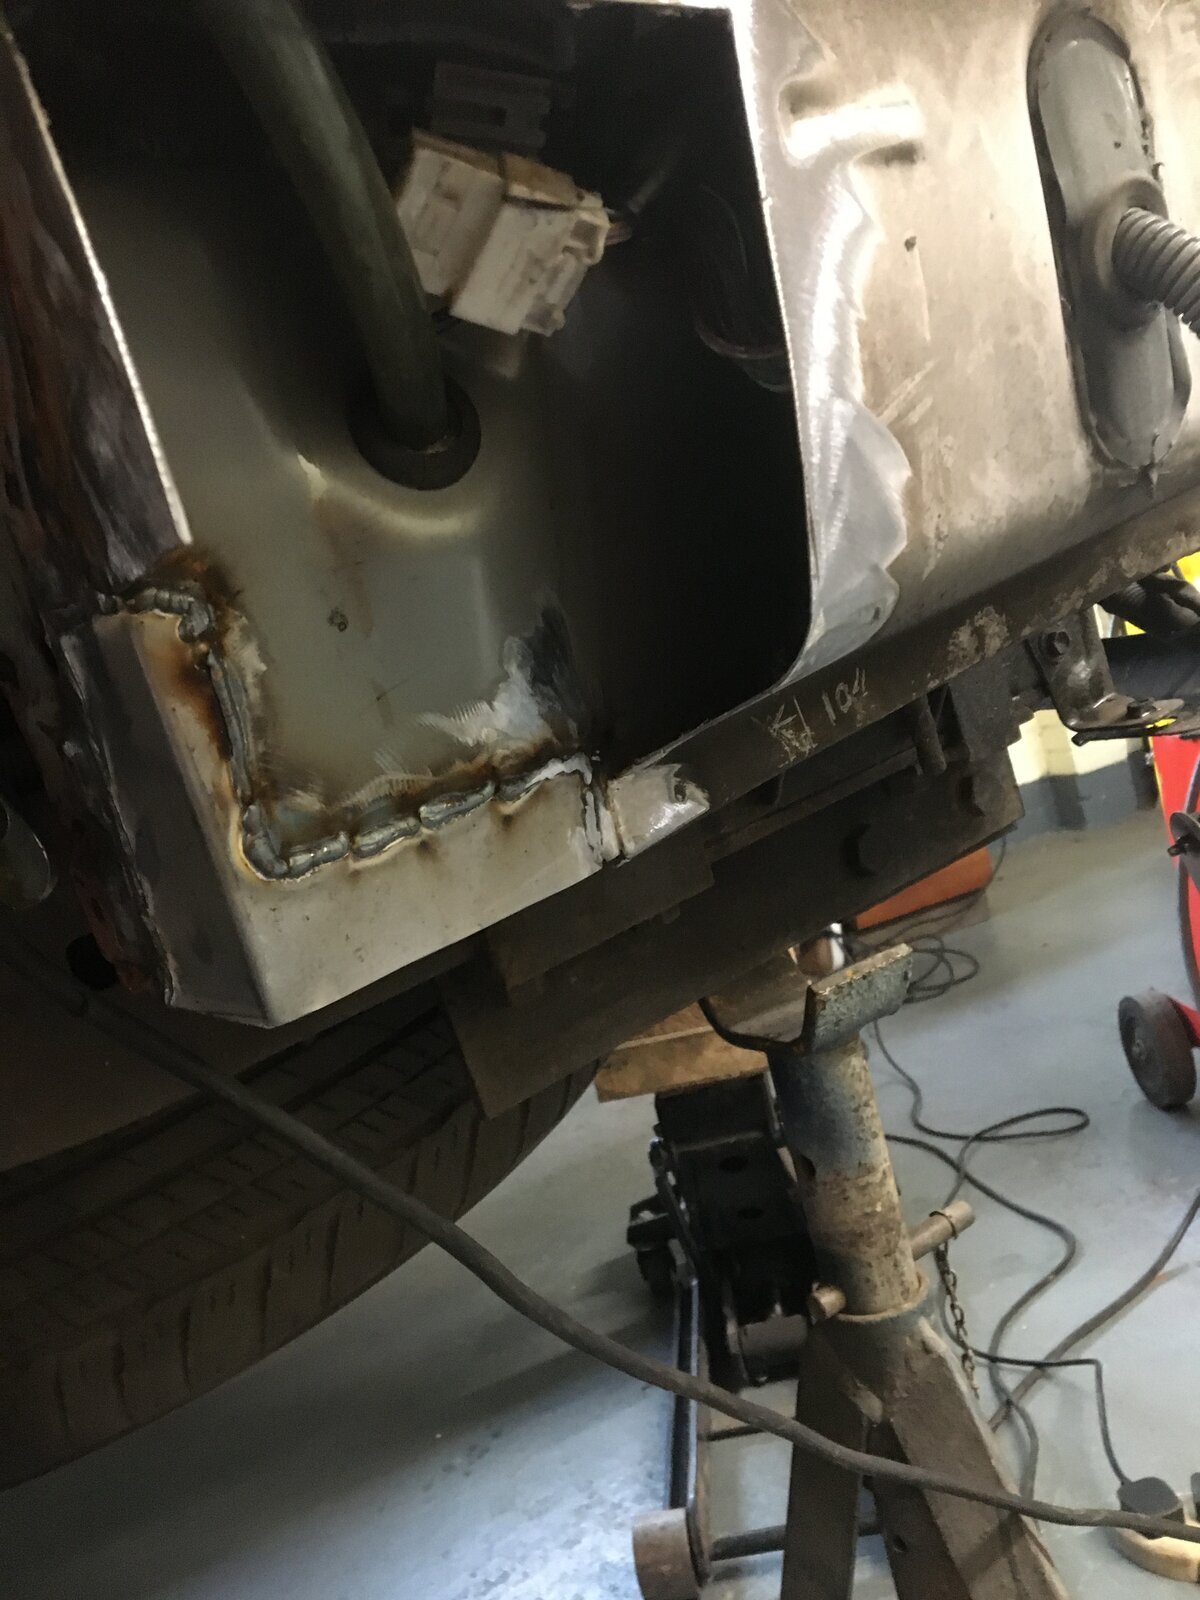
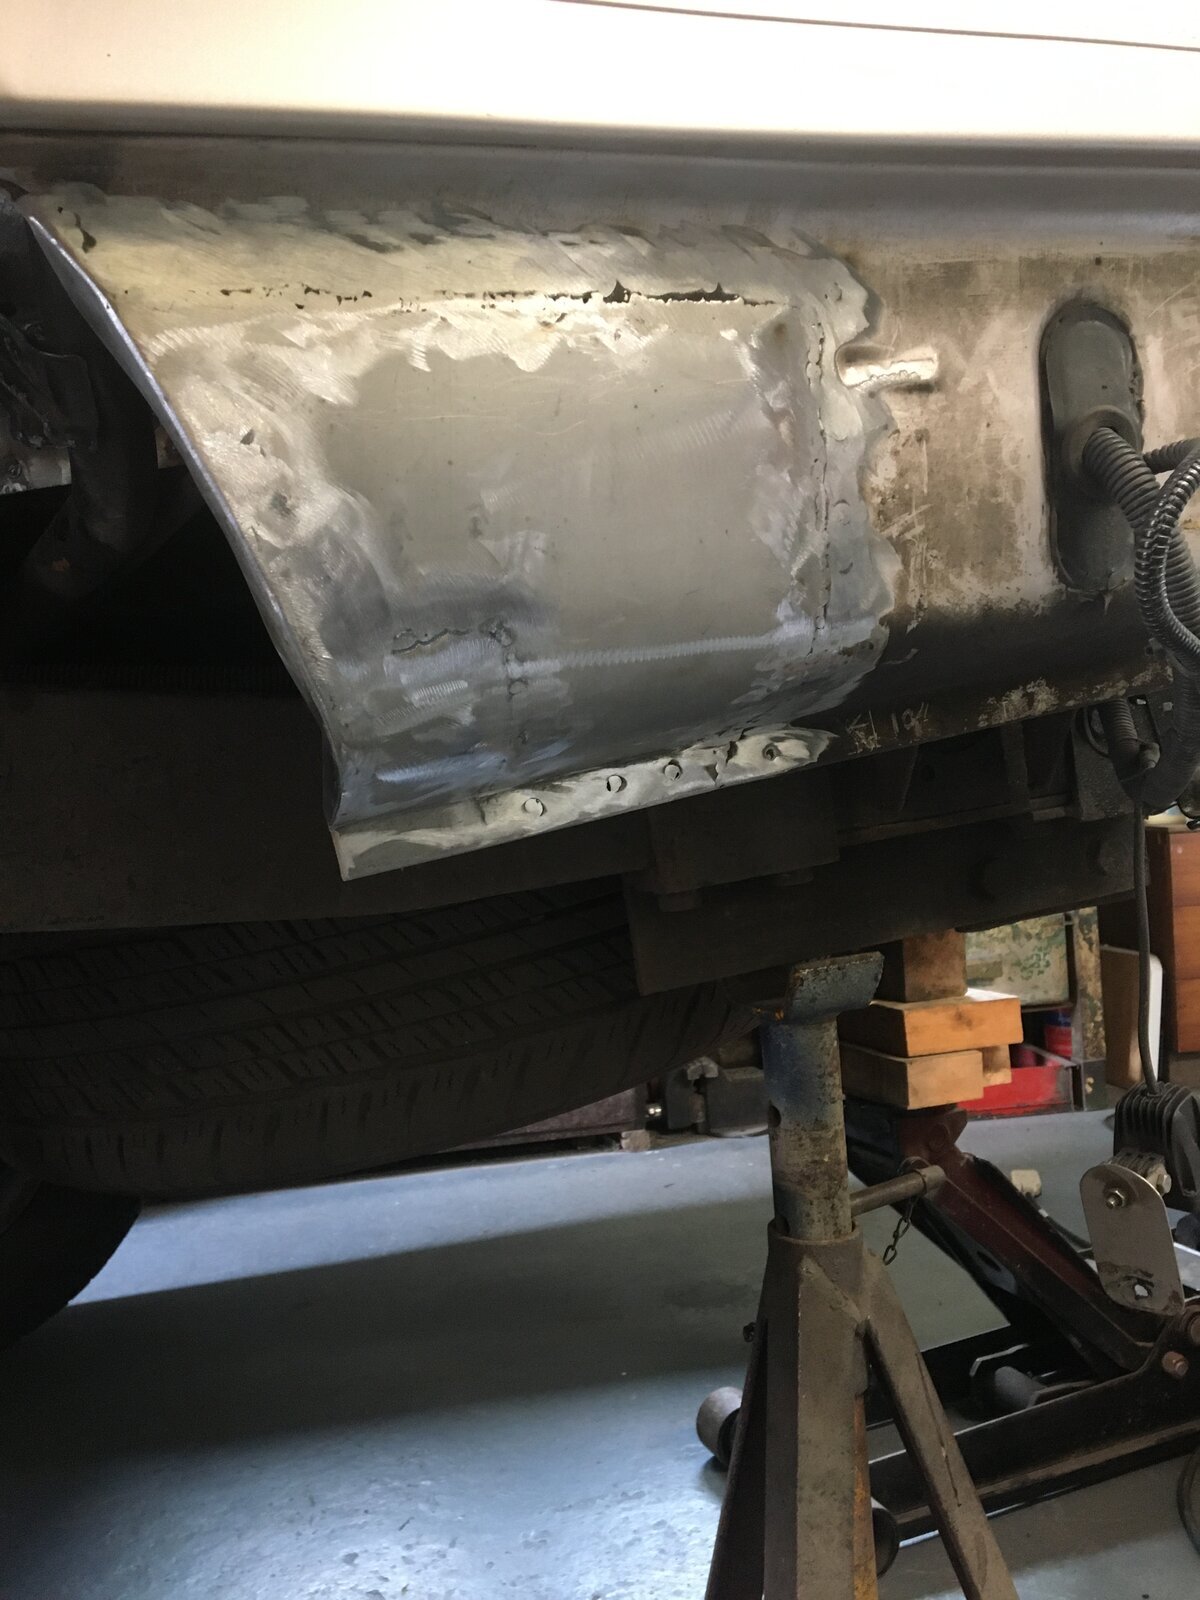
I'm in the process of hacking out the rusty remains of my inner sills and have a pair of Toyota panels waiting to be welded in - if I can find something to weld them to.

Has anyone done this before ???

I ask because I'm wondering if the easiest way to replace them is to cut the rocker panel (door sill ?) away from the outside - thus allowing the interior (with its shiny grey steel panels) to be seen and got at.

If I can remove the inner sill from inside I'll have a better chance of getting the whole panel in, instead of cutting and using the lower section only. I'll also have much better access for the MIG torch (I also have TIG, but think MIG is the way to go).

If I get this horribly wrong the truck could be heading for the breakers, the rust is pretty extensive.

DSCN9713.jpg


DSCN9707.jpg


DSCN9710.jpg


DSCN9712.jpg


Bodywork is not my thing so any advice will be welcome.

As usual, when I've finished I'll know what I should have done from the start :lol: .

Bob.
 
A very naughty 100 there! In the past I saw a very rusty situation and very similar looking rust on a 60 in Holland. They used a certain sized section of box metal that replaced the outer cill, then to as you have use the inner cill to join to the floor... It really is so disappointing to see the rust like this.

To remove the outer cill will indeed help you to do the task in hand.

Like all the other cruisers the brace that goes from the floor support down to the inner cill, hopefully it hasn't gone too thin, because it will weld back in to the new structure...


Best to get all the loose rust off and treat with a suitable rust neutraliser.. once treated and the brown metal has turned blue black then it should be safe..

Don't give up keep at it.... :thumbup:
 
I think you may have 3 panels to deal with Bob, the inner and outer sills and maybe a reinforcer in between them.
The outer sill is pressed as part of an outer bodyside assembly so there are no manufacturers joints that youcan easily unpick,to avoid getting involved with the A& B pillars you would need to cut and re weld it along its entire length just below the door apertures.
If there is a reinforcer you would also need to cut that along its length in order to access the inner sill , looking at your images the lower section is shot anyway and will need remaking as will the lower section of the outer.
There is no way you would be able to fit the complete inner sill without it turning into a massive job so that would also need to be cut so you are left with say the bottom two thirds which could then be welded to the top third of the original inner.
I think the decider for you is whether the top of the inner is solid enough to weld to or whether you can remake it using some sheet steel folded into an angle and welded to the underside of the floor pan - assuming that will clean up so you have something decent to weld to!
There’s a serious amount of work involved here so I can only suggest you have a good look round the other well known rot spots before you get the slitting disc out - let me know if you need a list, me and my mig know most of them!
Good luck
 
Last edited by a moderator:
Thanks Geoff, that's the conclusion I had come to. There are three layers there and I'll be taking the slitting disk to the outer today. Then the intermediate layer needs to come out before I can see the actual sill.

The outer two layers will need new bottom edges fabricated and welded on.

The rear wheel arch has also disappeared where it used to join the lower panel so some steel Origami needed there as well.

I'll post some pictures as I go.

Then the other side has to be done :doh: .

By the time I've finished something else will have rotted through :lol:.

Its a never-ending story.

Bob.
 
Bob - I do admire your perseverance and tenacity when it comes to repairing and maintaining your cruisers (and this probably applies to every vehicle in your possession). :cool: :thumbup:


Let's be honest, both your previous 90 and the current 100 haven't been exactly pin-up models for the reliability and build quality of Landcruisers. Now, that may not be their fault and more a result of years of neglect by previous owners.

However, you've never just said "f*ck it - this is not worth it and it'd be better sold/scrapped", you've always gone down the repair route and seemingly regardless of effort and cost, as I don't think I've ever seen you cut any corners. :cool:

All credit to you and your skills but I do wonder if you're a mechanical masochist at heart. :icon-wink:

BTW - the above is meant in the nicest possible way and not a criticism in the slightest. :thumbup:
 
Thanks Geoff, that's the conclusion I had come to. There are three layers there and I'll be taking the slitting disk to the outer today. Then the intermediate layer needs to come out before I can see the actual sill.

The outer two layers will need new bottom edges fabricated and welded on.

The rear wheel arch has also disappeared where it used to join the lower panel so some steel Origami needed there as well.

I'll post some pictures as I go.

Then the other side has to be done :doh: .

By the time I've finished something else will have rotted through :lol:.

Its a never-ending story.

Bob.
And when you’re done with all that you can pull the rear bumper off and find a whole load of fun at the bottom of the rear arches!
Scottish Winters have a lot to answer for!!
best of luck with it Bob!
 

Attachments

  • 76CD0DB4-9105-4F68-9645-58D288FD46FE.jpeg
    76CD0DB4-9105-4F68-9645-58D288FD46FE.jpeg
    235.2 KB · Views: 325
  • 49CDEAB7-3B3F-4504-8CE3-118FBB9D189A.jpeg
    49CDEAB7-3B3F-4504-8CE3-118FBB9D189A.jpeg
    230.5 KB · Views: 342
Last edited:
Don't like the adverts?  Click here to remove them
Progress (or should that be "Deeper into the hole" ??).

The lower rear wheel arch has disappeared:

DSCN9720.jpg


Cut line marked with a Sharpie.

DSCN9722.jpg


Outer skin removed to reveal . . . Another layer.

DSCN9727.jpg


I didn't disturb the 'A' pillar, I can see why these trucks weigh 3 tons !

The angle grinder wouldn't reach so out came the Sabre Saw - and off came the second layer.

DSCN9730.jpg


To reveal . . What's left of the lower 'B' pillar.

DSCN9733.jpg


And here we have the Inner Sill.

DSCN9735.jpg


I'm going to try and work around the 'A' Pillar - there were four layers here and its very substantial. This is going to take some fiddling.

DSCN9742.jpg


The remains of the 'B' Pillar came out without too much trouble (metal fatigue is a useful removal tool !).

DSCN9743.jpg


The next challenge is to cut the old sill away from the back of the heavy channel that links the body to the chassis - and to do it neatly.

DSCN9739.jpg


I've got to establish the cut line for the inner sill, and then cut the new panel to match it.

Then seam-weld the old & new together without setting the wiring that runs along the edge of the floor alight.

At present, the clean grey area that is sloping up at 30 degrees or so (where the spot welds are) is favourite - but I have to check what's in behind it.

DSCN9746.jpg


I can't say that I'm enjoying this much but it has to be done. Its not a "daily driver" and if I have to move a horse in a hurry I have the use of a neighbour's 'Trojan' pick-up so I'm not rushing and cutting corners (just rust). Its a learning curve.

Chadr - the 'previous 90' is still here - on SORN - waiting for floor, sill & body repairs. Buying the '100' was supposed to give me time to fix the '90', but the '100' has needed constant work which is why both are now indisposed.

"The best laid plans of mice and men go aft awry".

More to come.

Bob.
 
Sill ??? What Sill ???

Well, a lot of the old R/H sill is off. I clamped a length of 1/2" square bar to the inner angle and used it as a guide for the angle grinder slitting disk. I had to be careful to only cut through the inner sill layer - I need the underlying floor to weld to.

The rear body mount.


DSCN9750.jpg


The intermediate body mount (yes, I managed to lose some of the flange :doh: .

DSCN9751.jpg


The front-end is going to be a problem. I don't really want to cut any more of the reinforcing layers out, but I might have to in order to get access with the welder.

DSCN9755.jpg


Most of the front part of the inner sill has now gone, but it was dark at 20:00hrs so I'll take pictures tomorrow.

The bits of inner sill are mounting up :thumbup:.

DSCN9756.jpg


By the time I'd finished today I looked as if I'd come out of a coal mine - despite having a fire-retardant boiler suit, a 'Snood' covering my face, goggles and a woolly hat.

Its amazing how difficult it is to get metal cutters into awkward places (angle grinder, sabre saw, dremel, sharp cold chisel, metal shears . . .).

More tomorrow.

Bob.
 
This may sound a daft question but i thougt bodywork on a vehicle with a seperate chasis didnt necessary affect mot .ie when i had a jensen interceptor a hole in sills didnt matter
 
My 90 failed last year due to a hole in the driver's side rear sill - it was close to the seatbelt mounting point. There are other considerations aswell, I would have thought.
 
This may sound a daft question but i thought bodywork on a vehicle with a separate chassis didn't necessary affect mot i.e. when I had a Jensen interceptor a hole in sills didn't matter

Bad rot within 30cm of a body mount is considered an MOT failure. At my 2019 MOT the tester said "I'm not going to poke that - but you won't get away with it next year!".

Neighbours with Troopers and Land Rovers have the same issue.

Bob.
 
  • Like
Reactions: uHu
No progress today as No.1 daughter's RAV4 went for a new exhaust and she was told that the diesel tank was leaking :doh:.

So "Dad's Garage" gets the job (and the bill).

I'm hoping its just one of the pipes, but with my luck it will need a new tank as well as all the fittings (and straps).

So today was spent clearing the garage to make room for it.

I now have the '100' being worked on outside (dry days) and the RAV inside (wet days).

I have lost my Focus estate while I have the RAV (having just replaced brake pipes and got it a fresh MOT).

Then, this evening, No.2 daughter phoned to say that the clutch had gone in their Chevvy Cruze and could they borrow a car :angry-screaming:.

Tomorrow they get to use the Ford Grand C-MAX - leaving wifie & I without 4-wheel transport (but with four off-the-road cars).

At what age do children stop relying on their parents (mine are 40 & 39 this year) ??

Meanwhile, back at the ranch . . My R/H inner sill is almost completely removed, I'm hoping to finish the chopping out tomorrow - then its time to get creative.

DSCN9758.jpg


Bob.
 
Finally . . The RH inner sill has gone. I had to cut out the remains of the Rocker Panel in order to get in behind the lower corner of the 'A' pillar but with an angle grinder and a Dremel (with flexi-drive) and a collection of carbide burrs and cutting disks I got enough out.

Tomorrow I'll start trimming the new panel for a trial fit.

Then the edge of the carpets have to be lifted and the wiring raised and supported clear of the gully where I'll be welding.

I'll practice welding on some of the old bits I cut off. My 'SIP Migmate 150' has limited options for amperage and I don't want any holes.

DSCN9760.jpg


DSCN9763.jpg


DSCN9764.jpg


DSCN9767.jpg


Hopefully the N/S will be quicker as I'll know what I'm doing :icon-wink: .

Bob.
 
Hi Bob, can you tell me where you purchased the inner sills? mine are looking slightly worse for ware, how did the project end up?
Thanks Paul
 
Paul,

They're Toyota parts - ordered through Simon Holton at Steven Eagell Toyota.


Simon Holton
Parts Manager
Steven Eagell Toyota Milton Keynes
Merton Drive
Milton Keynes
Buckinghamshire
MK6 4AG
T: 01908248888
E: [email protected]
steveneagelltoyota.co.uk

!00 - Body Panels.png


7411BMEMBER, FLOOR SIDE, INNER RH
57401-600801€ 219.57
57412BMEMBER, FLOOR SIDE, INNER LH
57402-600901€ 219.57

I had to cut away the outer body skin and the inner Rocker Panel and weld repair pieces to the lower edge.

The off-side is done - awaiting some filler and paint while I work on the near-side. I'm having to fabricate a new front body mount before welding-in the inner sill. Then the rocker panel and outer skin have to be repaired and welded on.

I HATE bodywork so it isn't progressing very fast :doh:.

I have a lot of mechanical servicing to do when the body is back together so it won't be on the road soon.

I'm working on the brakes on a Mazda6 at the moment (Son-in-law's brother's car).

I'm beginning to hate cars too - particularly rusty Toyotas.

Bob.
 
Hi Bob, many thanks for the info, I could swear I read somewhere the panels are discontinued! I never thought to phone Toyota Anyway I had found last night the left hand panel form Amayama at £89 plus delivery £35 by I think a company call EMS from direct from UAE, after much searching found the left hand panel but this was direct from Japan at £122 plus (are you sitting down?) delivery UPS £368!!! Had an email this afternoon from Amayama saying they had made a mistake and the £35 carriage was now £65!! Phoned Toyota and they are ordered and arriving 10th September at £187 each fortunately I have friend who is an excellent fabricator he did a lot of work on my G Wagon 460, he's already taken a look at the sills and is not looking forward to it!! I dare not show him this thread I take it your in no rush?
 
I take it your in no rush?
I'm missing the car and have been borrowing tow vehicles from neighbours when fetching tons of sand/gravel/top soil etc.

But this job is turning into a 'Forth Bridge' epic. The more I see the worse it gets. The rear wheel arches are both shot and I'm not looking forward to fabricating something to repair them. It could well end-up looking like a refugee from a Mad Max film ! That link in the '90' forum for repair panels doesn't cover the '100-Series' unfortunately.

However, In the current political climate I don't feel inclined to replace it with something newer so will continue to work on it and hopefully get a few more years out of it.

Its an unending chore though (and then I've got the other one to do as well :doh: ).

Then there's the neglected house and garden maintenance . . . .

Bob.
 
Back
Top