Don't like the adverts?  Click here to remove them

Expedition 80 Series Build

Oops. Sorry! :oops: I found this to be a much more helpful community, so haven't visited TLOC in quite some while.

The carpet that I used is incredibly tough, and I bought it from http://www.automobiletrim.com/ where they have a wide selection.

I'll measure the drawers this weekend, as the 120 is currently under cover waiting to be sold :cry: But the good news is that I'm starting all over again on my 80 :dance:
 
If you're starting again it might be worth considering the cable tray / box section model (hat tip to Chris).
It's an easy build, cheap, lighter than all wood and pretty robust.

Ben implemented the idea in a flash here and I fumbled my through a similar set up using wooden drawers here.

If it's a full over-landing system you're building as opposed to just drawers then I don't know how much this idea would help you (as most would use a full metal multi-tier frame for that like Gary's here)... but thought I'd mention it just in case it helps.

There's loads more systems about on here if you do a search of course. I'm sure you've seen all these but I thought I'd chip in just in case :thumbup:

As for the carpet.... my plan was to use auto carpet too because it's thin and easy to fold... but in the end I just bought some thin hard wearing foam backed cheap stuff from the local carpet shop. Got a whole roll for a few quid and worked a treat with a bit of spray glue. Just watch the corner folds :lol:
 
So, I've got the carpet ordered, thanks Andrew! I've also ordered some spindles form www.comp4x4.com. I should have them in the next week or so.

I'm now looking for some quality rear seat covers. Anyone have some recommendations?

David
 
David Killough said:
https://docs.google.com/viewer?a=v&pid= ... y&hl=en_US[/url]

If I can remember where I bought I bought the carpet from (somewhere north of Wembly) I'll post that here.

Ah! So you're the guy on the TLOCK forum who I kept waiting for a response from! ;) I saw the file you posted there and though yours is for a 120, I definitely used some of your ideas. Great plans mate!

Is it just me or is this forum far more active than the TLOCK one?

Wish I they had a B&Q Extra out here in Portsmouth. Looks like the nearest supercenter is in Southampton. May have to make a trip! If you do know where to find good carpeting, please let me know!

Cheers!

David[/quote:26lli7ix]
.
Errrr,

Just a little,

Well, yes, infinitely more busier.

Gra
 
For the carpeting, I got some very thin foam rubber and then over-layed some 'boom-box' (for want of a better term) thin carpet I got from fleabay and it's worked really well - easy to work with and inexpensive enough to be able to strip it and chuck it if needs be vs try to clean it.

Quality seat covers?? How much do you want to spend :lol:

Try Melville & Moon or Jackalberry or my favourite, EsacapeGear (which you can get from APB Trading).

Cheers
 
Don't like the adverts?  Click here to remove them
If i were making these again, i would put a layer of thin rubber on the top as the carpet can be a bit weak when sliding stuff in and out. Helps keep stuff from moving around too.
 
That's what I have in my new drawers Jon and going on top. It's very good and stays put.

Chris
 
Well, I've finished the drawers and will post photos soon. I've been quite busy working on the Landcruiser and generally running around the UK.

Went up to see Julian at Overland Cruisers and got taken to school by him and Dave. Those guys are absolute legends and I would recommend any Cruiser owner to go see them. If you have the time, stay at the Moor Court B&B and work alongside them during the day. Besides getting to know some great guys, you'll come in with a general knowledge and what you think is a healthy vehicle, and will leave with LOADS of knowledge and the certainty that you're driving a healthy vehicle.

Julian made that 4.2 come alive with his diesel pump tweeks! It almost feels like a race car now. Well, as much as a landcruiser can... lol! We also did a thorough check over of the vehicle, I extended the diff, t-case and tranny breathers to the airbox, tightened up all the wheel bearings, got the a/c topped up with freon and had a look at the odometer which wasn't working. Nearly all my bumpstops were gone, so I picked up some new ones and had a heckuva time getting those bolts out that hold them in. I ended up shearing one of them off and spent hours getting it out. If I had more time and money I would have invested in an intercooler... Perhaps another day...

Made a rookie error when I replaced my rear pinion seal and greased the u-joints and slip joints on the drive shafts. I greased the slip joints a little too much as I was looking for a wee bit of grease to come out like on a u-joint... Well, I blew the brand new oil seal that I had put in as well as the existing front oil seal... Bought new ones from Simon at Toyota and put them in.

Doesn't look like I'm going to have time for the rear bumper on this visit. Will build it when in Rundu, Namibia.
 
Ok, so photos are ready.

Here's the drawer structure & wings getting covered. The lip was routered a bit to fit the aluminum channel stock.
[attachment=9:27l6xraf]Drawer Covering.jpg[/attachment:27l6xraf]

Here's a photo of the drawers installed before I put in the inverter and t-handles.
[attachment=8:27l6xraf]Drawer Install 1.jpg[/attachment:27l6xraf]

Passenger side view of drawers.
[attachment=7:27l6xraf]Final Drawers1.jpg[/attachment:27l6xraf]

Driver side view of drawers.
[attachment=6:27l6xraf]Final Drawers2.jpg[/attachment:27l6xraf]

Drawer interior w/ carpeting.
[attachment=5:27l6xraf]Drawers Carpeted.jpg[/attachment:27l6xraf]

Here's the inverter wing on the passenger side. I divided the length of each wing in two so I could access the front of the wing without having to move the rear seats forward or having to move any kit that is on top of them.
[attachment=3:27l6xraf]Inverter Wing.jpg[/attachment:27l6xraf]

Here's the 3rd battery wing on the driver side. I routered out two slots on the bottom front of the drawer base to run the cables from the passenger side to the battery on the driver side.
[attachment=2:27l6xraf]3rd Battery Wing.jpg[/attachment:27l6xraf]

Here's a close up of the inverter in place and the battery. I'll strap the battery down later.
[attachment=1:27l6xraf]Inverter.jpg[/attachment:27l6xraf]

[attachment=0:27l6xraf]3rd Battery.jpg[/attachment:27l6xraf]

The carpet company Andrew recommended is top notch! It works great and looks good. Being that my wife is a dress maker and good with fabric I had her work with the carpeting to make it look the best. She made sure that the "grain" of the carpet went the right way and such... I used diamond plate "C" channel to act as a guard/bash plate on the front of the drawers. This is a high wear point so I figured it would save the carpeting and also make it look good. The T-handles are awesome! I was actually given them by a company out of california who only sells bulk, but was willing to hook me up with some "samples." :D
 

Attachments

  • Drawer Covering.jpg
    Drawer Covering.jpg
    250.1 KB · Views: 351
  • Drawer Install 1.jpg
    Drawer Install 1.jpg
    246.3 KB · Views: 355
  • Final Drawers1.jpg
    Final Drawers1.jpg
    250 KB · Views: 354
  • Final Drawers2.jpg
    Final Drawers2.jpg
    250.7 KB · Views: 344
  • Drawers Carpeted.jpg
    Drawers Carpeted.jpg
    250.5 KB · Views: 351
  • Inverter Wing.jpg
    Inverter Wing.jpg
    173.6 KB · Views: 357
  • Inverter Wing.jpg
    Inverter Wing.jpg
    173.6 KB · Views: 408
  • 3rd Battery Wing.jpg
    3rd Battery Wing.jpg
    188.4 KB · Views: 346
  • Inverter.jpg
    Inverter.jpg
    228.5 KB · Views: 345
  • 3rd Battery.jpg
    3rd Battery.jpg
    103.5 KB · Views: 381
Here's some photos of work done at Overland Cruisers. I adjusted the height of the diff, gearbox and t-case breathers to go up to the airbox which is attached to a snorkel. So unless my cruiser drowns, I should be okay! =)

Rear axle and front axle are the same. Julian hooked me up with these sweet quick release attachments that are used on air brake systems for lorries. There's a hose that is connected to both gearbox and t-case so we cut the hose and plumbed some of the same hose into it and fastened with jubilee clips.
[attachment=3:21yc9vc0]Breather 1.jpg[/attachment:21yc9vc0]

Here's the joining of the front and rear axle and the gearbox/t-case to them as well. It all ends up on one pipe and gets plumbed into the airbox.
[attachment=2:21yc9vc0]Breather 2.jpg[/attachment:21yc9vc0]

Airbox plumbing
[attachment=1:21yc9vc0]Breather 3.jpg[/attachment:21yc9vc0]

Here's a kind of crap photo at night, but it shows just how bright these LED's are. I freaking love em!
[attachment=0:21yc9vc0]LED's.jpg[/attachment:21yc9vc0]
 

Attachments

  • Breather 1.jpg
    Breather 1.jpg
    140.1 KB · Views: 340
  • Breather 2.jpg
    Breather 2.jpg
    251.8 KB · Views: 365
  • Breather 3.jpg
    Breather 3.jpg
    188 KB · Views: 348
  • LED\'s.jpg
    LED\'s.jpg
    162.7 KB · Views: 432
:thumbup: That is a very neat job, how long did it take to do?
 
I have to bow to other knowledge, but I'm seriously worried about plumbing the breathers into the air box. Does the engine not generate sufficient suction in there to start pulling oil up the breathers? :shock: I'm sure I've read of something similar somewhere? :think:

More than happy to be proven wrong of course :cool: :shifty:
 
Cossack, I worked on it on and off for 5 weeks. If I would have had the t-handles, carpeting and the anchor bolts I needed, it wouldn't have taken more than a couple days. However, I had a lot of other things going on that also were vying for my attention.

Gary, I haven't noticed any oil being pulled out of it yet. There's a little oil residue that resembles condensation from being in an oily environment, but certainly no actual vacuum. Julian at Overland Cruisers recommends this, and he is WAY more knowledgeable than I. Either way though, when I'm in Africa, I'll let everyone know how it works!

David
 
You see, this is why I bought drawers. I could never have hoped to get such a professional look as that. Pallets nailed together covered in sacking just didn't float my boat. For one who makes stuff, I can very much understand the effort that went into those. Working with wood is nice, but I have learned that you have tome so much more accurate. Make a mistake in metal and you just weld it up and start again :lol: It's a licence to bodge. Measure once cut and cut again til it's right.

Top marks. Very nice indeed.

Chris
 
Great workmanship, David :thumbup:

Gary Stockton said:
I'm seriously worried about plumbing the breathers into the air box. Does the engine not generate sufficient suction in there to start pulling oil up the breathers? :shock:
x 2
Lorin had problems with this set-up - the suction caused the oil seals in the t-case to fail IIRC and he had other oil leaks related to the breathers.

David Killough said:
There's a little oil residue that resembles condensation from being in an oily environment, but certainly no actual vacuum. Julian at Overland Cruisers recommends this, and he is WAY more knowledgeable than I.
Put your hand over the snorkel intake when the engine is running and feel the suction - I assure you there is a vacuum (pressure < atmospheric). Was the oily residue there before?
Yes, Julian knows his stuff and presumably he does what works as he's prepped plenty of trucks. But I do think there is cause to double-check this arrangement, if we understand it correctly. My 2c!

Cheers,
 
Whether a good thing or a bad thing, I'd say it was an unnecessary thing. Mr T didn't see fit to to go mad with them, but I agree that for serious work abroad, a little enhancement isn't a bad thing, but there's no real need to over engineer these in my view. They're fine run into a multi connector with a small filter on the end. I wouldn't want negative pressure on the end of the pipe, but this isn't likely to be that much. Even so ....


Chris
 
Covered this a couple of times before, but here goes again......

In Lorin's case the suspension was lowered by removing spacers, but we didn't clean out the props - (having never had to lower suspension before it never occurred to him or us).

Lowering caused the props to be compressed but with old grease in there this can lead to hydraulicing issues putting extra pressure on the pinion seals and T/Case output seals leading to the leaks which is the most likely cause of the problems.

The key point to learn from this is if you lower your suspension, take the props off and clean them out before refitting with the new suspension setup and re-greasing.

Actually when loading up for a trip it would be worth getting the props off and cleaning and lightly regreasing the sliding joint because as the suspension settles you may have the same problem, particularly if you have under rated springs.

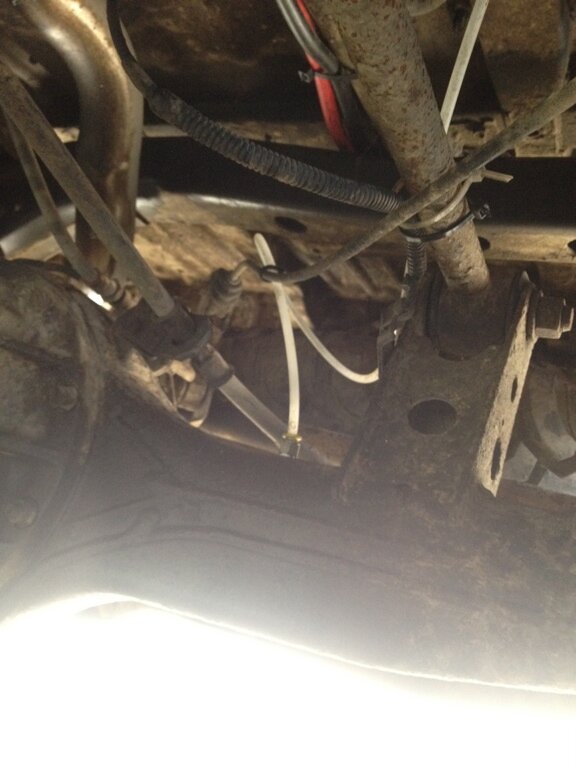
Back to the breathers, the standard breathers are designed with a one way valve in the cap so as the axle heats up the air expands and is expelled, but when the air cools down it isn't sucked back in so it leads to negative pressure in the axles. We have had axles on vehicles that have been sitting for a few weeks where there is still quite a loud sucking noise when you pull off the breather pipes.

True, there is some negative pressure in the air box, but nothing near to what you get normally in the axles so it isn't worth worrying about.

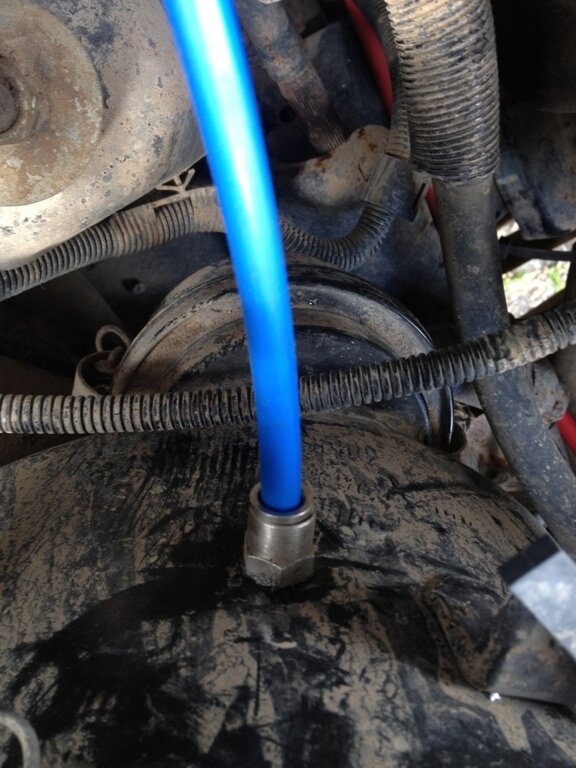
If you do a short pipe run from the front axle you can end up with some diff oil blowing up into the air box - Toyota recognised this problem so on post Aug '92 80s they started fitting a small plenum chamber on the chassis above the axle to catch that oil (which had been coming out off the breathers and causing blockages of the factory breathers). In some cases we will either extend the breather from the plenum chamber or we have a longer run up from the axle both of which reduces the issue of oil in the air box.

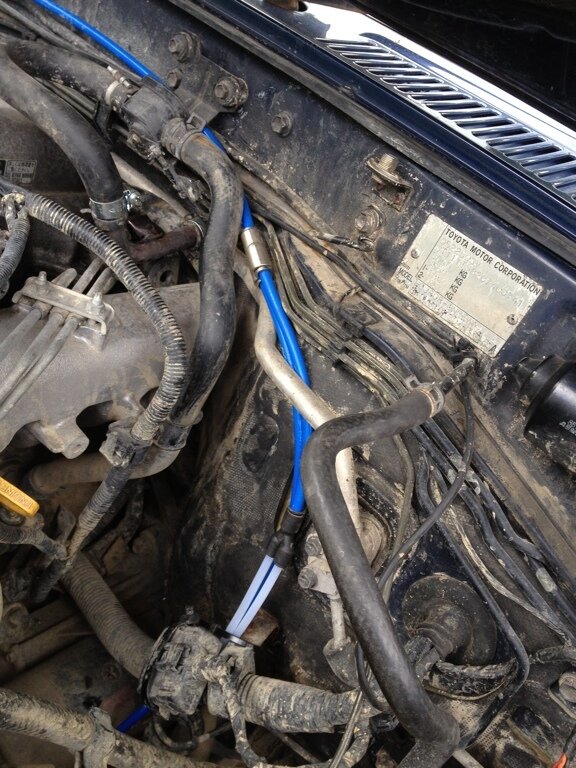
One final thing with plumbing into the air box, try to avoid putting the inlet directly into the path of the air flow where the air enters the air box - at that point the air flow is quite high and can lead to some venturi effect that may also increase the incidence of oil in the air box.

FYI, the main reason I went down the route of plumbing into the airbox is that it is a much neater solution, you don't have bundles of rubber pipes all over the place and don't have to mess around getting them up in to the snorkel head where they may be subjected to the 'ram effect' leading to excessive positive pressure in the axles and gearboxes :)

The only times we have problems with it now are with trucks with diff problems where the oil is getting cooked and we get vapour up in the air box.
 
Thanks for the explanation, Julian :thumbup: I wasn't aware of the diagnosis of Lorin's problems.

I am still not convinced about the merits of plumbing into the airbox versus the security it offers in wading but that's just me :mrgreen: For my money exposing the diff/gearbox/t-case oils to reduced pressures everytime you run the truck versus the once in a lifetime prospect of submerging the truck deeply enough and long enough to flood raised breathers in the engine bay doesn't seem a good trade-off. But I accept that you do this professionally and have worked on way more 80s than I will ever touch, so a neat solution that obviously works in practice is fair enough.

[Remember lower pressures reduce the vaporisation (boiling) point of oils, so this will generate more oil vapour than keeping the oils at atmospheric pressure.] :ugeek:

Enough of an OT from me for now :oops: Just trying to help .

Cheers,
 
Back
Top