Don't like the adverts?  Click here to remove them

FZJ80R from Devon

Hi rich.
How did you get on with the locker after giving it a good once over. I'm curious if it works with all the grease.
You did well to open it up with no issues.musymt have been a good second hand one or lucky. Most of the time the bolts holding them together just snap off. When I've been inside them I've only put a minimal amount of grease back in. I opened up one of the new ones I sell to see what they look like inside and they only have a small amount of grease inside them.

I'm sure it will last a good few years now.

As for the dog bones. @stan was doing them. Or you can add some weld to the inside edge of them. 3mm I think I've read.
 
@karl webster I finally got the front locker fitted last night, it works great. One of the bolts holding it together sheared but unlike the rear locker the bolts holding the actuator onto the axle go right through the casing and clamp it all together. That is why I had bolts holding it together when I had RTV'd it back together. I will have to get a new one for the rear and when I do I will definitely pack it with grease, the toyota amount of grease seems miserly and it had gone old and hard almost Dusty on the front locker I took off.

I think the hylomar type stuff that the diff is fixed onto the axle with is not sufficient to insulate the aluminium from the steel so I have used a fairly heavy amount of RTV there.

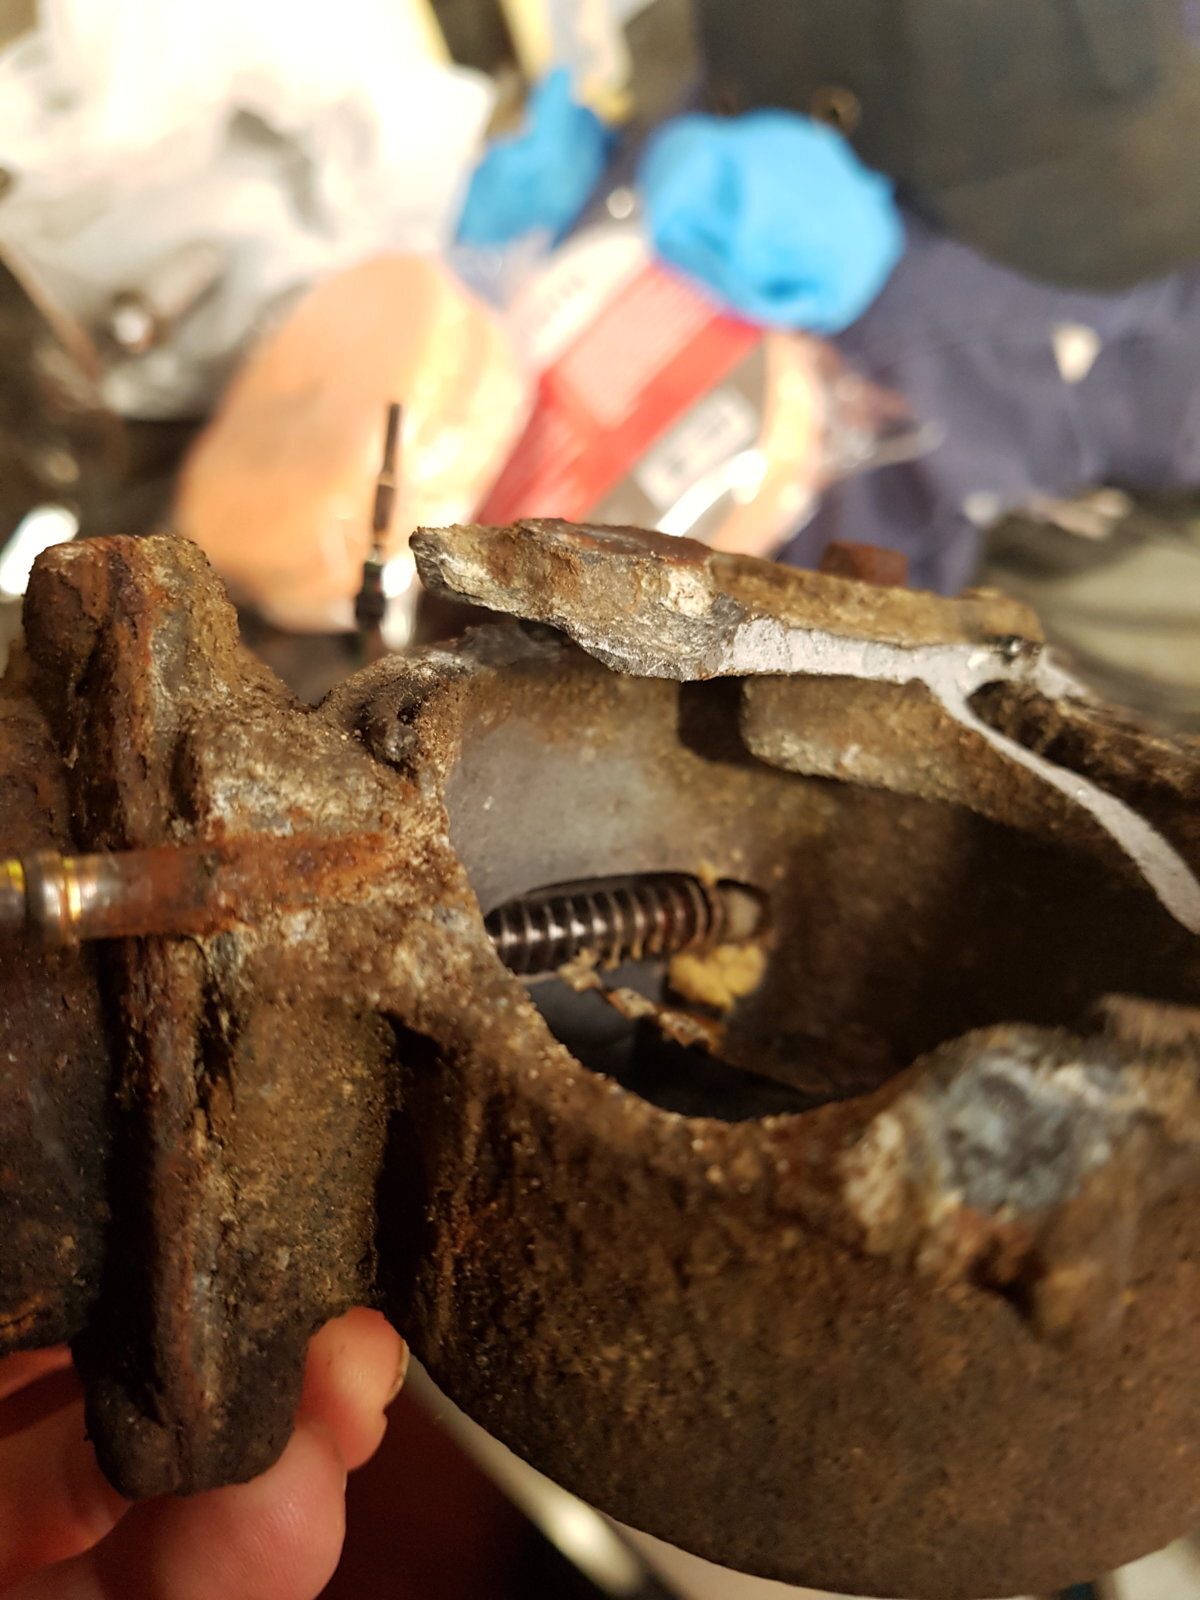
The locker I took off the front was completely seized to the axle and had to be broken into pieces to be removed. The motor in it was working but the output shaft of it was seized into the casing, I think due to the area above it having corroded away and left a hole!

I am going to try and make a 3mm shim to fit onto the dog bones tonight, if not I will try welding them.
 
I have booked a 4x4 tour on Salisbury Plain for February, with me in the 80 and my dad in his LR Ninety. Also the MOT runs out on the 10th Jan for the Land Cruiser so I have a couple of jobs to finish off for then.

So I need to keep pushing on with getting the Cruiser up together.

Mot stuff:
Handbrake needs finishing/sorting.
Rear of the sills needs welding both sides.
Salisbury Plain stuff:
Diff locks need repairing/making useable
Tyres need changing.
Need to fit some kind of front recovery point as there are none on the front, not even the stocko ones.

When I changed the front diff lock I pulled it out and found the old one covered in Moly grease which I thought was a bit unusual, well, actually the whole front axle is full of a gloopy mess of oil and Moly grease mixed together. Glad I bought that hub nut socket the other day. At the moment I have flushed it out as much as I can and refilled with 75/80. I will change it every day this week but I imagine I have some kind of seal gone in one or both of the hubs. Not sure how to proceed with this yet and there is no oil running from the swivels, I don't think Moly grease will hurt the diff not like running dry would so I will leave this job for a bit.

I started loosening the side steps to get them off but they are not very easy to get too due to the body mounts and Catalytic converters hopefully I can get them off without chopping them about.

Did some work on the rear diff lock, found I could take the plate off where the sensor is and help it engage with the lever bar, it was stiff on the actuator side not the diff side.
Removed 1 of the screws on the cover and broke the other 2, fairly dry inside but corroded right through at the top. Removed the actuator and found it was broken almost in half, corrosion had forced it to twist and was stopping it move. I just removed all the corroded alu, cleaned up the face and applied heavy layer of RTV, and refitted with the 2 remaining bolts.
Rammed the actuator gearbox full of grease and screwed in my 1 unbroken cover screw. It will hopefully work for a little while!

20171219_013517.jpg


Now have a triple locked cruiser! I will need to change the rear actuator at some point but I don't really have the budget for it at the moment, I would rather spend the money on getting the front axle sorted. Any ideas on how I can do a partial high quality repair on the front axle would be greatly appreciated.
 
Sounds like you have leaky inner axle oil seals allowing the moly grease from the swivel housings into the axle casing, and probably vice versa. Make sure the axle breather is clear as a blocked one exacerbates the problem. You can get seal kits from Milners, Roughtrax etc consisting of gaskets and wiper seals but the general consensus is it's best to use OEM inner axle seals. Not a quick job but not difficult either. The jury's out on wether moly grease in the diff housing is bad. Thinning of the grease in the swivel housing by the diff oil is probably more detrimental to the CV's but, personally I don't think it's that big an issue. Not ideal and not intended by Toyota obviously but I don't think it's a case of any urgency. You can actually get moly additives for diffs/gearboxes so go figure.seals


Edit
When I did mine I refilled with a budget diff oil of the correct spec, did around 100 miles then drained/refilled again doing this 2-3 times until the oil came out clean then refilled with an oil I was happy to leave in there until the next service interval.
 
Last edited:
Who are you doing a trip on Salisbury plain with?

It is illegal for them to charge for that.


Odd bylaw on the plains. I even saw a big sign last time I was there.

You will not need lockers down there either as it's easy going.


Enjoy
 
Thanks Towpack I will keep changing the front axle oil until it starts coming clean, I would expect that whichever hub is the issue will start weeping the oil out, or I may sample the grease through the inspection bung. I will check the breather as it is bound to be blocked with Moly grease.

Stumog, it is called 4x4 adventure tours, I'm not sure about the local bylaws of Salisbury Plain which is why I wanted to book a day with a guide! I can't really see how you could have a guide without them charging, so not sure about that?

Here is their web site 4x4adventuretours.co.uk

I will try and do the trip without using my lockers but I think they are nice to have just in case!

So I have a couple of pics of the old front actuator, it seems the corroding of the breather pipe has caused a crack and it has spread from there.


20171219_150603.jpg
20171219_150612.jpg
20171219_150627.jpg
20171219_150755.jpg


The seized output shaft with coating of Moly grease:

20171219_150812.jpg
20171219_150819.jpg
20171219_150627.jpg
 
Don't like the adverts?  Click here to remove them
Fixed the handbrake last night, couldn' make a shim to fit in there as the gap where it fits is too narrow really.

Welding the Shoe struts was the way, 1.8mm of extra material in my case. The shoe struts are made of quite soft metal, the welded metal is much harder. The handbrake now works excellently so that is another job off the list.

Struggled with removing the side steps, nearly got the N/s one off apart from one stud which is causing problems. Bad news is the N/S is the easy side without the exhaust in the way!
 
Got the side steps off with quite a bit of hammering 11mm socket onto the corroded bolt heads. Luckily the threads of the bolts were not corroded so when loosened they unscrewed by finger. The ones hidden behind the exhaust were much less rusty, perhaps because of the heat of the exhaust or it was keeping the mud and salt off.

Some rust pics...

20171220_234157.jpg
20171220_234204.jpg


The N/S sill isnt penetrated but it is pretty rusty, I will cut this part out and replace.

20171220_234229.jpg
20171220_234238.jpg
20171220_234257.jpg


The O/S is much worse, outer sill gone and inner holed as well. May replace the inner sill but may just patch it over, I will see how big a piece of outer needs cutting away!

After fiddling around with rusty old metal I fitted these stainless ring nuts to the roof rack to cheer myself up a bit!

20171220_234320.jpg
20171220_234334.jpg
 
That’s quite abut of work Richard but with dedication & love I’m sure your gonna bring out the best results.
 
Thanks Dervis, I don't have much patience with bodywork and even less with upsidedown welding! So I will try and go for acceptable results...

20171221_233740.jpg
20171221_233821.jpg
20171221_233727.jpg

20171221_233832.jpg


Plate #1, this plate replaces the corroded part of the main sill section. The rear part over laps it but it will have to be done in 2 sections as the rear part is a compound curve not just a gutter shape.

20171222_005043.jpg


This plate covers the hole in the wheel arch and provides the strength needed to form the curved piece.

20171222_005054.jpg

20171222_005110.jpg

20171222_005119.jpg


The 3rd plate, I am very happy with the shape of the plate, to make it you have to start one corner with the plate slightly twisted and weld an inch at a time shaping with the hammer as the metal gets hotter. It would be much easier to buy this plate though as it isn't that big so perhaps not very expensive.


That's one side done took about 3.5 hours, ground it back and panel sealed it and put a quick bit of primer on it, when it dries I will get some rust converter in the sill and paint it a bit better. Might even do it grey!

20171222_011916.jpg
20171222_011933.jpg


I like the shape of the truck with no side steps on but I will refit them as they are quite practical.

It shows how exposed the catalytic converters are on the petrol though!
 
Thanks Towpack, by the way you were right about the front axle breather being blocked, the metal cap valve on the plastic box part of the breather was corroded and holding the valve shut! Lucky you said or I would have re sealed it and probably had the same problem again.
 
Went down the MOT station before work as I wanted to check the Cruiser will pass the emissions test when I put it in. 8th Jan is the big day!

20171222_143454.jpg


Put it on the machine and she is running clean! Probably the cleanest vehicle I have ever had, which with a 4.5L engine I was surprised at. At least I know now that the 16mpg it gets is not due to it being out of tune, but my driving style and that it is a very heavy brick!
 
Obviously a very healthy engine you have thee Richard. The clean emissions are surprising, not just because of the size of the lump, more so because it's a 25 year old engine design! I'll bet there are many far newer designs around that are much dirtier.
 
Nice job mate, good to see it running clean too. For the amount of fuel they can burn through its always nice to know it's running properly.
 
It's a good base to work from for the LPG conversion, I will try advancing the ignition timing like you suggested Gary but I will wait till after the MOT. It seems to get a fairly regular 16mpg on shell fuel but I have had tanks that have only given 13 or 14 which were from texaco and tescos fuel. The Shell fuel makes a big difference, although the Sainsbury's fuel is good too. I want to try a tank of the Sainsbury's super unleaded as that used to goes well in my MR2 but the petrol station is a bit out of my way for regular use. Most of my driving is high speed motorway though, very rarely in town traffic.
 
They do seem to like decent fuel.
I've had tanks return single figure averages, all depends what I'm doing and how I'm driving.
 
Got a double din radio from darling wife for christmas,

https://www.ebay.co.uk/itm/2GB-RAM-...e=STRK:MEBIDX:IT&_trksid=p2055119.m1438.l2649

Got it connected to the car with this harness which saved a lot of wiring and makes things better and neater.

https://www.ebay.co.uk/itm/Toyota-L...e=STRK:MEBIDX:IT&_trksid=p2057872.m2749.l2649

Had to trim the fascia down slightly to get a good fit, this is easy though as there is a return you can cut off, only had to cut off the top, bottom and right hand side bit.

20171226_124649.jpg
20171226_124619.jpg
20171226_124557.jpg


Used a stanley knife heated with small blowlamp to cut it easily.

20171226_130856.jpg


20171226_130848.jpg


Looks really good in the dashboard, doesnt detract that much from the 'Boeing 747 cockpit' of the LC80!

It is an Android head unit, so it has many functions as well as just being a radio (which it does well with very good reception and a clear screen for the tuning).

It is like having a tablet or smartphone in the dash of the truck, it has gps with a gps ariel which i fitted in the corner of the windscreen, it has Wi Fi, it has a flying lead with a simcard slot so you can put a sim card in and use the data or make calls if wanted. My brother in law pointed out this would be handy in a non eu country as you could buy a local simcard to save on data and call costs.

I have just tethered it to my phone using the phone as a wi fi point, and the phone connects with bluetooth for hands free calls, and music etc. You can browse the internet and watch videos etc.

Next job is wire in the reverse camera.

20180101_172303.jpg


We went out earlier and tried some local lanes, learnt 2 lessons:

1. Reversing in a lane is undesirable

2. Reversing in a lane when it has got dark and is also now raining is very undesirable!

Emily had to sit in the boot with the tailgate open shining the torch in the end as I just couldnt see where i was going really. We had gone down a lane near Payhembrey which turns into a river, and it was running pretty high, so we had to go back.

IMG-20180101-WA0003.jpg
IMG-20180101-WA0004.jpg
IMG-20180101-WA0005.jpg
IMG-20180101-WA0006.jpg


The last pic is just before the lane t's with the river which is on the right and goes round to the left. You can see the footbridge in front of us.

20180101_172439.jpg
20180101_172747.jpg


The radio is handy for finding lanes!
 
I think these are great. mine was also a Christmas pressy from the missus a couple of years ago. went down the same cutting route as you did. after buying the Toyota radio loom from halfrauds I had to suss out and solder 20 odd wires together.. are these plug and play now?
 
Back
Top