Don't like the adverts?  Click here to remove them

my grey 80

Nothing new here really, just bringing this up to date with the swing outs.

As I have a 166l aux tank there's no need for fuel cans so I put a box on the 2nd arm for recovery gear instead, keeps it always accessible and not cluttering up the back of the truck.

IMAG2156.jpg


IMAG2151.jpg


The arms overlap. The tyre swing out has a spring loaded pin to hold it closed. The box arm overlaps and has an over centre clamp that pulls it down onto the tyre arm and then down onto a block of plastic on the bumper. There is an eyelet to hook a padlock through when required and that holds both closed.
IMAG2152.jpg


IMAG2153.jpg


IMAG2155.jpg


Using over centre clamps on both arms would have been a pain for access as would spring pins on both. Having the single one means access is ok and once the box arm is open access to the spring pin on the wheel arm is easy.

The pivots are pretty substantial things, OD is 76mm, shafts are 44mm, no fear of them breaking :)

IMAG1970.jpg
 
Last edited:
Fantastic work Jon :clap: Very high quality fabrication, I like the swing out tube to support the additional work surface and the tidy high lift mount. The overlapping arms is an interesting design, I don't recall seeing that before, nice idea.
 
Like it Jon:clap:

Especially the recovery gear box, it's really neat. My car always seems a mess in the back and because I want to keep the third row of seats, fitted stow boxes with any sort of capacity (in the car), are out of the question. Very professional work, good finish too. You should be proud! :dance:
 
Don't like the adverts?  Click here to remove them
as per discussion started on Chris's thread

interested in your charging setup and plugs

Quote Originally Posted by AndyCook View Post
John - is the DC-DC charger significantly better than using a simple VSR ?

what mains charger do you use and what battery is it connected to and does it interfere with the DC-DC charger

I used a 10amp CTEK charger on our trips this year, where we had mains hookup - and ran it in "supply" mode connected to the leisure battery, but invariably the voltage activated the VSR so the starter battery was also receiving the supply voltage from the CTEK
Yes DC-DC of some sort e.g. Sterling or CTEK is much better than simple VSR for this job imo. VSR works but significantly less capacity in batteries charged that way. I'm using an Elecsol battery I bought a few years ago mains charger is also Elecsol branded. Would probably go CTEK combo for DC-DC if starting again. 3 Anderson connectors on back bumper and a multiway outlet lead give me many options for charging config. Ask about the connectors in my grey 80 thread if you want more info, save messing up Chris' thread too much?
 
hi jon
just noticed the spindle mounts you have made for the rear wheel carriers. What bearings did you put in were they taper roller or just normal? did you also put a oil seal on top or make a cover up? I need to do something similar pretty soon and not sure what way to go.
I have some trailer Wb kits and was thinking of using them but would like to use parallel bearings as its easier to fabricate just not sure if they are meant to be used in that way.

Stu
 
I converted this 80 to 12v start and use a voltage sensing type set up to link and charge the 2nd under bonnet battery which serves as an aux battery of sorts for day to day usage e.g. HAM radio, PC, some power sockets, run fridge for day trips, nothing too demanding. I use a 500amp continuously rated DC electronics solenoid so I can link the batteries still if needed, for starting, winching etc. I have a water/dust proof Stirling DC-DC charger that I planned to use for better charging of that 2nd battery and use a dual mode setup which the Arduino gadget can handle but not got round to that yet mainly because it's a bit OTT given the 3rd battery I fit when needing more aux power.

I have a (fused) cable running from the starter battery to the boot. When I fit the 3rd battery, an Elecsol 110Ah in a steel box fixed to the drawers, I use the Stirling DC-DC charger connected to that power cable to charge the Elecsol. I only tend to have the fridge connected to the Elecsol and usually use the under bonnet 'aux' battery to run camp lights etc.

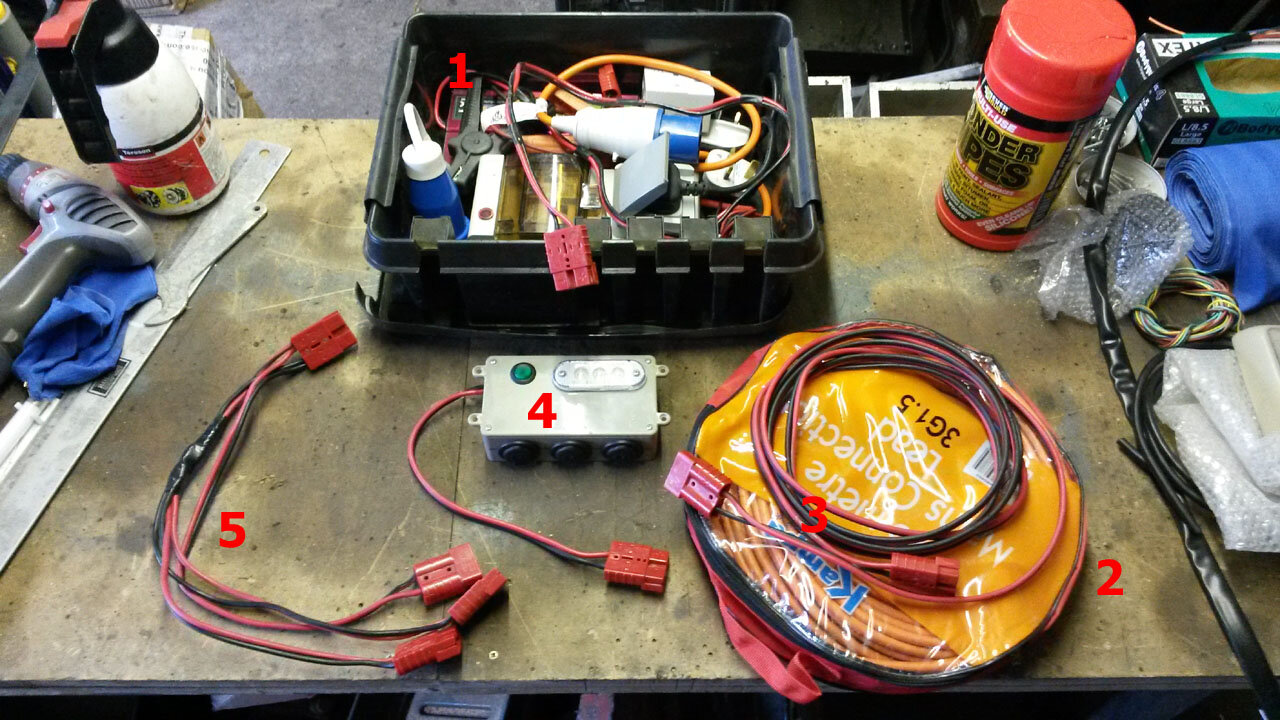
On the underside of the back bumper I have 3 red 50amp Anderson connectors., one per battery (fused of course). I use those to either power things or charge the batteries. Here's my hookup kit for that:

20131108_114303.jpg

No. 1 is an assortment of mains consumer unit, charger, various adapters, inside a weather proof box. Everything else here fits in this box for transit. The charger has an Anderson plug for connecting to the truck.

No. 2 is a 25M mains hookup lead.

No. 3 is an extension lead, so box and 80, or tent etc can be apart.

No. 4 is a maplin box with some power sockets and a light that go in the tent, makes charging phones, running fans etc easy as.

No. 5 just a multiway lead, so allows more than one thing connected at a time.

Lots of possible combinations for linking, charging and powering stuff. Quite often I will link the fridge battery and aux battery with no. 5 and also connect the charger and run 12v power into the tent with no. 4 on the end.

My voltage sensing setup won't automatically link the two front batteries if it sense charge on the 2nd battery, you have to tell it to do that, a conscious design decision so it doesn't interfere.

This was all aimed at family camping on European campsites where the 80 might not be run for 3 or 4 days.
 
Last edited:
very flexible and comprehesive - thanks for posting

andrew
 
hi jon
just noticed the spindle mounts you have made for the rear wheel carriers. What bearings did you put in were they taper roller or just normal? did you also put a oil seal on top or make a cover up? I need to do something similar pretty soon and not sure what way to go.
I have some trailer Wb kits and was thinking of using them but would like to use parallel bearings as its easier to fabricate just not sure if they are meant to be used in that way.
Got some taper bearings from local bearing place and an oil seal for the bottom. Turned a bit of aluminium for the top covers which are a snug fit with a dab of sealant to hold them on. I have a bit of paper I scribbled dimensions on for the spindle and hub if they're the kind of thing you can make yourself I can pass those numbers on.
 
i am tempted to use sealed taper bearings so i dont need to use extra oil seals to keep it a little smaller.
then some 50mm box do you think the box is strong enough? i am trying to keep it light weight really and may be offer as a kit if enough interest in it once its done.
stu
 
Depends how thick the wall is and how well it's triangulated. There is a LOT of leverage on that spindle so it might take more support than you think to get the flex out of it. Don't forget that even when the carrier is closed there is still a lot of leverage / twist from the mounted wheel weight which might not matter on nice roads but on corrugations anything wobbling about is more likely to cause fatigue fractures I should think.
 
Swapped the rear axle lower control arms for some I have sleeved with 5mm wall tube and put new bushes in.

20131201_122041.jpg


The simple press tools I turned to get the bushes in and out. Took 10 tons to shift some of them.

20131201_133859.jpg
 
Out of curiosity why have you decided to strengthen the rear lower control arms? I only bent one of mine after doing something really silly.
 
I think he's getting bored again Rob :-D

Sent from my GT-I9100 using Tapatalk
 
Out of curiosity why have you decided to strengthen the rear lower control arms? I only bent one of mine after doing something really silly.
I have bent a few and seen quite a few bent so it is simpler to sort them out now while rebushing anyway.

I think he's getting bored again Rob :-D
nah :shifty:
 
Looks like another future mod, thought days of bending suspension arms were behind me!
 
Back
Top