Citizen Brown
Member
- Joined
- Oct 18, 2013
- Messages
- 110
- Country Flag
Changing the old style of screens is quite easy. By old I mean non-bonded. The trick is not smashing the glass. Here is a rough guide to the steps:-
Taking out
1. Remove A-pillar plastic trims and cover dash with an old sheet (tape it so vents are covered)
2. Use an old blunt screwdriver or hard plastic spatula to "tuck" the inside lip of the rubber seal over the metal. Do this a little bit at a time and work in different areas around the perimeter until it is all out.
3. Tricky bit (so get someone to stand outside to get hold of glass) push out the screen and rubber surround. i have in past sat in passenger seats and pushed with my feet!
4. Screen and rubber is now out so put it somewhere safe to work on. ( wheelie bin with a blanket over will do) This is the stage that the breakages occur
5. Remove rubber seal. Ideally replace (what is the cost of this?) but if not scrape all the old sealant off and clean rubber with soap and water.
6. When all clear and dry re-fit the rubber to the screen. It usually is not needed but you may want to put a thin smear of sealant into the glass-groove
7. SEALANT - make sure you buy the old style black sticky stuff and NOT the one for bonded screens. It should be about £5-7 a tube.
8. Clean off all of the old sealant from window frame and then put a line of sealant all of the way around in the angle of the frame.
9. On the "frame" groove of the rubber seal you need to insert some cord.
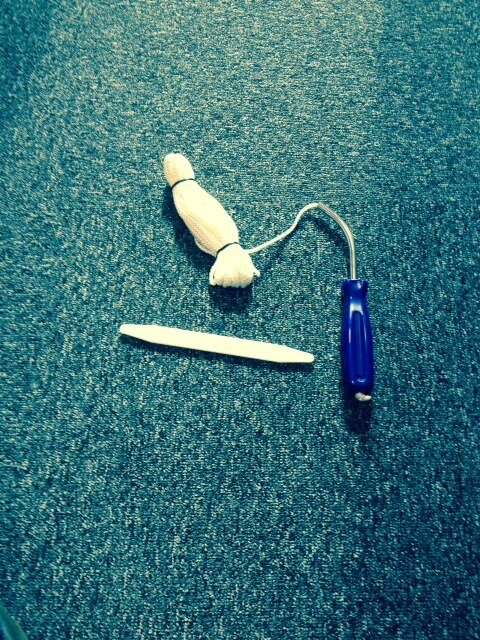
10. The photo is of a nifty tool for doing this. I had lost mine years ago and when I happened across this on the Flea had to buy it £15.00 including hard plastic spatula - see step 2
PUTTING BACK IN
11. put 4 "loops" in the cord half way down each straight on the screen.
12. Lift screen and rubber (preferably 2 people) and place into aperture and press in. Make sure loops dangle inside the car
13. Start at bottom loop and while glamorous assistant keeps pressure on the windscreen from outside pull the cord inwards. The rubber seal should follow and be back where it started off. Do about 20cm on first loop and then pull in 20cm or so on top loop, same for each side and then GENTLY work around each loop a few CMs at a time. Ensure that the GA follows you and keeps pressure on
14. Pressure should be firm but not so as to hurt your palm (never use a rubber mallet)
15. The corners will be the hardest to press and pull in, just take your time
16. Screen will be in and then you just need to clean remnants off the inside of the rubber.
Hope this sheds some light..
Taking out
1. Remove A-pillar plastic trims and cover dash with an old sheet (tape it so vents are covered)
2. Use an old blunt screwdriver or hard plastic spatula to "tuck" the inside lip of the rubber seal over the metal. Do this a little bit at a time and work in different areas around the perimeter until it is all out.
3. Tricky bit (so get someone to stand outside to get hold of glass) push out the screen and rubber surround. i have in past sat in passenger seats and pushed with my feet!
4. Screen and rubber is now out so put it somewhere safe to work on. ( wheelie bin with a blanket over will do) This is the stage that the breakages occur
5. Remove rubber seal. Ideally replace (what is the cost of this?) but if not scrape all the old sealant off and clean rubber with soap and water.
6. When all clear and dry re-fit the rubber to the screen. It usually is not needed but you may want to put a thin smear of sealant into the glass-groove
7. SEALANT - make sure you buy the old style black sticky stuff and NOT the one for bonded screens. It should be about £5-7 a tube.
8. Clean off all of the old sealant from window frame and then put a line of sealant all of the way around in the angle of the frame.
9. On the "frame" groove of the rubber seal you need to insert some cord.

10. The photo is of a nifty tool for doing this. I had lost mine years ago and when I happened across this on the Flea had to buy it £15.00 including hard plastic spatula - see step 2
PUTTING BACK IN
11. put 4 "loops" in the cord half way down each straight on the screen.
12. Lift screen and rubber (preferably 2 people) and place into aperture and press in. Make sure loops dangle inside the car
13. Start at bottom loop and while glamorous assistant keeps pressure on the windscreen from outside pull the cord inwards. The rubber seal should follow and be back where it started off. Do about 20cm on first loop and then pull in 20cm or so on top loop, same for each side and then GENTLY work around each loop a few CMs at a time. Ensure that the GA follows you and keeps pressure on
14. Pressure should be firm but not so as to hurt your palm (never use a rubber mallet)
15. The corners will be the hardest to press and pull in, just take your time
16. Screen will be in and then you just need to clean remnants off the inside of the rubber.
Hope this sheds some light..


