I'm on it Chris… watch this space…[emoji6]
Don't like the adverts? Click here to remove them
You are using an out of date browser. It may not display this or other websites correctly.
You should upgrade or use an alternative browser.
You should upgrade or use an alternative browser.
80 series gullwings rear windows
- Thread starter stan
- Start date
I am sure you are. And I will.
Just been looking at some Aussie ones that are done in glass! Nice but I can see too many drawbacks there. Hello, is that Autoglass, yes do you have a side window flap for a .......
Just been looking at some Aussie ones that are done in glass! Nice but I can see too many drawbacks there. Hello, is that Autoglass, yes do you have a side window flap for a .......
Ahh, thanks Chris, I'll give that a watch…[emoji41]
Yes, I can see now. Looks like they're using a slightly smaller seal than I have found as well as offset hinges. I was considering 3 hinges TBH but I think with 3mm ally, it will be ok. Could do the kit rack as well without too much trouble.
Quick question, the window is 3.54mm thick with my blackout film which is probably the 0.04mm. I was planning on doing the frame in 4mm ally to make it seal well, but thinking about it, keeping it all 3mm ally, and sealing the outside as per the original glass, should be ok. The 4mm ally is going to be chunky with a lot of waste.
Again, thoughts please…
Again, thoughts please…
Don't like the adverts? Click here to remove them
- Joined
- Feb 2, 2013
- Messages
- 17,108
I can't work out how or even if they would work but its been bugging me that kitchen unit hinges would allow you to fit the door with a hidden hinge and no trimming at all , a quick google images search shows there are some interesting variations of the same . It's a shot in the dark Starcruiser but worth a look maybe .
Again Shayne you are on my wavelength. I have looked at these but with my experience of them, I wouldn't say they were strong enough. I have, however, only yesterday, found two other manufacturers. One of which has potential in a fold out hinge. I will be ordering a pair over the weekend for evaluation. They look to be strong enough and might do what I'm after. I will run both types alongside until I know who likes/wants what and we can go from there. At least one set up WILL work.
Only you can say really as you have the bits in your hands but I really wouldn't want any sealant to make this work. So 4mm may be too much but is 3mm too thin? We're not going to get 3.5 mm plate are we.
Hidden hinges and clever trickery all sounds like unnecessary complication to me. Let's keep this simple and easy to make.
Hidden hinges and clever trickery all sounds like unnecessary complication to me. Let's keep this simple and easy to make.
Ok, time to clear up a few points here.
Whatever you do with these, I'm advising using non setting vehicle glass sealant. The glass has sealant from factory. Fit sealant or it WILL leak, as my windows did when the guy pulled them out to fit the tint film and didn't re apply the sealant/ got the existing dirty. If the vote is for 4mm, then I am vindicated in my original decision, just getting opinions. If anyone doesn't want to use sealant, it's up to you, but my advice is use it, or don't pull your windows out or it will leak.
I have now spent much of today and yesterday redesigning to make these work. This design is using EXTERNAL hinges as in my previous post. If I or anyone else wants to use concealed hinges, that's a project offshoot for another day, once I've found hinges that I like. I may like how the external hinges look and go with them for mine but for now, let's say the jury's out and I'm now doing these for you guys, and my project (how I originally set out to do this) is on hold until I find what I like. [emoji4]
The design is as follows.

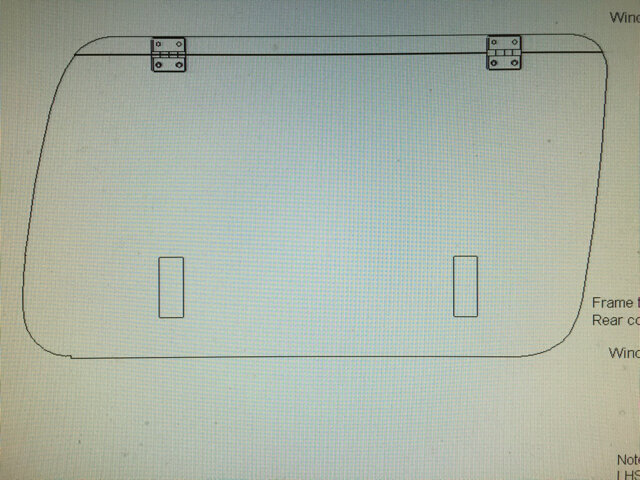
Door detail showing hinges and infill piece at top.

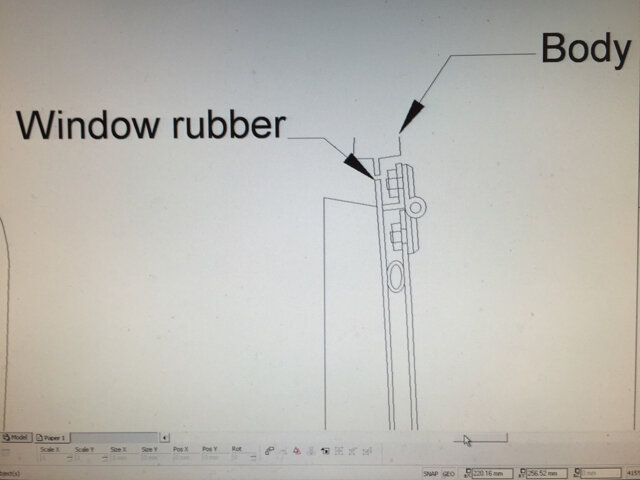
Fitting detail

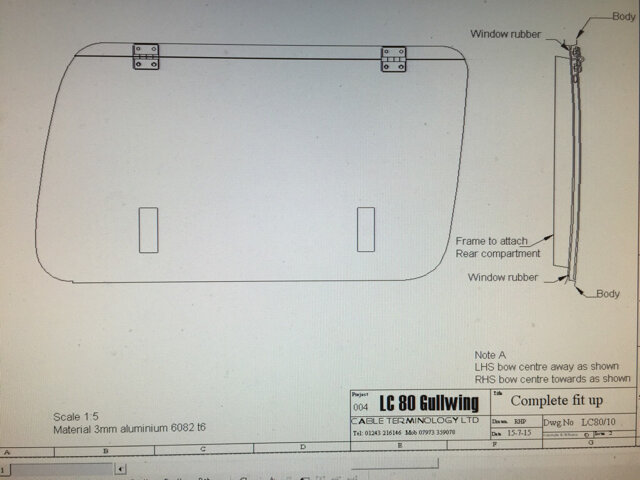
Complete drawing

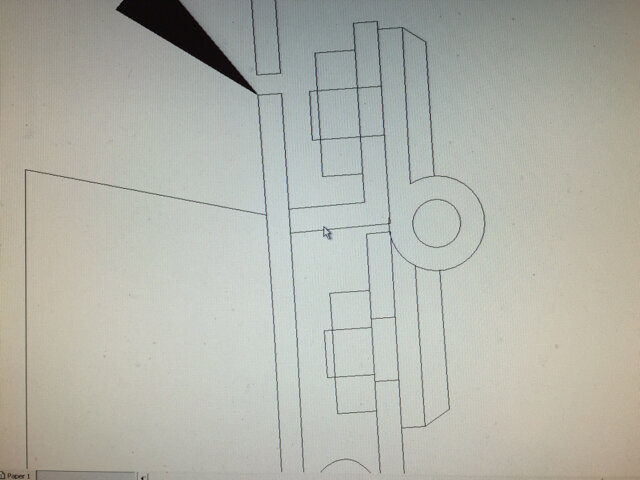
Hinge detail, with mouse pointer (not the big black arrow) on the end of the ally angle infill.
Now to explain why.
With these hinges, you can get offset ones, and you can get the flat ones I have shown. Generally the ones shown only have short studs, hence the infill piece at the top which will accommodate the studs and nuts nicely and negotiate the window rubber (not shown, ran out of time) and keep it neat (I know, maybe nobody cares if it's neat or not but I do and it's a straight forward simple solution while being neat). I don't really want to copy Yoda Tech's design cut for cut, though I do like it and will take inspiration from it.
Hope you like it. Hope it explains things better than text alone. [emoji4]
Whatever you do with these, I'm advising using non setting vehicle glass sealant. The glass has sealant from factory. Fit sealant or it WILL leak, as my windows did when the guy pulled them out to fit the tint film and didn't re apply the sealant/ got the existing dirty. If the vote is for 4mm, then I am vindicated in my original decision, just getting opinions. If anyone doesn't want to use sealant, it's up to you, but my advice is use it, or don't pull your windows out or it will leak.
I have now spent much of today and yesterday redesigning to make these work. This design is using EXTERNAL hinges as in my previous post. If I or anyone else wants to use concealed hinges, that's a project offshoot for another day, once I've found hinges that I like. I may like how the external hinges look and go with them for mine but for now, let's say the jury's out and I'm now doing these for you guys, and my project (how I originally set out to do this) is on hold until I find what I like. [emoji4]
The design is as follows.

Door detail showing hinges and infill piece at top.

Fitting detail

Complete drawing

Hinge detail, with mouse pointer (not the big black arrow) on the end of the ally angle infill.
Now to explain why.
With these hinges, you can get offset ones, and you can get the flat ones I have shown. Generally the ones shown only have short studs, hence the infill piece at the top which will accommodate the studs and nuts nicely and negotiate the window rubber (not shown, ran out of time) and keep it neat (I know, maybe nobody cares if it's neat or not but I do and it's a straight forward simple solution while being neat). I don't really want to copy Yoda Tech's design cut for cut, though I do like it and will take inspiration from it.
Hope you like it. Hope it explains things better than text alone. [emoji4]
Mate that looks the Mutt's. Clever idea using the angle infill to level out the hinge.
Something new that occurred to me. Is there any chance that as we drive along that the wind will try to get under the leading edge at all? Or do you think that they'll clamp up so tight that this won't happen. If it did and I stress IF, then I think it would be easy to simply glue a vertical strip of some sort as a deflector to push the air over the lip. None of the bought ones seem to have anything like that so with a bit of luck it's not an issue.
I didn't realise that there was any adhesive in there to be honest that was my point. I didn't want to use sealant because I didn't think there was to start with. When I took a set out a long time ago there was nothing. If there is and it needs to go back in that's fine.
Looking good.
Phew, thought I had lost you guys for a while there. Thanks Chris and apologies if I sounded a bit strong, I just didn't want anyone's truck to get wet on my watch. The sealant that Toyota have fitted is excellent stuff. After 21yrs it's still pliable and re-seals quite well where there's no dirt. As it's non setting, it remains a bit like door skin poly sheet sealer, still tacky.
Thanks and glad you like. As far as wind getting under, it has made me think seeing the double seal arrangement on the Yoda Tec ones which I like, and, of course, the seals around the original doors. I don't think the wind should lift it at all as it's going to be rolled slightly to accommodate the body curve and that turns even a piece of 1mm steel from being an Australian singer's wobble board to a pretty stiff item of strength. Plus i've moved the hinges out a bit too. I will look for some adhesive seal to go under the very edge of the door as this would help stabilise things further.
Thanks and glad you like. As far as wind getting under, it has made me think seeing the double seal arrangement on the Yoda Tec ones which I like, and, of course, the seals around the original doors. I don't think the wind should lift it at all as it's going to be rolled slightly to accommodate the body curve and that turns even a piece of 1mm steel from being an Australian singer's wobble board to a pretty stiff item of strength. Plus i've moved the hinges out a bit too. I will look for some adhesive seal to go under the very edge of the door as this would help stabilise things further.
Last edited:
Thanks David.
Ok. I've mulled this over and I think the 3mm thick plate will be fine. It will, of course, get a coat or three of paint, so that will take it ever closer to the magic 3.5mm and any remainder will be amply catered for by the sealant if indeed it doesn't actually come out at 3.5mm finished. At 4.5mm or just under, there is a chance the rubber would be over its capacity and sit like a V with the plate in.
3mm plate all round. Decision made.
There's also the need to order in some window rubbers for those that don't have fixed glass. Also of note is that the plastic trim over the rear vents curls round slightly less on the sliding window versions so there will be a gap when the conversion is done- Unless the plastic is ordered at the same time. I seem to recall around £140 or so from Toy UK.
I feel an Amayama order coming on…
Well that's always been the case Chas, yes. These are a direct replacement for solid back windows. Hence the discussion about the thickness of the panel being the same as the original glass you see. This is what makes the whole thing work. If you have sliding back windows, you can already open them....Now not in the same way as the gullwing ones but you can reach inside. Not something we can do on our basic models.
I haven't seen a price on rubbers myself so I can't say what they're likely to be as a best case scenario.
I haven't seen a price on rubbers myself so I can't say what they're likely to be as a best case scenario.
Paddler Ed
Well-Known Member
Been following this with interest; the amount of work that has gone into it has been fantastic... and goes some way to explaining why some "simple" solutions cost so much... it's the IP that goes into it in the R&D stage(s)!
Well done SC!
Well done SC!
Thanks Ed. You are absolutely right. The drawings alone take a long time. When I started this, I hadn't realised that the glass is slightly curved, and that the ends of the doors and the frame are curved too. Reverse engineering those curves has been a challenge to say the least. The greatest time is sourcing the right standard parts and making them fit the project or vice versa.
The search for the one solution went like this…
Think of a way if doing it, decide on what part needed, find ideal part already exists as car spare, order part, create mock up out of wood, find it makes the door foul the body, abandon that option, search internet, can't find part, have a cup of tea, search again, find part, find if fitted it fouls the window rubber, search again, find better part but too big, redesign to fit bigger part, check availability, 6 weeks delivery, try and find other supplier, find new supplier with better part, redesign, obtain part, part needs modifying, arrange for part to be cut down, half of part has to be welded but is steel, have half made in aluminium, but aluminium not good as a bearing material, find nylon bushes, order bushes, wait for prototype to be made, fit parts to prototype, mock up in car, find it doesn't work on car, modify prototype to try and make work, looks pants, abandon design and part, look for different part on Internet, find ideal part, modify area part fits, redesign doors and modify frame, source material to make it work without machining, convert drawings and email, enquire about part, have another prototype made, (and that's as far as I've got).…
Is it worth it…always as long as the price ends up being right. Don't know that one yet! Hoping it's going to be OK. Should be, just happier when it's all tied up as anything like this is a gamble.
Nothing ventured nothing gained…


