Don't like the adverts? Click here to remove them
You are using an out of date browser. It may not display this or other websites correctly.
You should upgrade or use an alternative browser.
You should upgrade or use an alternative browser.
Belts & chains
- Thread starter fridayman
- Start date
- Joined
- Mar 1, 2010
- Messages
- 2,003
- Country Flag

Two Vee belts driving the Alternator - change them as required as matched pairs.
Single Vee belt driving the Air Con - replace when worn/cracked.
Single toothed Cam Belt (all dry and easy to change) - replace at 60,000 miles (the car should give you a nudge when its due, then you have to reset the Cam Belt Warning Light by removing the instrument panel and moving a setting screw to a different hole).
No chains that need replacing periodically.
Do you want pictures
")
Bob.
Single Vee belt driving the Air Con - replace when worn/cracked.
Single toothed Cam Belt (all dry and easy to change) - replace at 60,000 miles (the car should give you a nudge when its due, then you have to reset the Cam Belt Warning Light by removing the instrument panel and moving a setting screw to a different hole).
No chains that need replacing periodically.
Do you want pictures
Bob.
- Joined
- Mar 1, 2010
- Messages
- 2,003
- Country Flag
fridayman said:Where are the pictures????")
Me and my mouth
Now I'll have to select some and upload them to Photobucket.
Coming soon
Bob.
- Joined
- Mar 1, 2010
- Messages
- 2,003
- Country Flag
Right, by popular demand, here are some pictures on how to change the 1KZ-TE timing belt and Vee Belts.
First, Some Disclaimers:
1. This is how I did it; others may take a different approach. If you don't have the tools, knowledge, or confidence don't try it. Having said that, its not a difficult job so don’t be frightened.
2. The pictures were taken while I was removing and then replacing the cylinder head. This means that a lot of stuff has been stripped off. You don't need to remove more than the sump guard (and possibly the battery & tray) to do this.
Neither do you need to be a Gynaecologist
The upside is that the pictures are clearer than they would otherwise be .
.
3. Because the pictures were really about the cylinder head, I didn't take any specific shots of the Vee Belts, I hope what I have got is enough for the purpose
Changing the Timing Belt:
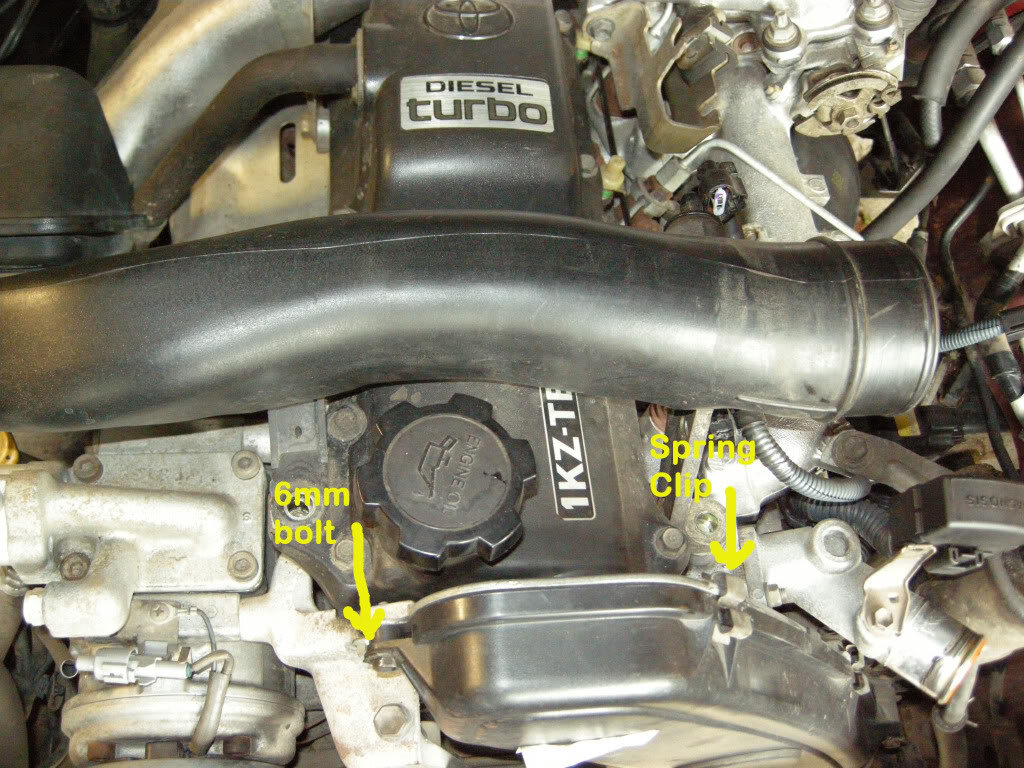
The first job is to remove the Timing Belt Cover. Its just plastic with a thick rubber sealing ring and nothing will fall out when it comes off.
It is held on with some spring clips and some 6mm bolts:

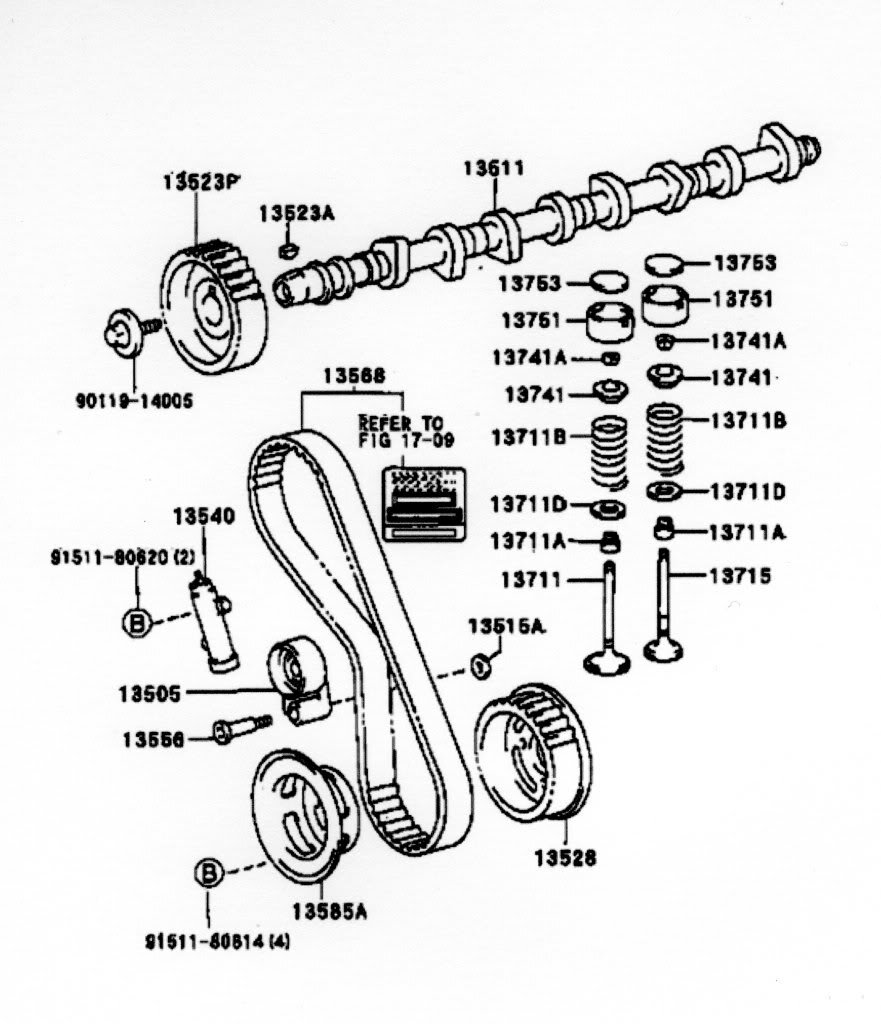
behind, you will find the Timing Belt, an Idler Pulley and a gel-filled sprung tensioner. The belt run and components are shown here:

BEFORE YOU DO ANYTHING ELSE . . . Put a socket on the crankshaft pulley nut and turn the motor clockwise (looking at it from the front) until the Timing Belt Alignment Marks line up.
You cannot do this with the belt removed as the valves will hit the pistons if you try to turn the Crankshaft or the Camshaft in isolation.
There are three points at which to check the alignment (The Crankshaft timing mark is not really necessary, but I like to be sure).
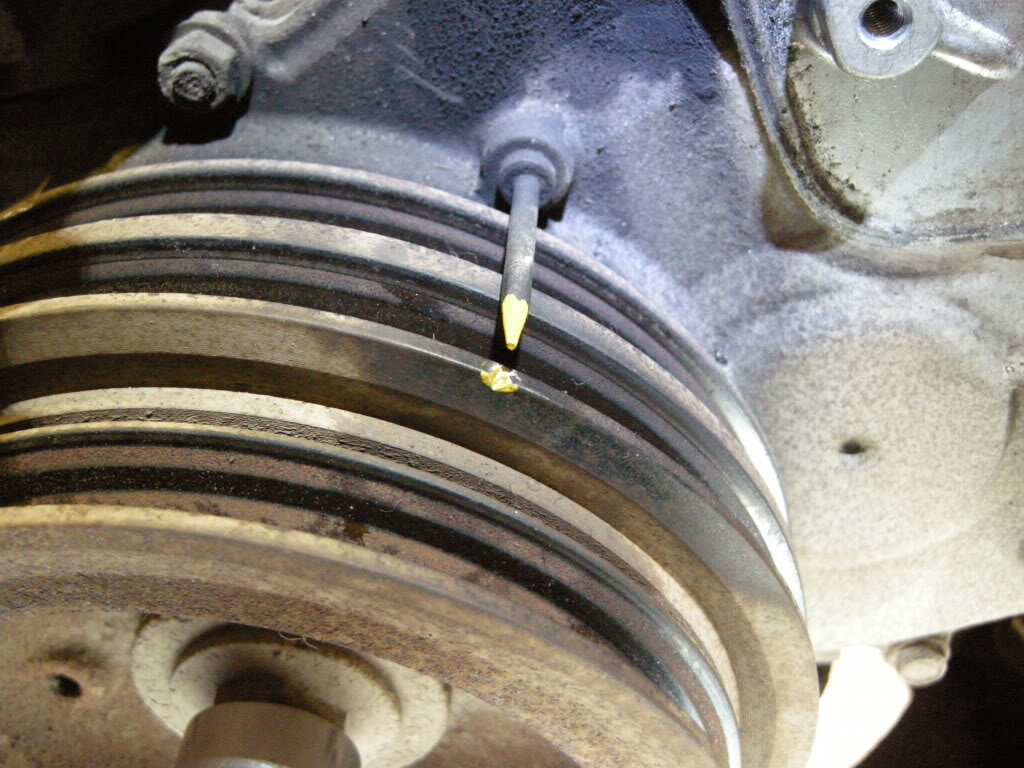
There is a timing mark and pointer on the crankshaft pulley. Turn the motor until the two are aligned then look at the camshaft.

Because the Cam runs at half engine speed, you may need to turn the engine another complete revolution before the Valve timing marks line up. The Camshaft Alignment Marks are here:

And the Drive Pulley (on the Fuel Injector drive) alignment marks are here:

Now you should have all three marks in alignment. If the Crankshaft and Injector Pump marks don’t align you are in deep S**t, hopefully that won’t be the case. Normally, people only align the two Cam Belt marks so wouldn’t know if there was a problem deep in the motor !
Next you need to compress and lock the Sprung Tensioner. It is full of Gel so requires a slow squeeze. I use a pair of Welding Clamps like this:

When the Tensioner’s plunger is compressed, you have to lock it with a small rod. I have used a Pop Rivet stem, but here I have used the original pin that came with the tensioner when I replaced it:

This is what you are trying to achieve:

Then unbolt the Tensioner and remove it. Because it is Gel-filled it has to be kept upright for a period before re-installation to prevent air mixing with the Gel:

Next, remove the belt Idler. When I did mine the first time the pivot bolt was almost seized and the timing belt was running a bit slack. Don’t be tempted to leave it in situ and work around it – just in case:

Here are the bits laid out. Clean and grease the pivot before putting it back. I replaced mine at 120,000 miles but I didn’t need to, the originals were perfectly OK.

Then remove the toothed belt from the two pulleys. It will probably look perfect as its clean, dry and runs at half engine speed at both ends. It has an easy life.
Fit the new belt, ensure that the ‘driven’ side is tight, both the alignment marks are correct and that all the belt teeth are properly located.

As soon as you do this, the new belt will try to jump off the drive pulleys. I keep it tensioned on the slack side with a bungee. Make sure its not going to damage the belt.

I also mark the direction of travel on the belt. If you have to remove it at some point in the future, and are not re-newing it, it should go back the same way round.

Now replace the Idler Pulley, just one bolt does the trick – tighten to 25 Lbs/ft (34 Nm):

Then replace the Tensioner - tighten bolts to 4.5 Lbs/ft (6Nm):

When everything is tight, remove the bungee and pull the pin out of the tensioner.

Now CHECK ALL THE ALIGNMENTS AGAIN and make sure that the belt is properly seated in the pulleys.
Finally, replace the cam cover – tighten the cover bolts to 4.5 Lbs/ft (6 Nm).
Job done (in 1/20th the time it took me to write this ).
Changing the Vee Belts:
There are two belts driving the Alternator and a single driving the Air Con Compressor. Always replace the Alternator Belts as a matched pair or one will be taking a greater load than the other and may fail prematurely. There is no ‘compensation’ between the two belts to even-out the load.
This is the belt run for the 1KZ-TE motor:

OK – for all you others who are feeling left out . . . :

The Air Con belt is in front of the Alternator Belts and is tensioned via a sliding Idler Pulley that has a long bolt running through the pulley mounting to adjust it. I found that I had to remove the pulley completely to get the new belt on which is no hardship.

Remove the Aircon Belt (and Idler Pulley), then change the Alternator belts – it’s the only way.
The Alternator Belts can be seen here:

The Alternator is tensioned with a bolt that moves a block that is attached to the underside of the alternator and moves in a slotted bracket . . Got that ?? Here’s a picture of a cleaned-up fitting:

Here are all the bits laid out. You will have to slacken the Alternator pivot bolt, the slotted bracket mounting bolt (as it has to move as the Alternator moves), the locking block and the adjusting bolt.
It will possibly require a good dose of Plus Gas or similar before it all moves:
Note: in this picture, I have removed the Alternator mounting bracket, along with the Aircon Compressor mounting brackets.

Slacken-off the Alternator as far as possible and remove the belts.
Replace with new belts, I put the identification labels side by side, facing the same way so that I can check whether one is moving more than the other.
Pinch up the Pivot bolt, the Adjusting block and Adjusting bracket, then tighten the belts using the adjusting bolt. Everything should move – without being slack.
When the belts are tight enough, tighten all the mounting bolts fully.
Alternator belts done .
Now fit a new Air Con belt and re-fit the idler pulley. The pulley is tightened via an adjusting bolt that raises the pulley mounting. Again, everything should be just pinched-up at this stage.
When the belt is tight enough, tighten the central bolt on the Idler Pulley which licks its mounting to the engine block.
Air Con belt done .
Refit battery & sump guard and take it for a spin .
.
Bob.
First, Some Disclaimers:
1. This is how I did it; others may take a different approach. If you don't have the tools, knowledge, or confidence don't try it. Having said that, its not a difficult job so don’t be frightened.
2. The pictures were taken while I was removing and then replacing the cylinder head. This means that a lot of stuff has been stripped off. You don't need to remove more than the sump guard (and possibly the battery & tray) to do this.
Neither do you need to be a Gynaecologist
The upside is that the pictures are clearer than they would otherwise be
3. Because the pictures were really about the cylinder head, I didn't take any specific shots of the Vee Belts, I hope what I have got is enough for the purpose
Changing the Timing Belt:
The first job is to remove the Timing Belt Cover. Its just plastic with a thick rubber sealing ring and nothing will fall out when it comes off.
It is held on with some spring clips and some 6mm bolts:
behind, you will find the Timing Belt, an Idler Pulley and a gel-filled sprung tensioner. The belt run and components are shown here:
BEFORE YOU DO ANYTHING ELSE . . . Put a socket on the crankshaft pulley nut and turn the motor clockwise (looking at it from the front) until the Timing Belt Alignment Marks line up.
You cannot do this with the belt removed as the valves will hit the pistons if you try to turn the Crankshaft or the Camshaft in isolation.
There are three points at which to check the alignment (The Crankshaft timing mark is not really necessary, but I like to be sure).
There is a timing mark and pointer on the crankshaft pulley. Turn the motor until the two are aligned then look at the camshaft.
Because the Cam runs at half engine speed, you may need to turn the engine another complete revolution before the Valve timing marks line up. The Camshaft Alignment Marks are here:
And the Drive Pulley (on the Fuel Injector drive) alignment marks are here:
Now you should have all three marks in alignment. If the Crankshaft and Injector Pump marks don’t align you are in deep S**t, hopefully that won’t be the case. Normally, people only align the two Cam Belt marks so wouldn’t know if there was a problem deep in the motor !
Next you need to compress and lock the Sprung Tensioner. It is full of Gel so requires a slow squeeze. I use a pair of Welding Clamps like this:
When the Tensioner’s plunger is compressed, you have to lock it with a small rod. I have used a Pop Rivet stem, but here I have used the original pin that came with the tensioner when I replaced it:
This is what you are trying to achieve:
Then unbolt the Tensioner and remove it. Because it is Gel-filled it has to be kept upright for a period before re-installation to prevent air mixing with the Gel:
Next, remove the belt Idler. When I did mine the first time the pivot bolt was almost seized and the timing belt was running a bit slack. Don’t be tempted to leave it in situ and work around it – just in case:
Here are the bits laid out. Clean and grease the pivot before putting it back. I replaced mine at 120,000 miles but I didn’t need to, the originals were perfectly OK.
Then remove the toothed belt from the two pulleys. It will probably look perfect as its clean, dry and runs at half engine speed at both ends. It has an easy life.
Fit the new belt, ensure that the ‘driven’ side is tight, both the alignment marks are correct and that all the belt teeth are properly located.
As soon as you do this, the new belt will try to jump off the drive pulleys. I keep it tensioned on the slack side with a bungee. Make sure its not going to damage the belt.
I also mark the direction of travel on the belt. If you have to remove it at some point in the future, and are not re-newing it, it should go back the same way round.
Now replace the Idler Pulley, just one bolt does the trick – tighten to 25 Lbs/ft (34 Nm):
Then replace the Tensioner - tighten bolts to 4.5 Lbs/ft (6Nm):
When everything is tight, remove the bungee and pull the pin out of the tensioner.
Now CHECK ALL THE ALIGNMENTS AGAIN and make sure that the belt is properly seated in the pulleys.
Finally, replace the cam cover – tighten the cover bolts to 4.5 Lbs/ft (6 Nm).
Job done (in 1/20th the time it took me to write this
).Changing the Vee Belts:
There are two belts driving the Alternator and a single driving the Air Con Compressor. Always replace the Alternator Belts as a matched pair or one will be taking a greater load than the other and may fail prematurely. There is no ‘compensation’ between the two belts to even-out the load.
This is the belt run for the 1KZ-TE motor:
OK – for all you others who are feeling left out . . . :
The Air Con belt is in front of the Alternator Belts and is tensioned via a sliding Idler Pulley that has a long bolt running through the pulley mounting to adjust it. I found that I had to remove the pulley completely to get the new belt on which is no hardship.
Remove the Aircon Belt (and Idler Pulley), then change the Alternator belts – it’s the only way.
The Alternator Belts can be seen here:
The Alternator is tensioned with a bolt that moves a block that is attached to the underside of the alternator and moves in a slotted bracket . . Got that ?? Here’s a picture of a cleaned-up fitting:
Here are all the bits laid out. You will have to slacken the Alternator pivot bolt, the slotted bracket mounting bolt (as it has to move as the Alternator moves), the locking block and the adjusting bolt.
It will possibly require a good dose of Plus Gas or similar before it all moves:
Note: in this picture, I have removed the Alternator mounting bracket, along with the Aircon Compressor mounting brackets.
Slacken-off the Alternator as far as possible and remove the belts.
Replace with new belts, I put the identification labels side by side, facing the same way so that I can check whether one is moving more than the other.
Pinch up the Pivot bolt, the Adjusting block and Adjusting bracket, then tighten the belts using the adjusting bolt. Everything should move – without being slack.
When the belts are tight enough, tighten all the mounting bolts fully.
Alternator belts done
Now fit a new Air Con belt and re-fit the idler pulley. The pulley is tightened via an adjusting bolt that raises the pulley mounting. Again, everything should be just pinched-up at this stage.
When the belt is tight enough, tighten the central bolt on the Idler Pulley which licks its mounting to the engine block.
Air Con belt done
Refit battery & sump guard and take it for a spin
.Bob.
Attachments
Don't like the adverts? Click here to remove them

Having done a few of these now, I just line it all up as per Dr Bob then cut the belt. Take the tensioner off to the garage to compress it in a vice, reassemble then put the belt on and pull the pin. It saves trying to compress the tensioner in situ. It's a pretty easy job. Most people will only ever do this once, so by the numbers is the best way. But after a few, you kinda start finding easier ways. I cut the belt on the tensioner run so that it doesn't pull on the toothed pulleys.
The bit that I have never understood is why bother with two alternator belts. Why didn't they either use a wider flat belt or just one single instead of two. OK you might think that it's to ensure that you keep running if one breaks, but you can carry a spare. Not a big job to swap in the field. And if you look after it, how many alternator belts snap nowadays. Having to match pairs is just a pain.
Chris
AndyCook
Well-Known Member
good photo guide
the two times i have changed the belt on a 1KZTE - i have also wound the engine round by hand on the pulley after fitting new belt to make sure everything still lines up afterwards
before turning the key!
the two times i have changed the belt on a 1KZTE - i have also wound the engine round by hand on the pulley after fitting new belt to make sure everything still lines up afterwards
before turning the key!
- Joined
- Mar 1, 2010
- Messages
- 2,003
- Country Flag
Chris said:Having done a few of these now, I just line it all up as per Dr Bob then cut the belt. Take the tensioner off to the garage to compress it in a vice, reassemble then put the belt on and pull the pin. It saves trying to compress the tensioner in situ. Chris
I go along with that - providing you cut the belt first.
However, if you are removing the belt for other reasons (i.e. changing the head gasket) and the belt is to be re-fitted, I would compress the tensioner in situ. Otherwise I suspect the first couple of 6mm tensioner bolt threads in the block will be damaged as there is a strong spring in the tensioner.
It is much easier to compress it on the bench
Bob.
- Joined
- Mar 1, 2010
- Messages
- 2,003
- Country Flag
AndyCook said:the two times i have changed the belt on a 1KZTE - i have also wound the engine round by hand on the pulley after fitting new belt to make sure everything still lines up afterwards
before turning the key!
Yup - me too
Bob.
BobMurphy said:However, if you are removing the belt for other reasons (i.e. changing the head gasket) and the belt is to be re-fitted, I would compress the tensioner in situ.
Bob.
I was always taught to fit a new belt rather than retension an old one, the belt i have just taken of to change the head is only a couple of months old but i still put a new one on for safety sake.
mabe thats sounds over the top but for the sake of 18 squid i wouldnt have it any other way.
- Joined
- Mar 1, 2010
- Messages
- 2,003
- Country Flag
Chris said:Incidentally Bob, I forgot to say -- superb pics. Got a part time job for Haynes or what?
Chris
If Haynes ever do a manual for the '90-Series' . . . . I'm ready
Bob.
MisterCruiser
Well-Known Member
- Joined
- May 28, 2014
- Messages
- 512
- Country Flag

Will the pulleys just remain in place themselves with the belt removed, whats to stop them moving when you're trying to put the belt back on?? Is there no locking pin slots for the pulleys?
Towpack
Well-Known Member

The only pulley 'free' to move when the belt is off is the camshaft pulley, due to the rotational load applied to the camshaft by the valve springs but this is unlikely if the timing marks are lined up at No.1 TDC. Even if it did move slightly it would be relatively easy to re-align the timing marks.
V belts are used as they are superior in many ways to flat belts. Two or more V belts are usually used in high load applications for reliability/durability. Maybe Toyota consider the alternator drive a high load application or maybe two belts are used on a vehicle that is aimed at off road use were there's a possibility the belts and pulleys will be submerged in muddy water and all the other off-roading crud. Personally, I don't buy the '2 belts in case one breaks' theory. JMO
V belts are used as they are superior in many ways to flat belts. Two or more V belts are usually used in high load applications for reliability/durability. Maybe Toyota consider the alternator drive a high load application or maybe two belts are used on a vehicle that is aimed at off road use were there's a possibility the belts and pulleys will be submerged in muddy water and all the other off-roading crud. Personally, I don't buy the '2 belts in case one breaks' theory. JMO
MisterCruiser
Well-Known Member
- Joined
- May 28, 2014
- Messages
- 512
- Country Flag
The only pulley 'free' to move when the belt is off is the camshaft pulley, due to the rotational load applied to the camshaft by the valve springs but this is unlikely if the timing marks are lined up at No.1 TDC. Even if it did move slightly it would be relatively easy to re-align the timing marks.
V belts are used as they are superior in many ways to flat belts. Two or more V belts are usually used in high load applications for reliability/durability. Maybe Toyota consider the alternator drive a high load application or maybe two belts are used on a vehicle that is aimed at off road use were there's a possibility the belts and pulleys will be submerged in muddy water and all the other off-roading crud. Personally, I don't buy the '2 belts in case one breaks' theory. JMO
I see, well that explains the non need for locking pins then so. Just something else im not clear on, if you have to remove the injection pump like I do to get it reconditioned, if I remove the pump pulley and pump even whilst having it all set at TDC beforehand, how do you know to put the pump and pulley back on in the correct place, will the pump only go in the 1 way and will the pulley only go onto the pump the 1 way?