Don't like the adverts?  Click here to remove them

HJ61 Body-off Rebuild project

After most of the doors were done, I started getting the Left front fender off.

Almost the entire wheel arch was rotten away, as well as the part in front of the sill.
After watching a DVD about an old bloke showing original sheet metal technics, I got inspired and decided to give it a go.

Keep in mind, the goal for this project is not to get in complete original condition. Rust prevention is the key thing.
If some of the original line differ by a few millimeter, we'll just call it a one-off design by me :p

Rotten area, in front of the sill. Remaining steel was too thin to leave it like that, but usable to catch it's original shape.
20131004_163928.jpg

20131006_142235.jpg

20131004_205930.jpg

20131009_193800.jpg

20131006_185234.jpg

20131006_185251.jpg

20131002_202719.jpg

20131101_194201.jpg
Exept the first few pics in this threas, all pictures have been taken with my phone. On the phone the quality is good, but having them on a bigger screen I'm a bit disappointed....
I'll get my proper camera back in the shop, and use it from now on!

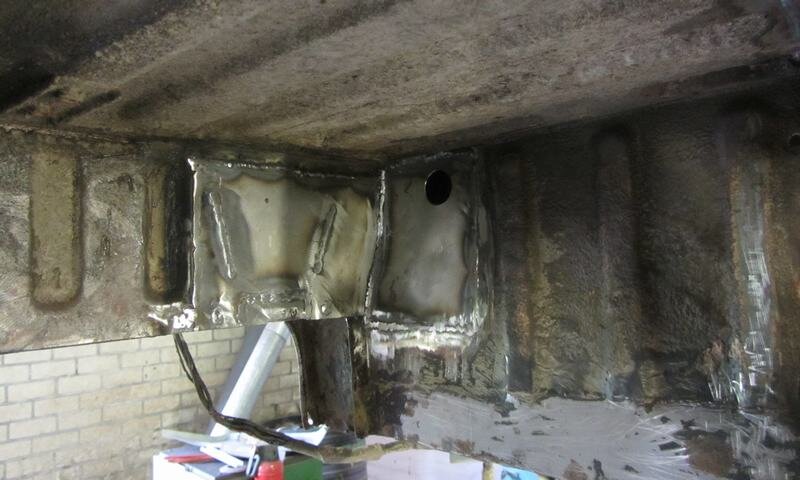
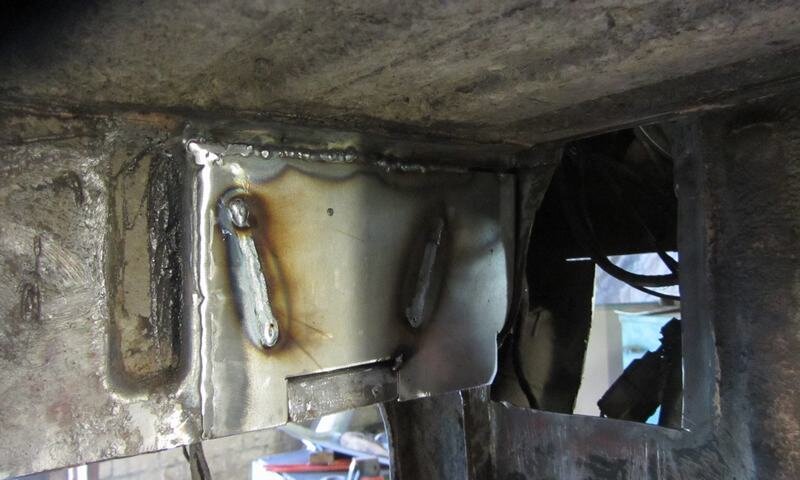
With the cruiser being dry and warm, I started notice brown drips on several spots on the chassis. It looks to be coming from the inside out? :think:
20131101_193227.jpg
 
Next job was to get the front panel off. With this, I mean the panel in front of the radiator, housing the headlights and all.

Mainly at the chassis mounts / inner vender connection point, most off the steel was gone :icon-evil:

20131109_151654.jpg

20131109_151722.jpg

20131112_213435.jpg

20131113_144103.jpg

After all welding was done I cleaned the whole thing with a wire brush on a grinder.
Blank metal parts are first being threated with Brunnox primer, followed by multiple thick layers of Brantho Korrux. This paint can be ordered in several colors. All inside panels will be painted using the Brantho in the exact same colors in which the exterior of the body will be painted. Since the brantho can easily be put on with a roller of brush I can do this myself :icon-biggrin:

Both front panel and inside of the front fenders have been painted

20131214_131110.jpg

Got the panel fitted again in order to be able to work on the inner fenders. After getting all mounts on the inner fenders back in place the too were ready for a paint job.
20131225_131030.jpg

The engine side of both the inner and front fenders are painted silver, and the 'wheel' side is black.

20140109_210511.jpg

20140125_213421.jpg

20140125_213409.jpg

On the front fender I used a wire brush around the wheel arch to remove all the paint. I found several spots where rust was present underneath the paint, so that's why I removed the paint a relative big area. Rusty spots I sand-blasted prior to painting. This had to be done in open air, as our cabine is by far not big enough. Trust me, it was dust all over the place :cry:
When the inside of the front fenders were painted, they could be sent of to Laurens. He's doing his magic with filler and eventually paint, thanks mate!

Oh, before the right hand side front fender could be painted and all, we had to fitt the snorkel off course :icon-biggrin:
The 12HT does not like water, so we obey here wishes :icon-wink:

20131202_204646.jpg
 
:icon-cool: You could be rivaling Ben's thread soon Jente :icon-biggrin:

Impressive stuff - keep it coming :)
 
:icon-cool: You could be rivaling Ben's thread soon Jente :icon-biggrin:

Impressive stuff - keep it coming :)

Thnx, I'll keep sorting out the pictures! What's posted now is about a third of the total progress so far.
 
Don't like the adverts?  Click here to remove them
I still have a feeling that I'm missing loads of pictures :thumbdown:

Anyway, let's continue:
Most of the panel work was done, so it was time to split body and chassis. The 2 column ramp is ideal for doing the split!

20131229_112552.jpg

20131229_124747.jpg

20131229_131847.jpg

Best of all: I didn't forget anything, no wires or chassis mounts what so ever :icon-wink:


After the split I could take a closer look at the chassis. Loads and loads of rust, and even a crack of about a meter long on the left side of the tranny. Rust is a b*tch :icon-evil:. I'll take some more decent pics in a while. No progress with the chassis so far.
The plan is to replace the whole chassis. Just too much work involved, which is no problem but you'll never be able to get it as good as new.
Plan is to use a donor chassis, get it registered the official way and improve it. The double U-shaped profiles in the rear I'll fully box, and I'm planning on adding several stiffeners to the chassis, as well as making it a watertight box to prevent rust.

Anyway, plans for later! After the split I got rid of the tank.
The gauge was reading empty during her last miles, so I didn't expect much. I started draining in a dirty bucket to put those few litres in the shop's oil heater. But the tank turned out to have over 20 Litres still left in it.... should have caught it in a clean barrel to put it my daily driver.

So, with tank off, it was time to clean it;

20140102_193547.jpg

20140102_193610.jpg

20140103_194909.jpg

20140105_152717.jpg

found a small hole underneath where the mounting strips are positioned. I've cleaned it thoroughly with a flap disk and used some steel filled epoxy compound to fill it. The same stuff I've been using earlier to seal the oil sump which had a leak...

After wire-brushing the entire tank it's been coated with 2 layers Brunnox on corroded areas and 3 thick layers of black Brantho.
After this, the tank and all other finished items are wrapped in plastic and put away high and dry in the shop.
20140109_210528.jpg

To be able to get the body moveable I thought it would be handy to make a cart for it:

20140103_223359.jpg

20140104_143618.jpg

20140104_143630.jpg

20140104_143636.jpg

20140104_143642.jpg

IMG-20140517-WA0000.jpg

I used the chassis mounts underneath the bulk-head as front mounts and the tank connection girder at the back to secure the body to the cart. I'm pretty happy with the result, as I can pick up cart+body on the ramp at once and I can move it around the shop easily by hand because of the relatively heavy duty wheels. :icon-cool:

A Little update on the panel work:

20140228_202724.jpg

20140228_202732.jpg

20140228_202941.jpg

All panels are smoothed with filler after several layers of rust inhibitor and epoxy primer. To be honest, I'm no expert in painting, so I'm not exactly sure what has been done to them :think:. What I do know is that all panels and doors are ready for their final end-layer!!
 
Last edited:
Looking good i have to say. There seems to be alot of rust on cars from Holland do they use a lot of salt on the roads there in winter?

Nice to chat to you guys at lincomb and hope you get to pop over again soon.

stu
 
Looking good i have to say. There seems to be alot of rust on cars from Holland do they use a lot of salt on the roads there in winter?

Nice to chat to you guys at lincomb and hope you get to pop over again soon.

stu

Thanks!
Yeah, their can be lot's of salt during winters :S, but the car is originally from Finland..... Don't now what happened their, but it didn't do good to her :eusa-snooty:

It was good to be @ Lincomb, we'll probably head over there again sooner or later!
 
Amazing project, I admire your patience. :crazy:

Just a note on your comment above "...as well as making it a watertight box to prevent rust".

Please take care, all boxes should be vented with ample drain holes to allow water out. In my experience, there's no such thing as a watertight box, and when you try to make one, it will rust from the inside 10 times quicker than a well treated box with plenty of vents.
 
and fill with waxoil!!

great fab work, really impressive, love the cart!
 
Thanks all,

To get back to the boxed sections: all sections will be equipped with drain holes, and plugs to get waxoil in. Only the new sills are fully welded shut, as they are 90x40mm square tubes. Both ends are welded up.

I started with the body. the sills and wheel arches were the biggest items, but I started small.
In the wheel arch, around the spot where the seat-belt and rear seat is mounted, it was a bit rusty. This is a common spot for 60's to have troubles.


20140210_194959.jpg

20140212_215018.jpg

20140214_202545.jpg

Found some old patches on the left arch underneath a lot of sealant. Of course a plate like that had to go :eusa-naughty:
20140214_210000.jpg

20140214_210005.jpg

20140215_125227.jpg

Seat mounts and belt mounts back in place
20140215_125238.jpg

20140222_151440.jpg

Just found a few pics of a little side project, the newly build rear bumper. In the pictures the prototype is fitted.
We're pleased with the results, shame the pictures are not of the best quality...

20131029_213415.jpg

20131029_221549.jpg

In the mean time I dismantled everything form the bulkhead, cleaned it and painted it. Also all brake and clutch lines have painted and put back. Mast brake cylinder, and clutch booster are still awaiting the new paintjob.
20140216_105945.jpg

A small 'in between' job at the rear:
The edge on with the rubber will be put on was rotter in the corner and on the horizontal face. A few hours fiddling around, and it was good as new!
20140227_201504.jpg

The next job was a big one: Getting the new sill in.
The sill was a bit rusty, and in my opinion fragile. Therefore I choose the square tube profile to fit in.

20140301_143928.jpg

20140301_143935.jpg

20140301_144441.jpg

20140301_152104.jpg

Trial fit. one of the challenges was to get a proper connection between the sill and the bottom of the car.
20140301_205331.jpg

20140302_140732.jpg

20140302_140742.jpg

20140302_140747.jpg

20140308_085306.jpg

:think: ok, the floor in front of the driver seat was mostly gone. Every time you start digging, you find more and more...
I didn't know I had it in me, but I turned out to become a bit of a perfectionist during the project :icon-biggrin:

So, started cutting the floor panel
20140316_112937.jpg

And used a donor body nearby to get a 'new' piece
20140316_145805.jpg

If figured out the way to fit the sill to the floor by using a 2mm plate straight up. The new floor panel is also welded in place in the next pic:
20140322_203919.jpg

Due to the cross-member the vertical plate is made out of two sections.
Also the original bracket for the seat belt is welded in place.
20140322_204015.jpg

20140322_204022.jpg

I'm missing a picture of the outside of the sill but I'll post one later on.

In the meantime, all bolts and other originally galvanized components like turbo heat-covers and door-locks have been re-galvanized. Makes life a lot easier with all bolts being rust free and clean! :drool:


20140507_125749.jpg
 
Last edited:
Brilliant! You'll be very proud of this when you're done. Enjoy your perfectionism :clap::thumbup:
 
at the risk of causing extreme anguish, presumably you know Maarten has NOS sills? (I didn't find out until after mine were rebuilt:icon-rolleyes:)
 
at the risk of causing extreme anguish, presumably you know Maarten has NOS sills? (I didn't find out until after mine were rebuilt:icon-rolleyes:)

What do you mean with 'NOS sills' moggy?

If you mean he has the same sill contruction, then yes; I know. I've welded them into his as well :icon-cool:
Got to say I learned a few tricks whilst working on his truck! Made me do some things differently as well :shhh:
 
Hi Jente,

where did you do the galvanizing of the bolts & nuts ?
and is it expensive ?

shoulw work great when starting to bold ol the pieces together.

:thumbup: for the thread
 
Peter,

In total about 50 euro. I had it done by a galvanizing company in Harkema, up north. All paint must be removed, cause the acid can't get rid of it. All bolts are originally galvanized as well, so I had them treated the way they came out.
 
really like your build, The rear bumper looks awsome, i plan to build one very similar with a hitch receive incorporated. Love what you did with the sills to!!
 
It's been a while since the last update, so time for some new pic's

IMG_3373.JPG

Finally got the end of the sill worked out.

IMG_3379.JPG
Made a new chassis mount on the body. mount has been made out of 3 pieces of 4mm plate.

IMG_3380.JPG

IMG_3381.JPG
All loose parts of different items have been organized in zip-bags...

IMG_3383.JPG
On the right rear, the whole plate with connections for the diesel lines has been replaced, as it was long gone :icon-evil:


Next project was to get the wheel arch protected for the next few decades. With the imitation panel in place, the inner corner of the arch would be vulnerable as it's real hard to get it properly sealed. In order to get some more strength and get is water and mud proof, I decided to get it boxed:
IMG_3388.JPG

IMG_3389.JPG

IMG_3390.JPG

IMG_3391.JPG

IMG_3392.JPG

IMG_3394.JPG

Next up was the left rear corner of the underside. originally the bolt of the chassis mount could be reached when opening the little cover. on both sides these were more or less rotten away. In my opinion the bolts can also be made accessible from the inside of the car when drilling a hole.

Besides the chassis mount, also the bulkhead for the wiring was a little bigger then original....

IMG_3399.JPG

IMG_3402.JPG


Progress is a little slow, but steady!
 

Attachments

  • IMG_3410.JPG
    IMG_3410.JPG
    56 KB · Views: 258
  • IMG_3407.JPG
    IMG_3407.JPG
    54 KB · Views: 255
Last edited:
Back
Top