Don't like the adverts? Click here to remove them
You are using an out of date browser. It may not display this or other websites correctly.
You should upgrade or use an alternative browser.
You should upgrade or use an alternative browser.
HJ61 Body-off Rebuild project
- Thread starter Jente
- Start date
Iwan
Well-Known Member
- Joined
- Mar 28, 2011
- Messages
- 1,908
- Country Flag

thnx Iwan,
I just saw that some of the pics are shown as attachment, How do I get rid of them? :S
I've come across this many times previously... can be frustrating!
I have gone to edit then deleted the attachment caption and reload the right pic in..
Hope it helps Bud
Jente
Active Member
- Joined
- Jun 10, 2014
- Messages
- 83
- Country Flag

Ah, found a way to to get rid of the oversized pics in the post!
Basically I'm in the process of getting around the body once more. Left rear is done, and I'll proceed to the right rear. Same job to be done as the left; New wheel arc, box it and finish the sill to the arch.
Hopefully during my holiday in a few weeks I'll get the body more or less ready for a paint job.
Then it's time to start looking for a donor chassis!
OverlandMark
New Member
- Joined
- Oct 12, 2012
- Messages
- 48
Wow, lovely job!!
peter kohler
New Member
- Joined
- Mar 14, 2014
- Messages
- 39
- Country Flag
Hi Jente
How is the Landcruiser coming along ?
How is the Landcruiser coming along ?
Don't like the adverts? Click here to remove them
Jente
Active Member
- Joined
- Jun 10, 2014
- Messages
- 83
- Country Flag
Hej there Peter,
Yes, progress is there! need to find some time to get some pics on here. Had a few busy weeks at work. All welding to the body is done, inside is painted and the underneath is ready to be painted tomorrow.
I'll get to uploading some pics soon!
Yes, progress is there! need to find some time to get some pics on here. Had a few busy weeks at work. All welding to the body is done, inside is painted and the underneath is ready to be painted tomorrow.
I'll get to uploading some pics soon!
Jente
Active Member
- Joined
- Jun 10, 2014
- Messages
- 83
- Country Flag
It took a while, but here are some pics of the progress form the last weeks.


Tricky sheet metal jobs around the corner, under the tailgate:


After that I stripped the complete inside of the body, and get it ready to paint.
It's been painted in three thick layers of Brantho-corrux, in the same colour as the exterior is gonna be (different kind of paint offcourse)..


Also started on the wheel arches:

Forgot to take pictures during the job, but the filler pipe to the tank was rotten and therefore leaking. After some fiddling around with the right settings on the welding machine I got is patched up by just adding wire during welding.
Got it painted in 4 thick layers, so that'll hold the next few decades

After hours cleaning the underneath of the body, I thought it was time to paint it. However, there were still areas with original coating... this coating was a bit sticky, and I was afraid that the paint wouldn't hold. I applied paint on a few test areas with different grades of 'cleanliness' so to say..
When I got back at it after being away for work a few weeks, all test areas past the wire brush test to check adhesion, so I told myself to stop whining about it: Time to paint!
As I had both black and grey to choose from, I started with black.

Second layer is grey:

I kinda like the grey, as it will make live easier in future to check for rust / leaks / dirt plus it will be a little lighter underneath...
So, third and last layer will also be grey.
That's it for now.
Tricky sheet metal jobs around the corner, under the tailgate:
After that I stripped the complete inside of the body, and get it ready to paint.
It's been painted in three thick layers of Brantho-corrux, in the same colour as the exterior is gonna be (different kind of paint offcourse)..
Also started on the wheel arches:
Forgot to take pictures during the job, but the filler pipe to the tank was rotten and therefore leaking. After some fiddling around with the right settings on the welding machine I got is patched up by just adding wire during welding.
Got it painted in 4 thick layers, so that'll hold the next few decades
After hours cleaning the underneath of the body, I thought it was time to paint it. However, there were still areas with original coating... this coating was a bit sticky, and I was afraid that the paint wouldn't hold. I applied paint on a few test areas with different grades of 'cleanliness' so to say..
When I got back at it after being away for work a few weeks, all test areas past the wire brush test to check adhesion, so I told myself to stop whining about it: Time to paint!
As I had both black and grey to choose from, I started with black.
Second layer is grey:
I kinda like the grey, as it will make live easier in future to check for rust / leaks / dirt plus it will be a little lighter underneath...
So, third and last layer will also be grey.
That's it for now.
Jente
Active Member
- Joined
- Jun 10, 2014
- Messages
- 83
- Country Flag
Hello all, it's been a while since the last update. mainly because the work involved wasn't realy picture worthy.
I spent a whole lot of time in getting the body ready for the paint. When the guy came over to make a quote he gave me a list of homework to to .
.
In the meantime I painted some more parts to go on the firewall:


But the biggest new is: The body is off to the painter!!


Panel work will follow early next week, and the then the job can start. As I'll travel to China for a few weeks for work, the next time I'll get to see her she will be as good as new, in a grey 70% gloss, industrial paint! I really can't wait!!
I spent a whole lot of time in getting the body ready for the paint. When the guy came over to make a quote he gave me a list of homework to to
In the meantime I painted some more parts to go on the firewall:
But the biggest new is: The body is off to the painter!!
Panel work will follow early next week, and the then the job can start. As I'll travel to China for a few weeks for work, the next time I'll get to see her she will be as good as new, in a grey 70% gloss, industrial paint! I really can't wait!!
peter kohler
New Member
- Joined
- Mar 14, 2014
- Messages
- 39
- Country Flag
great update Jente 
looking forward tho see the body painted.
looking forward tho see the body painted.

Jente
Active Member
- Joined
- Jun 10, 2014
- Messages
- 83
- Country Flag
Hi you all,
It's been a while (over three months ) but it's time for an update!
Eventhough work kept me buzy, and I didn't always feel like working on the cruiser, there is big progress!
In the last post, the body was sent to the painter. While I was in China for work, the body and all paneling has been painted in the industrial grey.
.jpg")
first picture I got from the painter.


The body being pikked up


all hollow areas have been treated multiple times with conservation wax. On this pic, all drain holes were plugged by rags to keep as much of it in.
It's been a while (over three months
) but it's time for an update!Eventhough work kept me buzy, and I didn't always feel like working on the cruiser, there is big progress!
In the last post, the body was sent to the painter. While I was in China for work, the body and all paneling has been painted in the industrial grey.
first picture I got from the painter.
The body being pikked up
all hollow areas have been treated multiple times with conservation wax. On this pic, all drain holes were plugged by rags to keep as much of it in.
Jente
Active Member
- Joined
- Jun 10, 2014
- Messages
- 83
- Country Flag

all panels preserved with wax on the inside.


so far, over eight of these are allready in the body and all panels


Trial fit of a blacked panel to check the contrast. I'm really happy on the color scheme with the grey and the deep black.

With the body put aside in the shop, it's time to start on the chassis. Or what was left of it.....

first Engine and tranny out of it. Since both gearbx and transfer case were overhauled and the engines compression and oil pressure were good, I don't plan on any major works on this assembly. Maybe in a few years I'll take the engine out again for a winter overhaul.

Since it had been a while without welding, I used some left over steel to make good stand for the engine assembly. Just got to find me some decent wheels to bare that weight

Next up: rear axle.


I went a bit further than anticipated by removing all brake parts, brake lines, stabilizer etc. But I'll do this once, so better do it properly!

Next up will be the front axle, and then getting the replacement chassis ready. On this chassis I'll need to reposition the engine mounts as I'll be using an FJ62 patrol chassis.
Last edited:

Jente
Active Member
- Joined
- Jun 10, 2014
- Messages
- 83
- Country Flag
It's been a while since the last update, so time for some pictures!
After both axles being cleaned and painted, it was time I got started on my 'new' chassis.
The chassis is of a FJ62, with auto tranny.


The chassis is in perfect condition! There is some rust on the predictable places, but also has original paint underneath the body mounts, and even paint inside the square sections!


To be expected were rusty C-channels at the back side.


Since the chassis once belonged to a petrol with automatic gearbox, both motor mounts and crossmember had to be repositioned:

Taking the old dimensions using a special tool


I was quit sure about the motor mounts but found it difficult to position the crossmember.
After a lot of measuring I was still not convinced, so I decided to get the engine in for a trial fit.


Smokey...

Next up was making a better version of the original Double C-channels.
Getting al them rivets out was quit a job. A combination of grinding, drilling and smashing the F*** out of them
The plan was to use 90x50x4 square profile, with both ends welded shut.

A bit of a corner at the end.


Cleaning with the wire brush was not good enough, so I wrapped the area in plastic and used the sand-blasting gun:


Tag-welding it in place
 \
\
The end-result


Now the right side will get the same treatment.
After that I need to close the shock-tube and it's ready to be fully sand-blasted and painted.
Can't wait to start building her up again.
I got one question though;
On the chassis there were also all brake and fuel lines, in perfect condition.
The fuel is one big feeding line and a smaller return. On my original set-up the 12HT uses to pipes of the same size, equal to the big on of the 62.
How big is the risk in using the smaller return pipe on my 12HT? I think the difference is 8 and 6mm, but I still need to really measure them.
After both axles being cleaned and painted, it was time I got started on my 'new' chassis.
The chassis is of a FJ62, with auto tranny.
The chassis is in perfect condition! There is some rust on the predictable places, but also has original paint underneath the body mounts, and even paint inside the square sections!
To be expected were rusty C-channels at the back side.
Since the chassis once belonged to a petrol with automatic gearbox, both motor mounts and crossmember had to be repositioned:
Taking the old dimensions using a special tool
I was quit sure about the motor mounts but found it difficult to position the crossmember
.After a lot of measuring I was still not convinced, so I decided to get the engine in for a trial fit.
Smokey...
Next up was making a better version of the original Double C-channels.
Getting al them rivets out was quit a job. A combination of grinding, drilling and smashing the F*** out of them
The plan was to use 90x50x4 square profile, with both ends welded shut.
A bit of a corner at the end.
Cleaning with the wire brush was not good enough, so I wrapped the area in plastic and used the sand-blasting gun:
Tag-welding it in place
\The end-result
Now the right side will get the same treatment.
After that I need to close the shock-tube and it's ready to be fully sand-blasted and painted.
Can't wait to start building her up again.
I got one question though;
On the chassis there were also all brake and fuel lines, in perfect condition.
The fuel is one big feeding line and a smaller return. On my original set-up the 12HT uses to pipes of the same size, equal to the big on of the 62.
How big is the risk in using the smaller return pipe on my 12HT? I think the difference is 8 and 6mm, but I still need to really measure them.
Attachments
tonytoyota
Well-Known Member
- Joined
- Sep 9, 2010
- Messages
- 1,800
- Country Flag

Hi that is one good job on the cruiser love it thanks for the pics from .Tony

Sorry, no, but this is one very special build, thanks for posting all these great photos!
Jente
Active Member
- Joined
- Jun 10, 2014
- Messages
- 83
- Country Flag
Thnx Clive,
Think I'll have a look at mud. Over in the states there must be plenty builds transferring FJ62 --> 12HT.
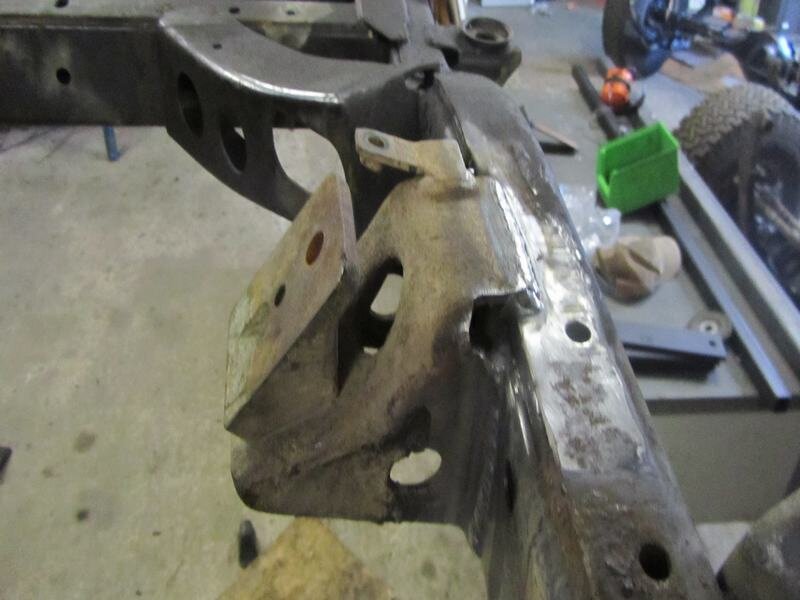
Meanwhile also the right side has been fitted and welded (forgot to take a pic in the last stage)

Just when I thought I was done, I took a closer look at the back cross section. It had a tow-hook mounted in the middle which is not the right way
(yes, the tow-hook should be in the middle, but is should be mounted on the side of the chassis imho)
Allthough not visible on the picture it had a crack in the metal in both layers.


But if you do it once, you'd better do it right!
To avoid bending the chassis, I installed some braces.


Good opportunity to try out the new hacksaw

I used square profile of 140x70x4mm

Profile had to be tapered at the end, since it was about 10 mm too high. Both ends are welded shut


Next up is the other side, check it all around once more and get it to the blaster
Think I'll have a look at mud. Over in the states there must be plenty builds transferring FJ62 --> 12HT.
Meanwhile also the right side has been fitted and welded (forgot to take a pic in the last stage)
Just when I thought I was done, I took a closer look at the back cross section. It had a tow-hook mounted in the middle which is not the right way
(yes, the tow-hook should be in the middle, but is should be mounted on the side of the chassis imho)
Allthough not visible on the picture it had a crack in the metal in both layers.
But if you do it once, you'd better do it right!
To avoid bending the chassis, I installed some braces.
Good opportunity to try out the new hacksaw
I used square profile of 140x70x4mm
Profile had to be tapered at the end, since it was about 10 mm too high. Both ends are welded shut
Next up is the other side, check it all around once more and get it to the blaster
Similar threads
- Replies
- 17
- Views
- 380