Don't like the adverts? Click here to remove them
You are using an out of date browser. It may not display this or other websites correctly.
You should upgrade or use an alternative browser.
You should upgrade or use an alternative browser.
KZJ73 front axle
- Thread starter Dalky
- Start date

Tel Boy
Member
- Joined
- Dec 19, 2019
- Messages
- 140
- Country Flag

Hi Dalky, it's a bit busy here today but beginning to quieten down now.
That third kit is good because it has gaskets for the f/w hubs as well - just the wrong ones for you. Maybe there is a kit which includes manual f/w hub gaskets. You could also do with new adjusting nuts for the wheel bearings.
You need this file from the manual. All the procedures and torques are in there
Attachments
Tel Boy
Member
- Joined
- Dec 19, 2019
- Messages
- 140
- Country Flag
Yes, I have done these jobs a few times and you can do it without any of those SSTs or the spring gauge.
Start by using the same thickness shims as you took off. As you will have new bearings that might end up a bit too tight. If so, then put in one or two more thin ones and continue to try everything by feel. Each time you must do up the 4 nuts at top and 4 at bottom to the correct torque, which is REALLY tight. When the shims are correct you will be able to turn the knuckle very easily with no feeling of tightness but there will be no up-and down and no in-and-out movement on the bearings at all. It takes a few tries.
The other thing I found was I don't like the wheel bearing torque it says in the manual. I found it too tight. With the front wheel off the ground it would stop spinning really soon and stop suddenly. And after driving for 30 minutes the hub was very hot, not too hot to touch, but really uncomfortable to keep your hand on it. So when I assembled the bearings, after tightening the first nut and spinning the hub backwards and forwards a few times, slackening and then repeating several times, as per instructions to locate the wheel bearings properly, I slackened off the first nut and, being very careful not to disturb the hub, then re-tightened it using only fingers until it just touched the thrust washer. Then after putting on the lock washer I tightened the outer nut to something like 45Nm instead of 64Nm. Then the wheel spins freely, stops gently and stays cool on the road. The nut is locked, so cannot come loose, and there is no slack in the bearings. I advise you to try yourself and see what you think. You want it just a little bit tight but not too much.
Good luck. Let us know the result.
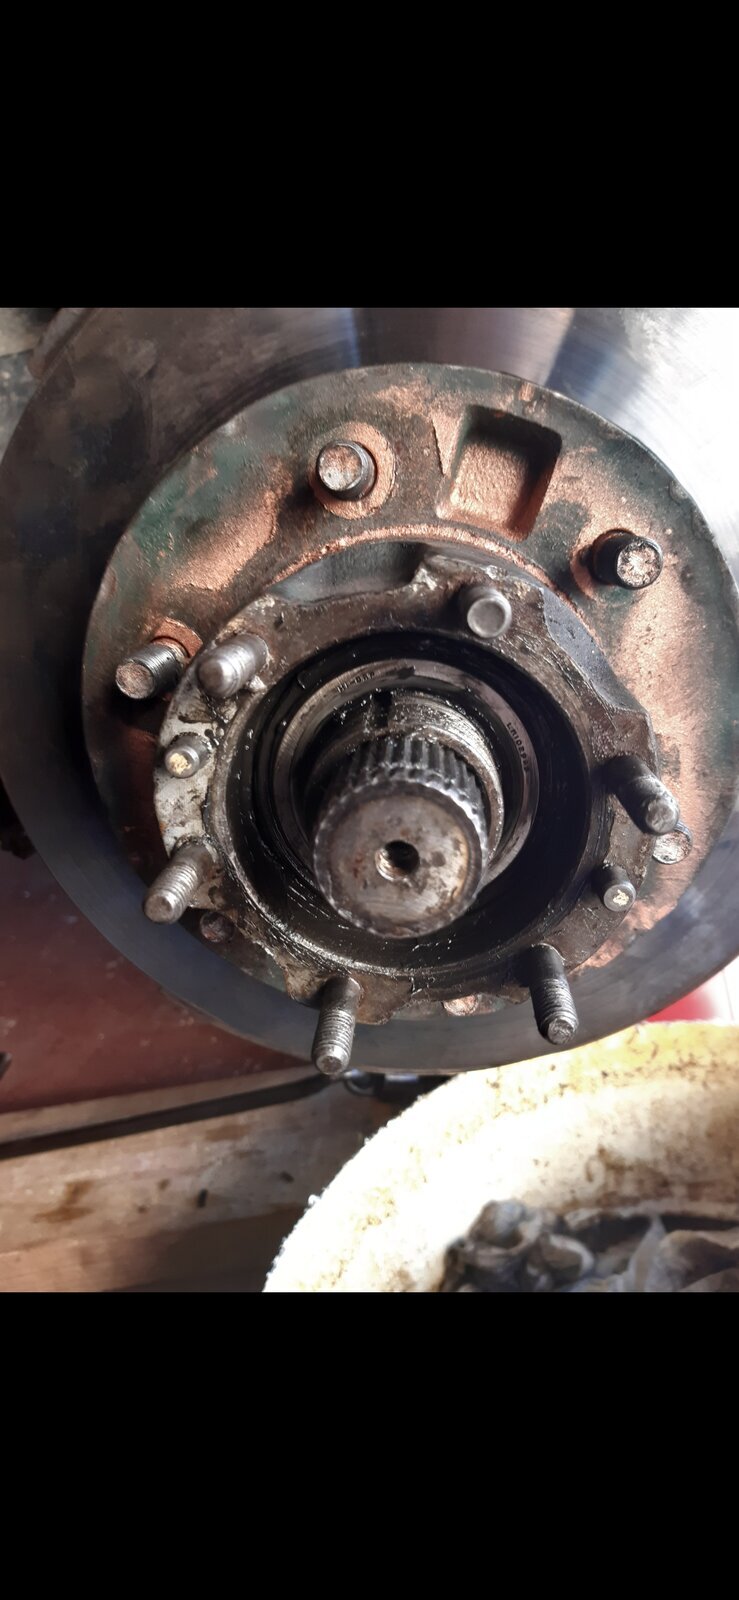
Hi Tel Boy, I waw waiting a long time for the 54mm socket, so I jumped into it today. I removed the both 54mm nuts but I can not remove the rotor/disc. I can see the wheel bearing but I can not pull the disc out. It there something more to release? Can you help me where is the problem? Thanks
Edit: no result after hours of effort by a rubber hammer, the rotor stuck on the spindle. What can be there stuck, the bearings?
Edit: no result after hours of effort by a rubber hammer, the rotor stuck on the spindle. What can be there stuck, the bearings?
Attachments
Last edited:
Tel Boy
Member
- Joined
- Dec 19, 2019
- Messages
- 140
- Country Flag
I have never seen one stuck in place like that and I can't think what could be holding it on. I can see from your photo there is nothing holding the hub in place, the numbers on the bearing race are visible. Normally a quick wiggle on the disc and the bearing just falls out and you lift off the entire rotor & hub together. Try tapping the bearing race with a rod and metal hammer while you spin and wiggle the rotor, to see if it will come loose. If not, then try walloping it to shock it loose.
If all else fails you might have to make up a tool which pulls on the hub studs and has a bolt to push on the centre of the shaft. An easy thing to make up if you have a few bits of angle bar lying around the garage, a drill, a nut & long bolt and a welder.
If all else fails you might have to make up a tool which pulls on the hub studs and has a bolt to push on the centre of the shaft. An easy thing to make up if you have a few bits of angle bar lying around the garage, a drill, a nut & long bolt and a welder.
Don't like the adverts? Click here to remove them
Finally I had a bit a success today and made to tap it out, disassembled and cleaned everything. In the next days I will try to adjust a preload and put all together.
I have noticed some rusty brake lines and cracked brake hose which I will replace at a time. When bleeding brakes can I use the old pedal method? I read somewhere that it might damage a seal in master cylinder but not sure if it applies also to 70 series.
I have noticed some rusty brake lines and cracked brake hose which I will replace at a time. When bleeding brakes can I use the old pedal method? I read somewhere that it might damage a seal in master cylinder but not sure if it applies also to 70 series.
Hello Tel Boy, hope you are fine. I think I need your help again.
Today I spend few minutes in order to adjust a preload. I started by 2 shims up and 2 down, the old ones were like that. The knuckle was very loose, I could even move it up and down by hand. So I took out one shim up and down, ie I left only one the thinest shim up and one the thinest shim down. Now It was tight, but not enough, when I measured a preload it was 1kg instead of 3-6kg. If I use no shims or only one shim(preferable up or down?) maybe I will reach 3kg. It is possible to have a knuckle without shims?
Thanks.
Tel Boy
Member
- Joined
- Dec 19, 2019
- Messages
- 140
- Country Flag
Hi Dalky,
Sorry for the delay, I have been away for a few days. It's good to see you are making progress and you have reached the point where rebuilding with new parts has started.
Brakes
You can use the old pedal method without any damage to the master cylinder, I have done this many times with no problems at all.
Shims
Yes it is possible to have no shims, my old LJ70 was like that. And it does not matter if the shims are not the same number or thickness at top and bottom. Shims do not have to be even. The knuckle is "floating" between top and bottom and it's OK in any position provided it is more or less in the middle and the preload is right. From your description it sounds like you probably need just one thin shim, and it makes no difference if it is up or down. If you choose up there is less dirt and grit. If you choose down there is less rust because oil & grease always accumulate there.
Hi Tel Boy, great to hear you again! I am done with the job. It was a real nightmare, but not because of the job itself but because of unexpected problems like stuck things, rusty or worn bolts and screws where it tooks hours to loosen or replace them. But ok, now there is no squeaking sound anymore. The wheel has no play and seems to be tight.
Regarding shims, I finally kept one thinest shim up and down. I had a try with only one shim, it seemed to be a little bit tight. With one shim up and down the knuckle was very easy to turn and there was no up and down or in and out movement, so I kept it like that. I was trying to measure a preload, I had some digital device, but it think that device was not working well since there was always about 1,5kg preload although by hand I felt a change.
I bled the breaks with the pedal method but scared of it I was pressing the pedal only into its halfway. There was no problem to bleed the lines, everything fine.
I replaced a brake rotor, brake hose and a break line between the caliper and the hose. The problem now is that the car pulls to the left when breaking(I was replacing the right side). There is no problem with the caliper, I cleaned the new rotor and I am sure there is no air in the system. I hope its due to fact that the surface of the new rotor is not "worn", hence lower breaking effect on that side. I will probably need to do the same kind of job also for the left side, at least to replace the second rotor or everything untill I remember what to do. If you had any other idea what might cause that pulling would be appreciated.
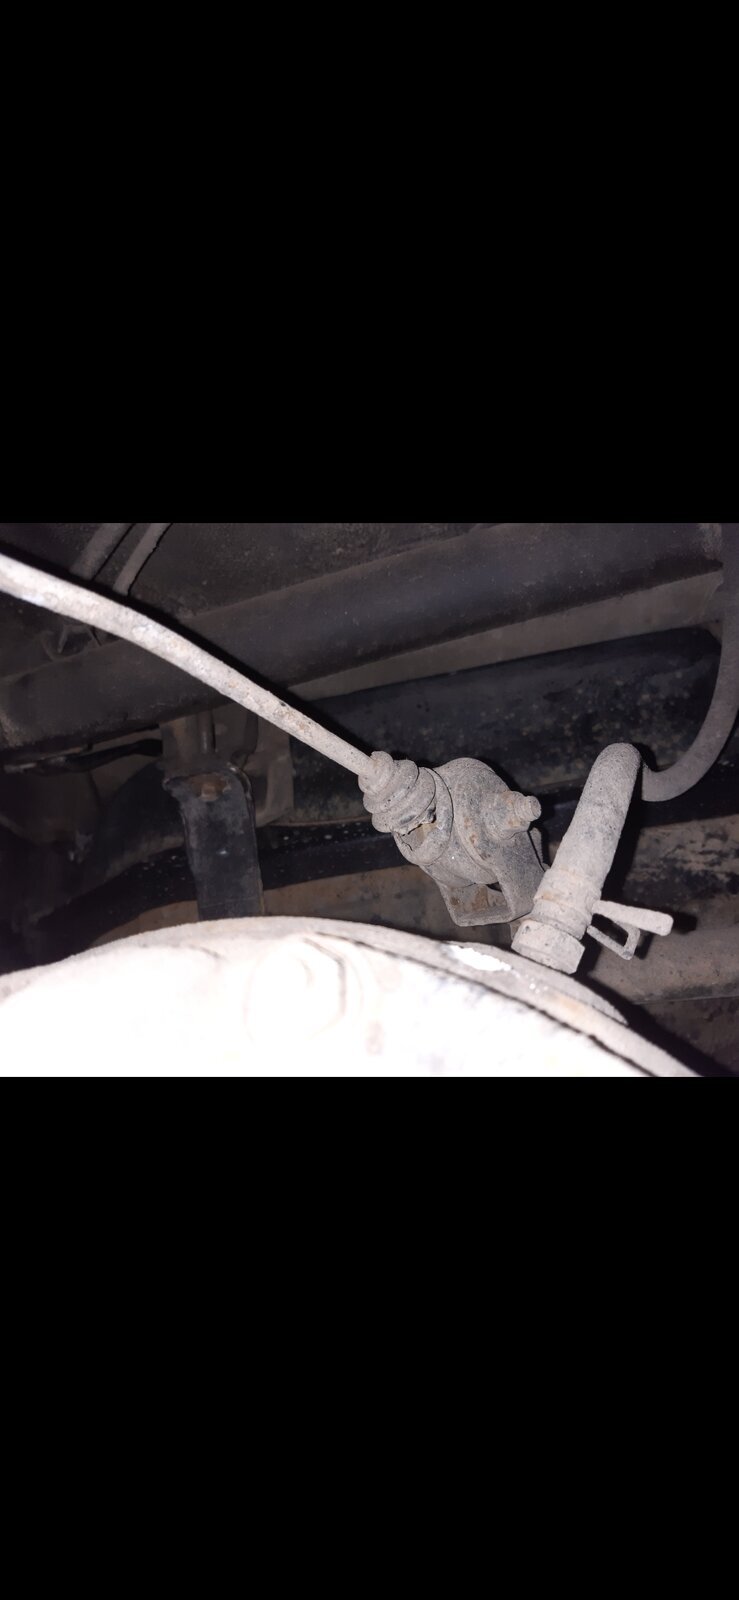
Another thing is that I was checking the whole breaking system. I found one cracked rubber housing, see picture, it´s something with a hand break?
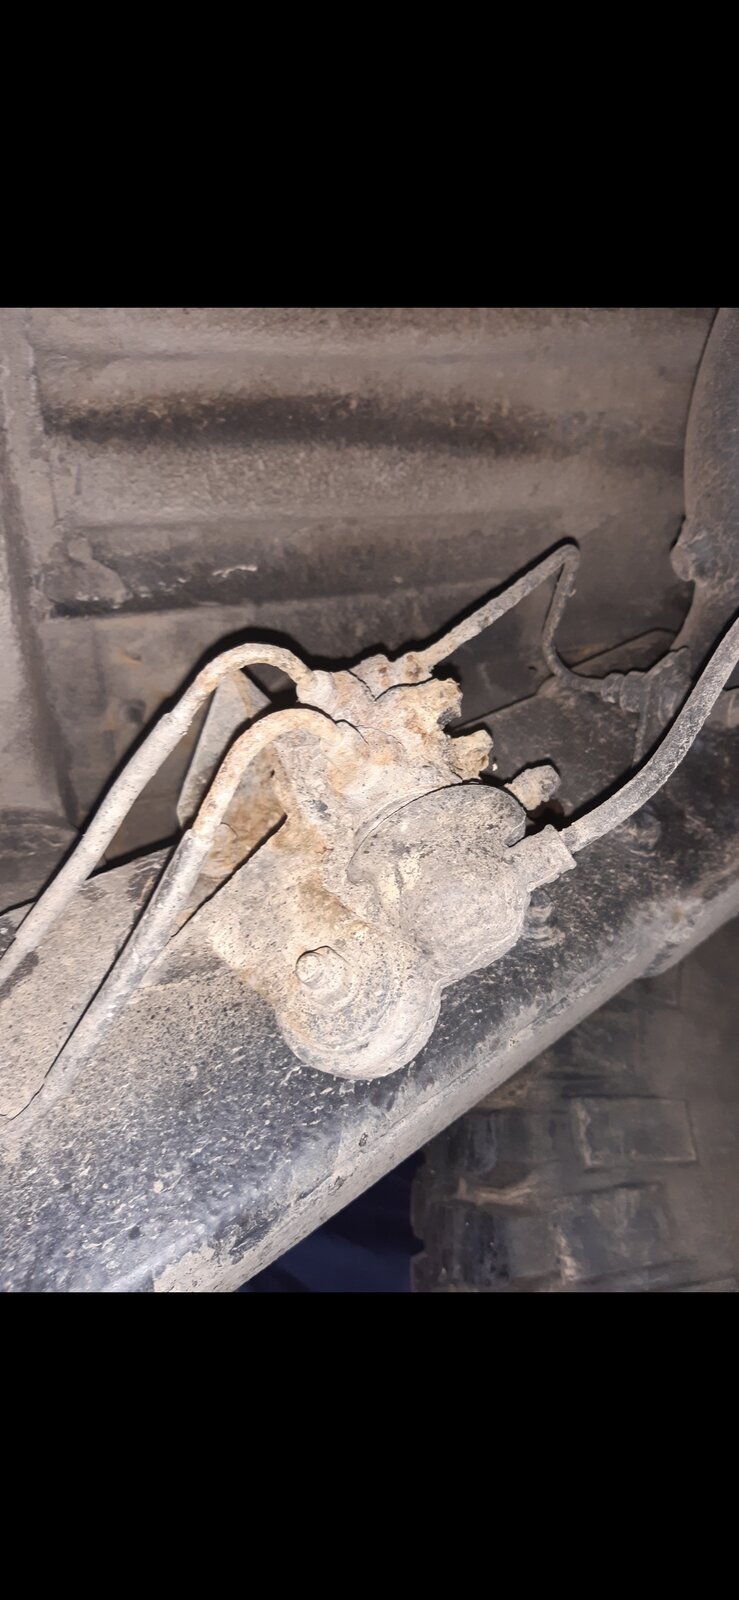
Other picture is a rear break cylinder? The breaklines comming to that cylinder(or what is it) are very rusty (the rust starts 30 cm before the cylinder, untill then they are fine) and I will definitelly have to replace them or a rusty part of them. I can imagine the future, it will be a nightmare to loosen that bolts. I think there is also a bleeding valve(?)... Do you have any experience how to refurbish that thing(if it´s possible).
Thanks&Greetings.
Regarding shims, I finally kept one thinest shim up and down. I had a try with only one shim, it seemed to be a little bit tight. With one shim up and down the knuckle was very easy to turn and there was no up and down or in and out movement, so I kept it like that. I was trying to measure a preload, I had some digital device, but it think that device was not working well since there was always about 1,5kg preload although by hand I felt a change.
I bled the breaks with the pedal method but scared of it I was pressing the pedal only into its halfway. There was no problem to bleed the lines, everything fine.
I replaced a brake rotor, brake hose and a break line between the caliper and the hose. The problem now is that the car pulls to the left when breaking(I was replacing the right side). There is no problem with the caliper, I cleaned the new rotor and I am sure there is no air in the system. I hope its due to fact that the surface of the new rotor is not "worn", hence lower breaking effect on that side. I will probably need to do the same kind of job also for the left side, at least to replace the second rotor or everything untill I remember what to do. If you had any other idea what might cause that pulling would be appreciated.
Another thing is that I was checking the whole breaking system. I found one cracked rubber housing, see picture, it´s something with a hand break?
Other picture is a rear break cylinder? The breaklines comming to that cylinder(or what is it) are very rusty (the rust starts 30 cm before the cylinder, untill then they are fine) and I will definitelly have to replace them or a rusty part of them. I can imagine the future, it will be a nightmare to loosen that bolts. I think there is also a bleeding valve(?)... Do you have any experience how to refurbish that thing(if it´s possible).
Thanks&Greetings.
Attachments
Tel Boy
Member
- Joined
- Dec 19, 2019
- Messages
- 140
- Country Flag
That's great to hear the job is done and the squeak is gone. That's what it was all about. Now you have a healthy car. Congratulations on a successful result. I'm afraid the struggle you had with stuck and rusted fastenings is part of the fun of owning a truck which is over 25 years old. I'm really glad to hear you were able to get everything off without damage or breakages. You sound like a careful, patient and persistent mechanic. Not the usual type of mechanic!
Your choice of shims sounds about right if you describe it as tight but only just tight, and if your other choice was too tight. After trying so many different combinations you get a good feel for it in the end.
I think your diagnosis of why your brakes are pulling towards the side with the old rotor is exactly right. I think you will find after 200 or 300 km everything will be normal again when the brakes have bedded in. For this reason the rotors are usually replaced both sides at the same time. Then the brakes don't work well at all to begin with, but they don't pull to one side. The same thing will happen to the other side when you change the other rotor.
Your photos of the rear brakes shows the system for increasing brake pressure to the rear when the car is heavily loaded. The first pic is nothing to do with the handbrake, it's just a joint at the rear of the rod which measures how high the axle is relative to the body. The higher it is the heavier the load and the more pressure goes to the rear brakes. Inside the torn rubber cover is just a mechanical rotating joint, no hydraulics and nothing clever. Best to take it apart, wire brush it and make sure it is rust free and moving freely. Then grease it and put a new rubber cover on to keep it clean & dry.
The second pic is the actual brake proportioning valve (or load sensing valve) which adjusts the rear brake pressure. These often get rusted up and seized solid, but your looks like it may be still OK. When you have the rear of the long rod detached, carefully pull off the rubber cover and move the rod up and down. The front end of it moves a cylinder up and down inside the valve housing. Make sure the cylinder is moving freely also, and there is no brake fluid leaking here. If it is stuck with rust and dirt it can be pulled out and the whole thing cleaned up carefully inside the same way you would do with the front brake pistons in the caliper. Of course this is all much easier if you remove the valve from the car first. If you are going to replace the brake lines in that area then you may find it easier to do that.
This is not a job I have yet done myself, though I need to do it. I have been putting it off for the same reasons you mention - rusted bolts which are hard to reach. There are several threads on this forum about this job. If you search for "brake proportioning valve" and "load sensing valve" you will find some useful information. The valve is bolted to a bracket on the chassis and I remember reading that it is easier to first remove the bracket with the valve still attached. Good luck with this job, if you are as careful as you were with the front hub then you will have a successful outcome with this too. It would be good to hear how you get on, and don't forget to post pics of your good work.
Hi Tel Boy, thanks a lot. You make my life with this car much easier!
I plan do the same job for the other side this weekend. Then I start working on the load sensitive valve, the challenge will be to loosen the bolts and especially the bleeding screw. Hopefully I will be able to bleed the system after replacing the brake lines in that area. I keep you posted.
I plan do the same job for the other side this weekend. Then I start working on the load sensitive valve, the challenge will be to loosen the bolts and especially the bleeding screw. Hopefully I will be able to bleed the system after replacing the brake lines in that area. I keep you posted.
Hi Tel Boy,
So I did the other side as well. This time the rotor and the bearing went out very easily. The only problem I had were the upper studs. When tighting the nuts these studs were comming out from their threads, so it took me a while to tighten them.
I replaced the other rotor as well, now the car goes straight when breaking.
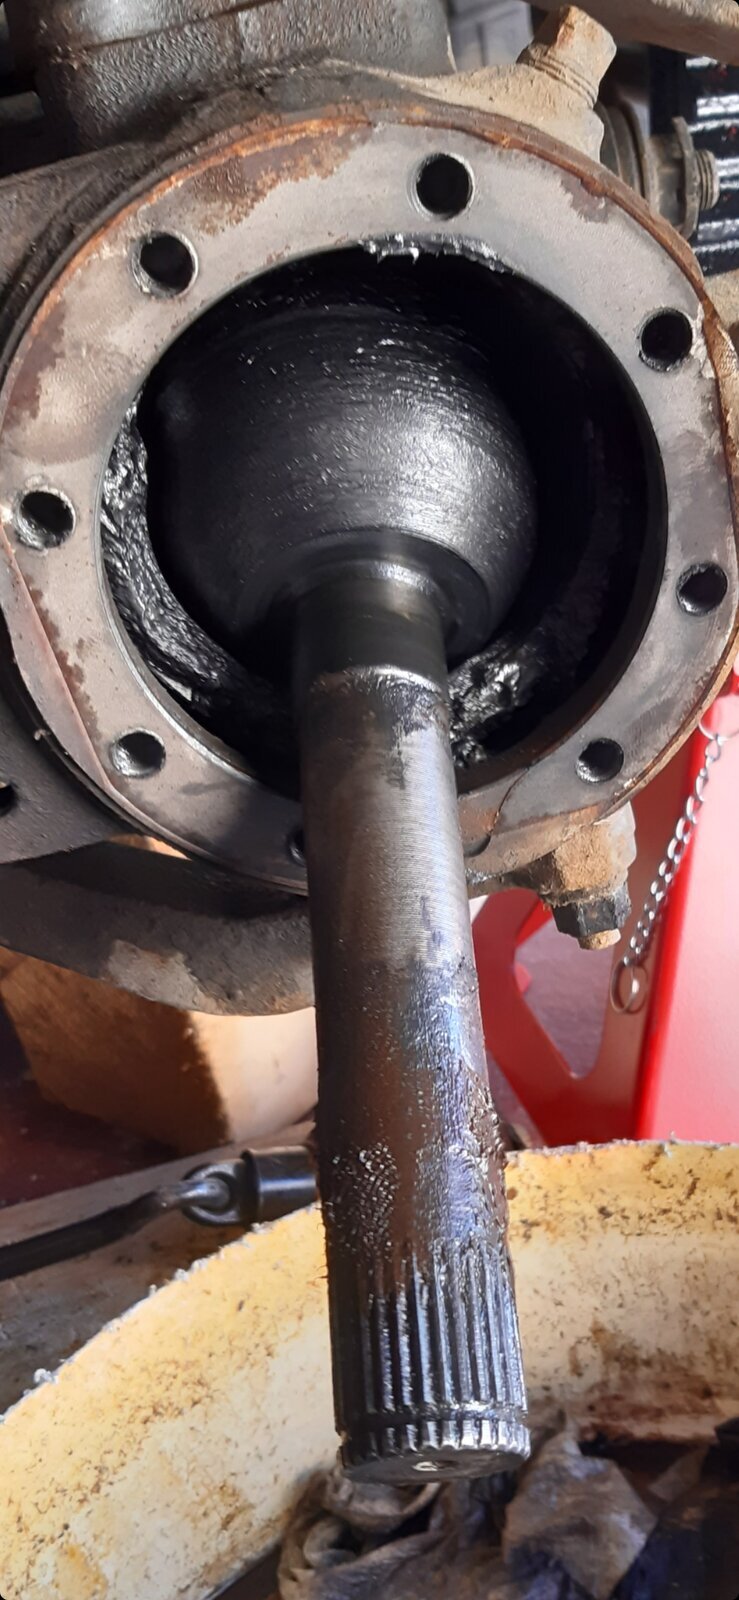
I 'm watching some photos from when I was previously working on the "squeaking" side, see attached. You can see some rust on the spindle, mixed with grease. I wonder if this could also have caused some squeaking.
So now the knuckle bearing's and squeaking story is over, thanks again for your big help, and I can start working on other issues.
Apart from the load sensitive valve, which is already on the list, I have a problem with a high/low beam switch. It switches to high beam anytime, very annoying. Don't you know if it can be fixed or do I need a new piece?
Then I have noticed some rattle(difficult to explain) from the clutch, when I press the clutch it stops. I would say that one of springs which are on the clutch plate is loose, maybe broken. Otherwise I have no issue with the clutch, so I'm not sure if I should start thinking to replace it or leave it be. What do you think?
Thanks&Regards.
So I did the other side as well. This time the rotor and the bearing went out very easily. The only problem I had were the upper studs. When tighting the nuts these studs were comming out from their threads, so it took me a while to tighten them.
I replaced the other rotor as well, now the car goes straight when breaking.
I 'm watching some photos from when I was previously working on the "squeaking" side, see attached. You can see some rust on the spindle, mixed with grease. I wonder if this could also have caused some squeaking.
So now the knuckle bearing's and squeaking story is over, thanks again for your big help, and I can start working on other issues.
Apart from the load sensitive valve, which is already on the list, I have a problem with a high/low beam switch. It switches to high beam anytime, very annoying. Don't you know if it can be fixed or do I need a new piece?
Then I have noticed some rattle(difficult to explain) from the clutch, when I press the clutch it stops. I would say that one of springs which are on the clutch plate is loose, maybe broken. Otherwise I have no issue with the clutch, so I'm not sure if I should start thinking to replace it or leave it be. What do you think?
Thanks&Regards.
Attachments
Tel Boy
Member
- Joined
- Dec 19, 2019
- Messages
- 140
- Country Flag
Hi Dalky, you have been busy. I am glad to hear that everything went well. I don't know about rust causing the squeak but I do know that rust is a not a good thing to see in your hubs. Water has got in, the seals had gone, so it's good that you have rebuilt the hubs now.
With your headlights it sounds like you have a stray strand of wire or something has come loose, probably in the switch on the steering column. You will have to take it apart and have a look. Hopefully it is something you can fix easily.
With your clutch it might be a worn release bearing. That can make a rattling noise when it's worn loose with dirt and grit from off-roading. Since the clutch is working OK you might prefer to leave this one until it gets worse. It's a straightforward job to replace it but the gearbox has to come out, and with the transfer box attached it is a bloody heavy, awkward lump to heave around. You will need to plan the job well with a big jack on wheels. In fact it's such a pain that while you have it all apart it's probably worth putting in a new clutch at the same time. Do you know how many km your clutch has done?
Hi Tel Boy,
Thanks for your comments.
Unfortunately I do not know the history of my clutch. I made a record of that sound. It sounds springy I would say, that's why I think it is one or more springs on the plate which is loose. It's not the best record but maybe you can hear it. If not I'll try to make it better.
Let me ask you one more question about bleeding of the load sensitive valve. When bleeding the rear brakes, what is the bleeding order? I mean, this valve has to be bled as the last, or the first one and then the rear calipers?
Thanks&Regards.
Attachments
Tel Boy
Member
- Joined
- Dec 19, 2019
- Messages
- 140
- Country Flag
It's so hard to tell with a rattle. All I can say is that it certainly sounds more rattly than mine at tickover, but the source of the rattle is a mystery to me. I can't say it sounds like the clutch or the release bearing. You say the rattle disappears when you put your foot on the clutch pedal, so maybe it would be worth making a recording of the noise again. Start with foot off, then put foot on the pedal, than off again. Maybe that will reveal something.
This is getting outside my direct experience. It would be best if another owner with a 1KZ chips in here with the benefit of their experience if they have heard their own truck making a noise like that. My advice here is to start a new thread with your new recording and ask if anyone can help identify the source of the rattle. Explain why you think it might be the clutch and see what others suggest.
I'm thinking about your bleeding question on the brakes (so to speak) and it seems to me that once you have had everything apart and a lot of air has got in the logical thing to do is start at the reservoir and work outwards from there, pushing the air out as you go. So bleed the load sensing valve first, then the brakes. In sequence of increasing distance from the reservoir. Does that sound sensible?
Yes, probably the ticking/rattling sound is worth starting a new thread. Fortunately the clutch works ok, but I'd better know where it comes from.
To bleeding. I remember, for other cars which I had there was always a rule to begin at the furthest caliper from the driver and proceed in order toward the driver, ie right rear, left rear, right front, left front. The reason for such way is to minimize the amount of potential cross-contamination between the new and old fluid. But none of these cars had the sensitive load valve, so for KZJ the order can be opposite..
I prefer to ask before then solving a potentional problem after. Normaly this information shlould be in the factory manual. Recently you sent me the "axle" part. Don't you have the part related to bleeding as well?
Similar threads
- Replies
- 3
- Views
- 728
- Replies
- 0
- Views
- 512