Don't like the adverts? Click here to remove them
You are using an out of date browser. It may not display this or other websites correctly.
You should upgrade or use an alternative browser.
You should upgrade or use an alternative browser.
LJ70 Build Thread!
- Thread starter Ben
- Start date

spackrackman
Well-Known Member
- Joined
- Mar 7, 2010
- Messages
- 438
What is Jonnoie going to do with that pile of **** when he gets it back to the UK?
Not letting you near it for one.
- Joined
- Oct 13, 2010
- Messages
- 6,058
- Country Flag

Thanks guys. 

I did think that pic might be a little bit too controversial.
The whole beer in the shower thing came from my mate Suzuki Dave as I've read in his blogs that he always enjoys a cold beer in the shower, especially after a long day 4wding.
A cold beer really does taste better in the shower, you just have to try and remember to move the empties if you've got a Mrs as apparently they don't like finding empties in the soap dish!
Ossum mateAll bar the shower photos... The guys in the office just happened to spot that as I was scrolling down & now think i'm a wooftah!!! :-D
I did think that pic might be a little bit too controversial.
The whole beer in the shower thing came from my mate Suzuki Dave as I've read in his blogs that he always enjoys a cold beer in the shower, especially after a long day 4wding.
A cold beer really does taste better in the shower, you just have to try and remember to move the empties if you've got a Mrs as apparently they don't like finding empties in the soap dish!
Chas
Well-Known Member

Great write up as usual Ben and the customary excellent photos! Thanks!
Liked the 'old car' photo, looked like a Triumph 2000 or 2500 PI. I used to have one of them in brown!
Blerry hell Clive, I had a Triumph 2000 in brown.
Great report Ben, but not enough pictures of Erin.
Last edited:
- Joined
- Oct 13, 2010
- Messages
- 6,058
- Country Flag

Paddler Ed
Well-Known Member
I did think that pic might be a little bit too controversial.
The whole beer in the shower thing came from my mate Suzuki Dave as I've read in his blogs that he always enjoys a cold beer in the shower, especially after a long day 4wding.
A cold beer really does taste better in the shower, you just have to try and remember to move the empties if you've got a Mrs as apparently they don't like finding empties in the soap dish!
I have memories of my first year student house shower's often having empty beer cans or bottles on the window sills from when people had taken in pre-drinks. The big challenge was not getting warm/hot water in your beer!
Looks a good trip; I've been looking at options for a short trip for us up here; in the process of getting the new tyres sorted with which I'll be a bit happier than the mis-matched set I have now (3 Coopers and a Bridgestone... 2 different sizes...) also needs to be something that can be solo'd, as we're on our own up here.
Don't like the adverts? Click here to remove them

Blerry hell Clive, I had a Triumph 2000 in brown.
Great report Ben, but not enough pictures of Erin.
It was a great car, cost me 250 quid! With the overdrive (switch on the gear knob) it would hold 100 mph on the motorway and it was as stable as a rock. Nothing made it sway, trucks, side-winds, nothing. Heavy as lead, but solid, roomy and comfortable. Smooth as silk with the 2 liter 6 cylinder engine. Fond memories of that one.

tonytoyota
Well-Known Member
- Joined
- Sep 9, 2010
- Messages
- 1,800
- Country Flag

Hi Ben the Best write up love the lot of it and love the photos keep up having a good time and keep up with the life style you have I wood like to be in your Shoes but I think that they R to big for my thanks Ben Tony.
AndyCook
Well-Known Member

a great report and trip
looks like a great place to visit
loved the tent portage photo
showed my wife that, as we both remember camping by our car on the Island of North Uist in scottish Outer Hebrides in the 90's.
we spotted a nice grassy spot by road and at edge of the sea, and set up the tent. unfortunately we didn't know it was a spring tide, so when sea was 1m from our tent, we pulled the pegs out and took an end of the tent each. and walked up on road as there was a better spot 50m away, but unfortunately a car came along the road, so we had to scuttle into a passing place on the single-track road to let the car passed - they looked at us as if we were lunatics! , taking our tent for a walk!
of course we didn't see another car for hours after that!
looks like a great place to visit
loved the tent portage photo
showed my wife that, as we both remember camping by our car on the Island of North Uist in scottish Outer Hebrides in the 90's.
we spotted a nice grassy spot by road and at edge of the sea, and set up the tent. unfortunately we didn't know it was a spring tide, so when sea was 1m from our tent, we pulled the pegs out and took an end of the tent each. and walked up on road as there was a better spot 50m away, but unfortunately a car came along the road, so we had to scuttle into a passing place on the single-track road to let the car passed - they looked at us as if we were lunatics!
, taking our tent for a walk!of course we didn't see another car for hours after that!
Paddler Ed
Well-Known Member
Done you tax return yet mate? Just done ours, and I'm hopefully getting a new set of tyres! Woop Woop!
Also when is the update making an appearance?!
Also when is the update making an appearance?!
- Joined
- Oct 13, 2010
- Messages
- 6,058
- Country Flag
No I havnt mate but I know it needs to be in this week.
I spent a few hours doing it online and then got an error message saying I couldnt do it online and would instead have to print out forms and fill them in.
So I'm just going to pay an accountant to do it and then next year I will claim back the accountants fee. I'm owed about $800 so need to get it done.
Not sure when I will get the update up, but all being well before the weekend.
I've spent 4 hours working on LJ tonight trying to get her ready for this weekends 4 day trip. I'm now finally at 9.37pm cooking dinner!
The trip is going to be a really tough one so I need to make sure LJ is in tip top condition.
Paddler Ed
Well-Known Member
I think I've got mine right, but there's a bit where I seemed to go round and round in circles for ages, and then worked out the way out, so it's all good... hopefully...
- Joined
- Oct 13, 2010
- Messages
- 6,058
- Country Flag
I randomly woke up 2 hours before my alarm today and thought I'd get the update done.
OK so Frankenzuke first..................
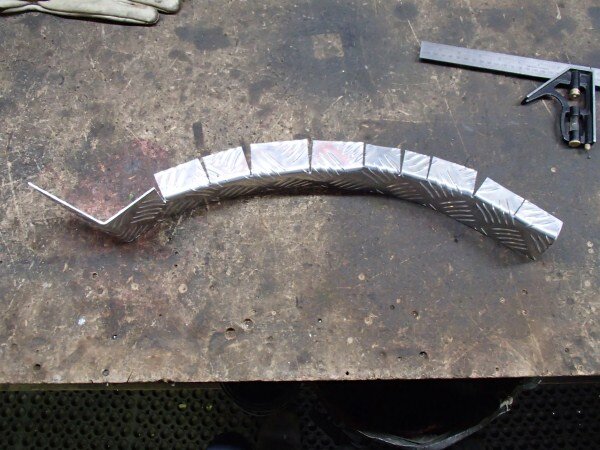
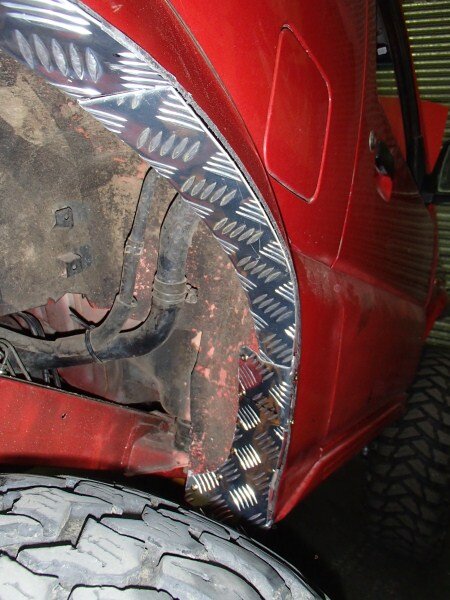
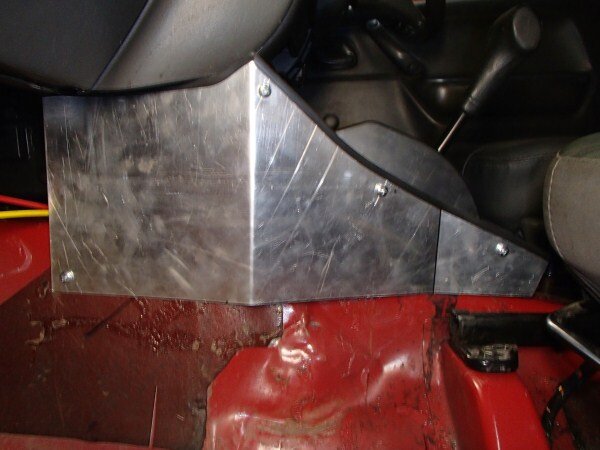
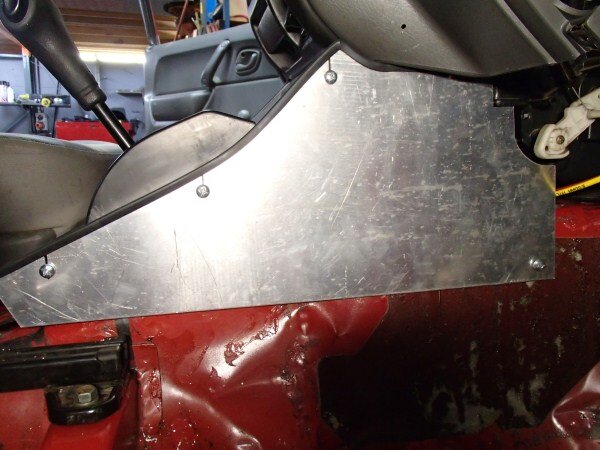
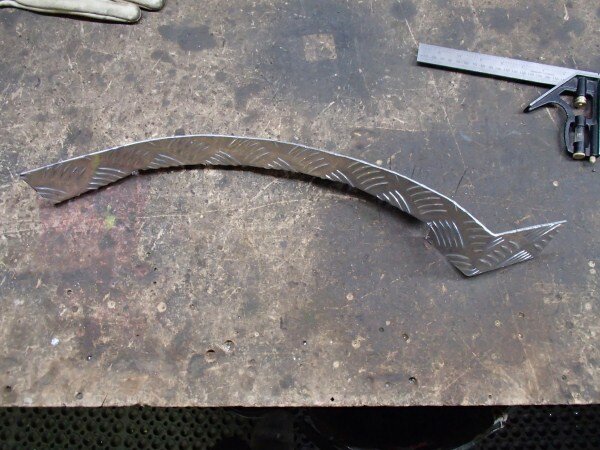
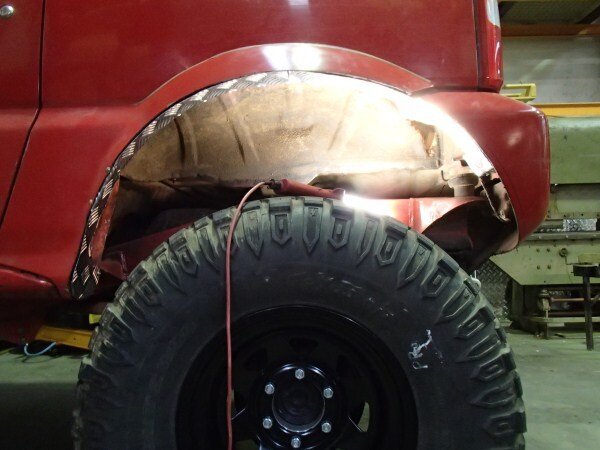
I needed to fill in the inner guards after all the trimming to get the 37" tyres fitted.


Still need to do the fronts but the rears are done.
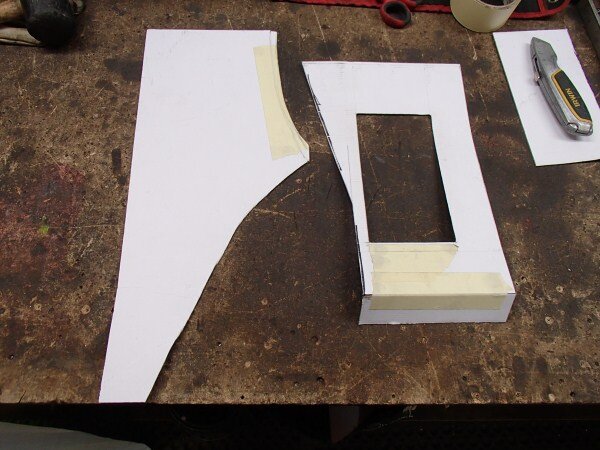
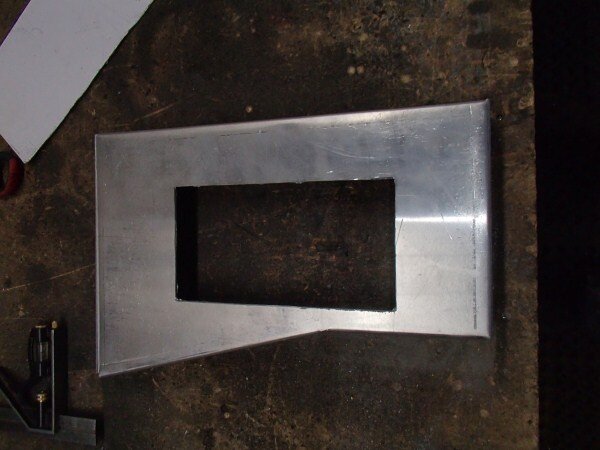
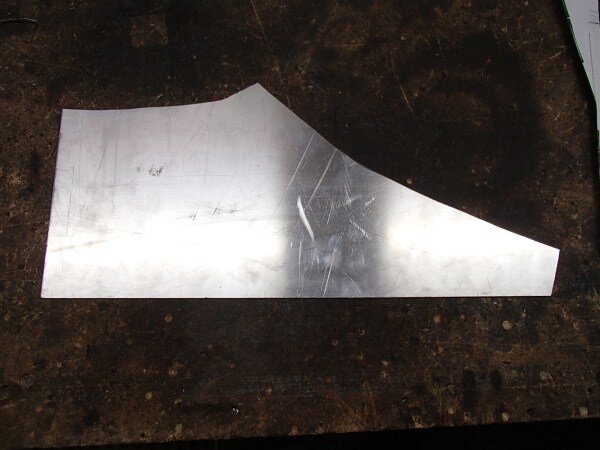
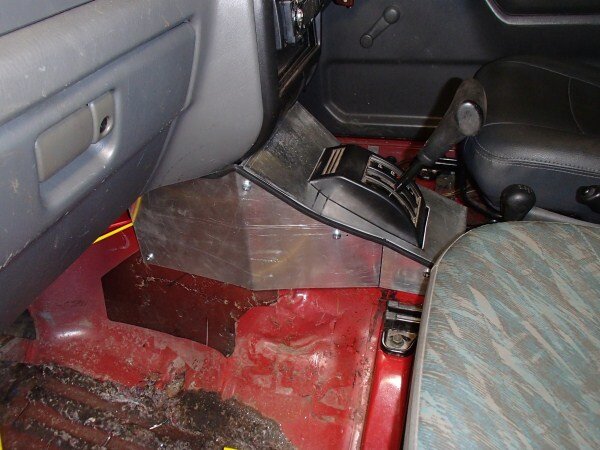
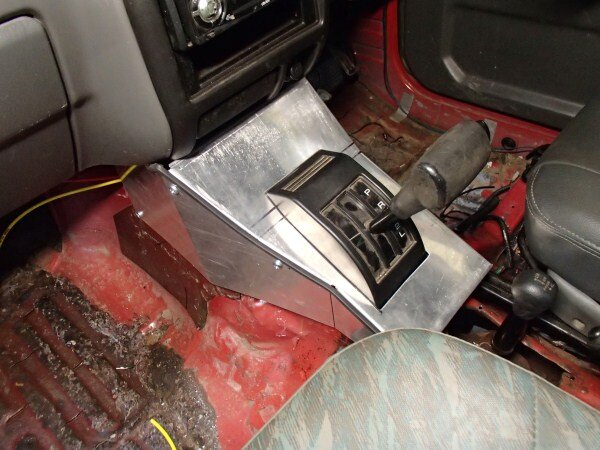
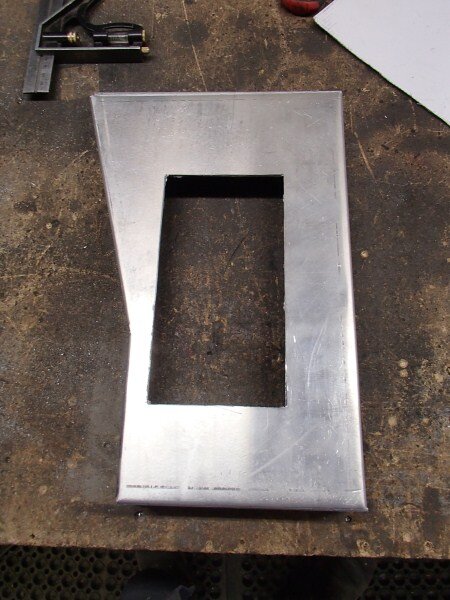
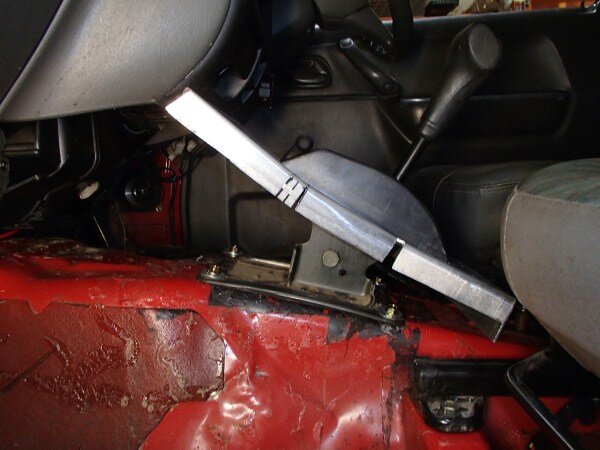
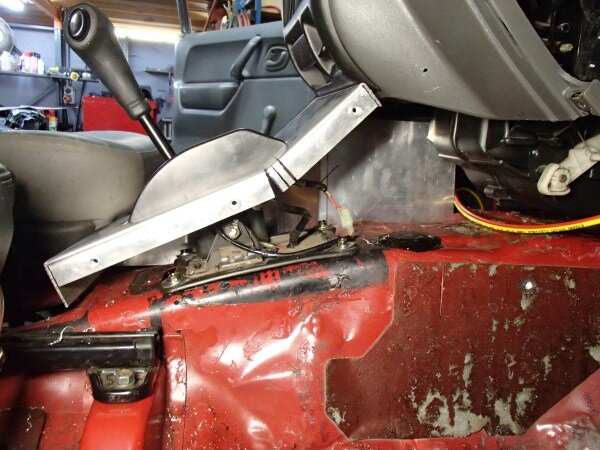
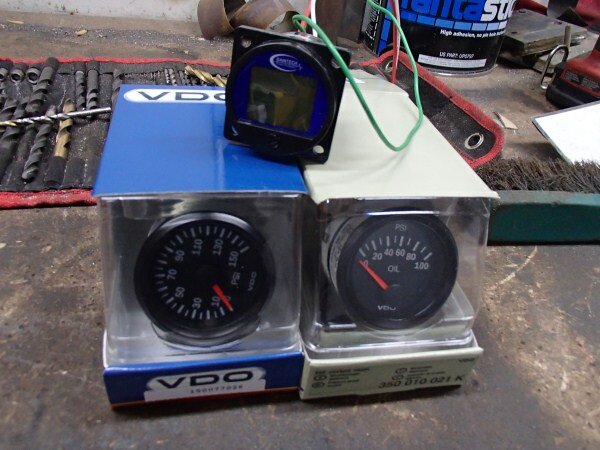
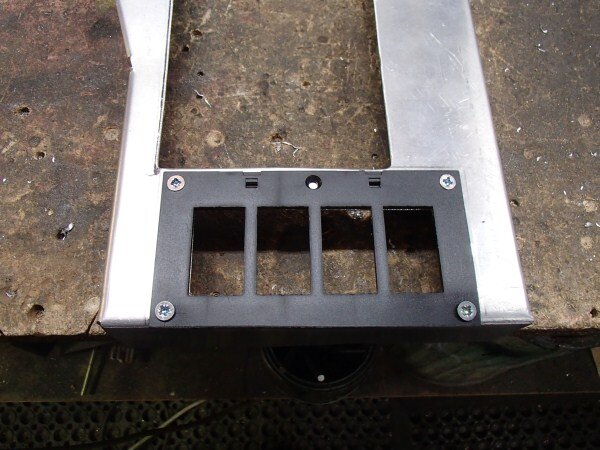
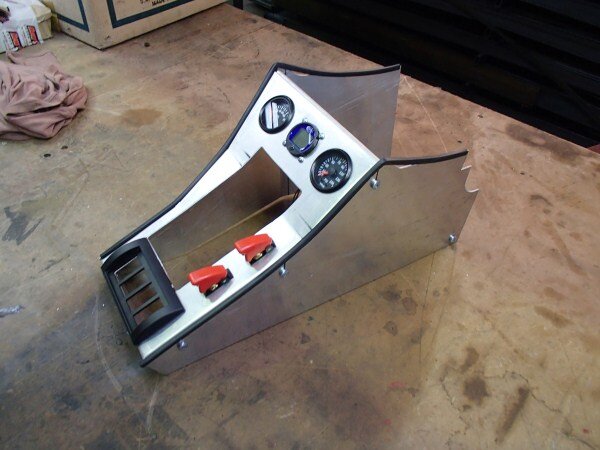
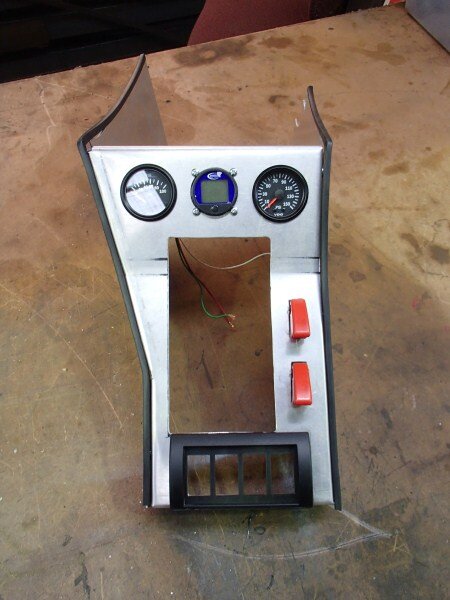
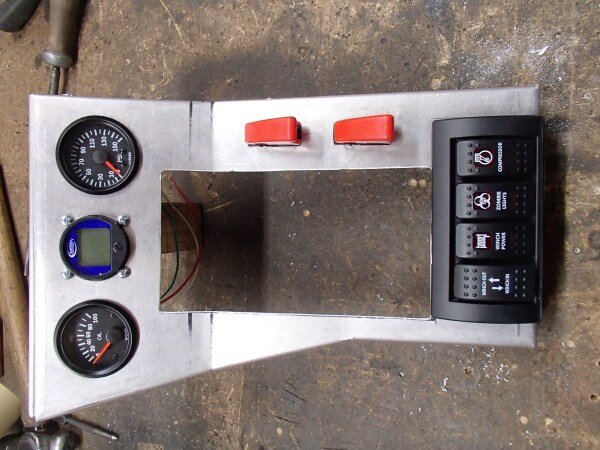
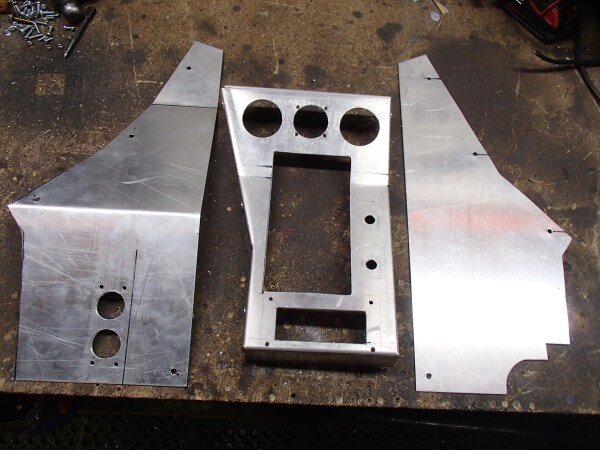
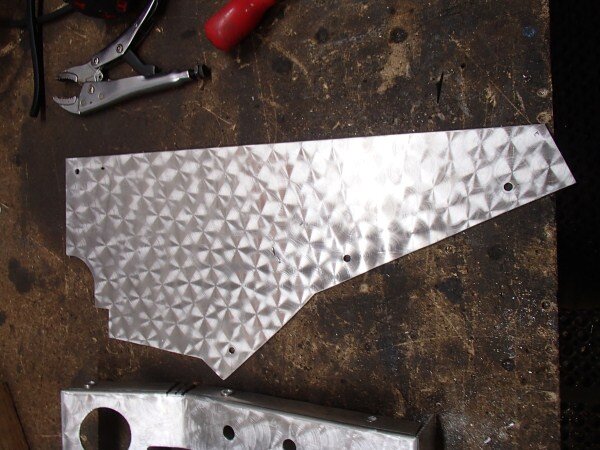
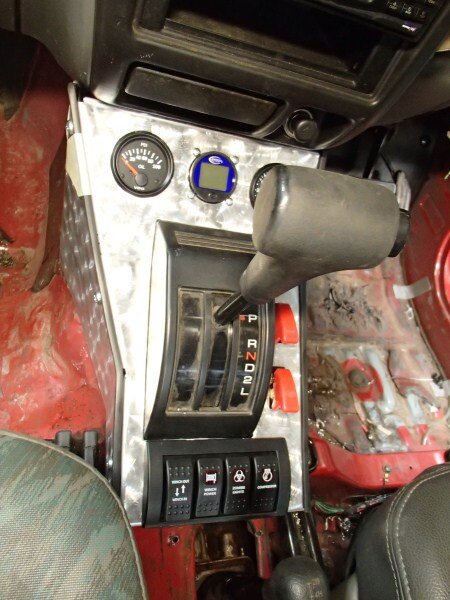
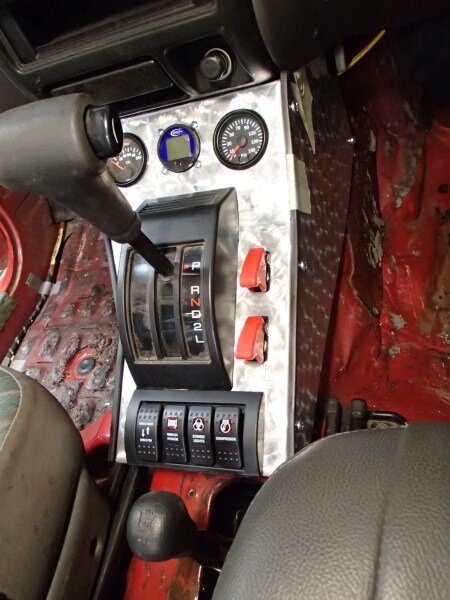
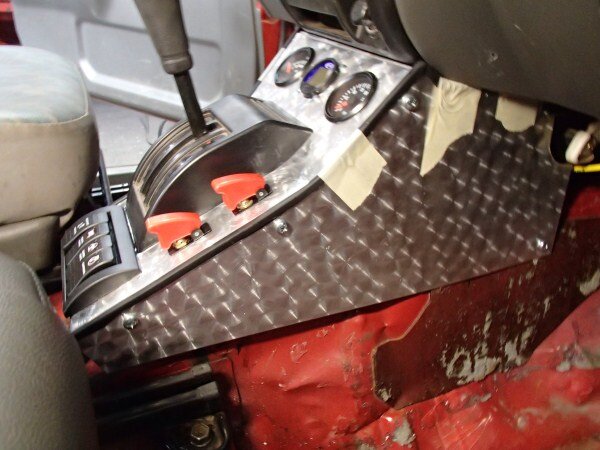
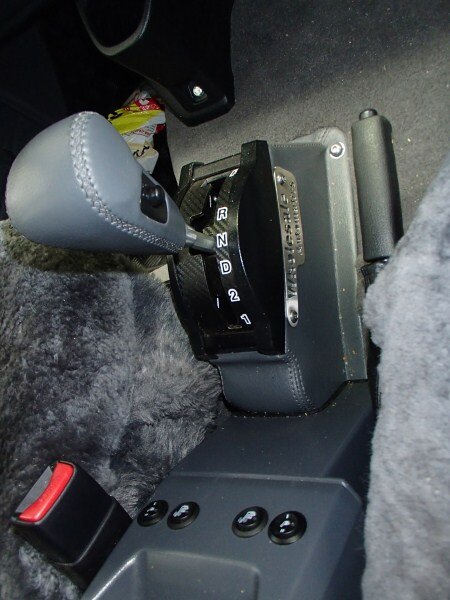
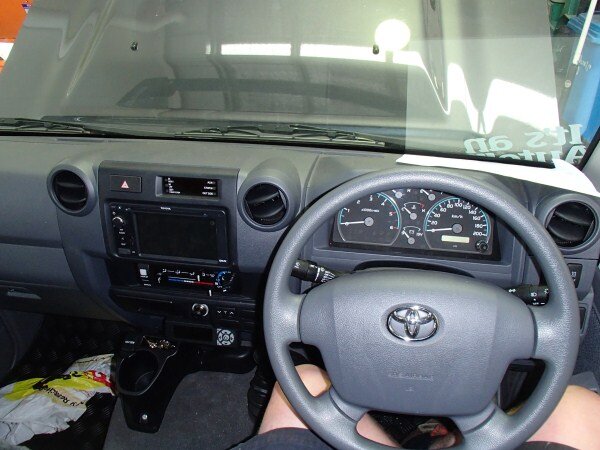
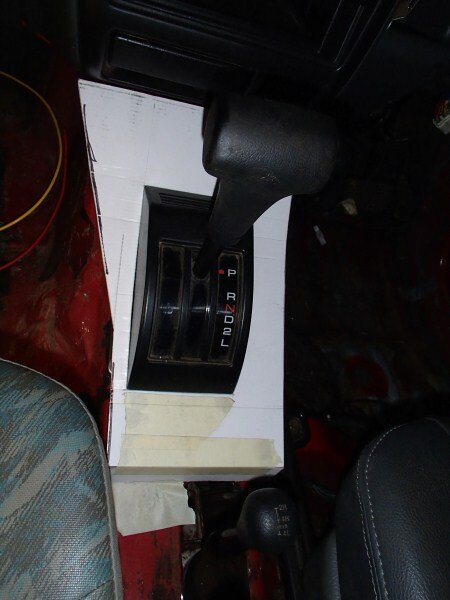
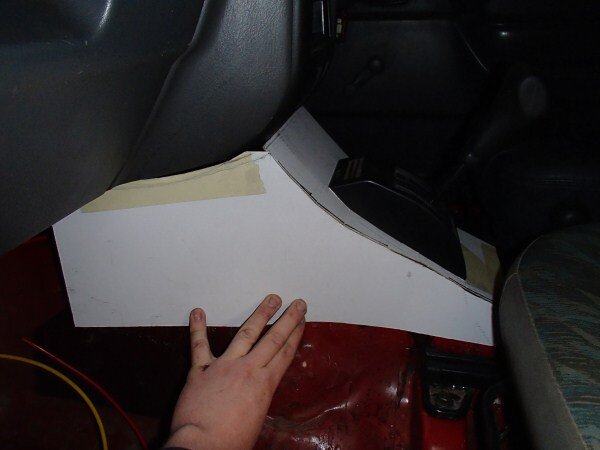
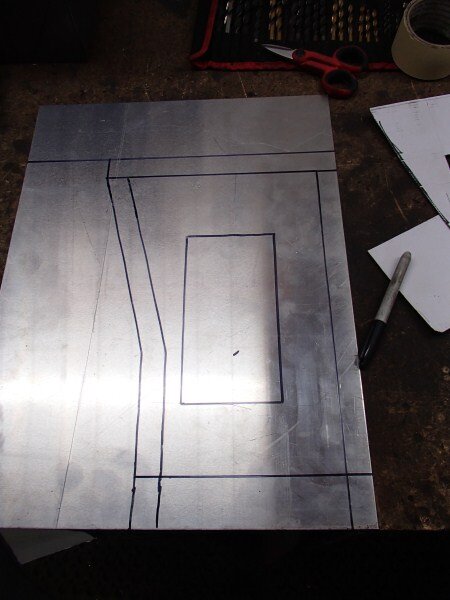
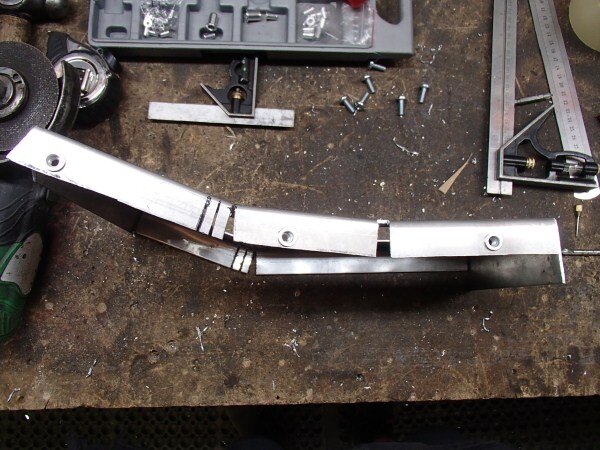
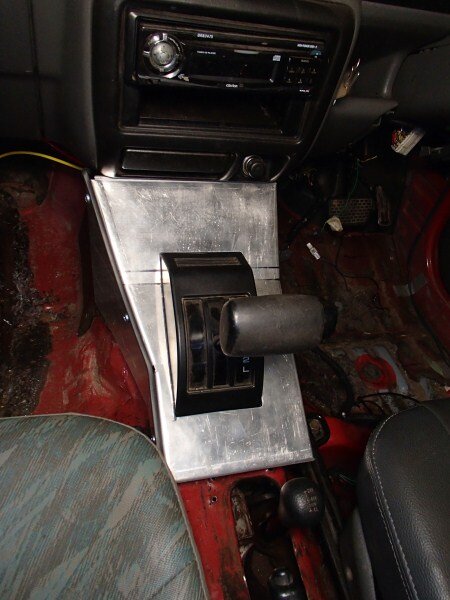
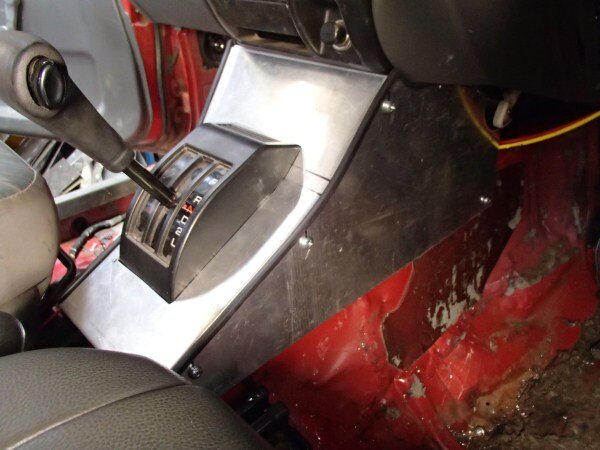
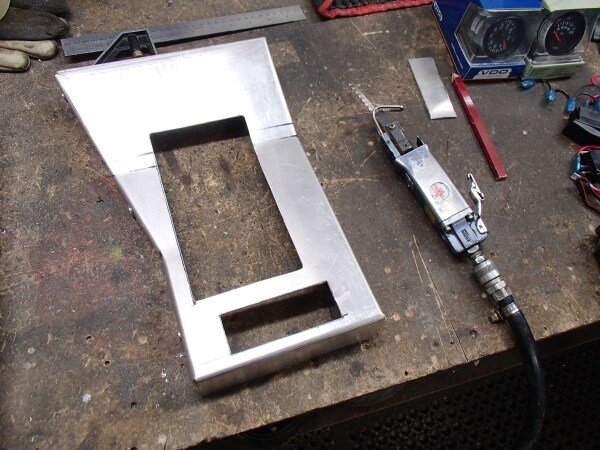
The next job was to build a center console to fit switches and gauges into.

Cardboard template first.


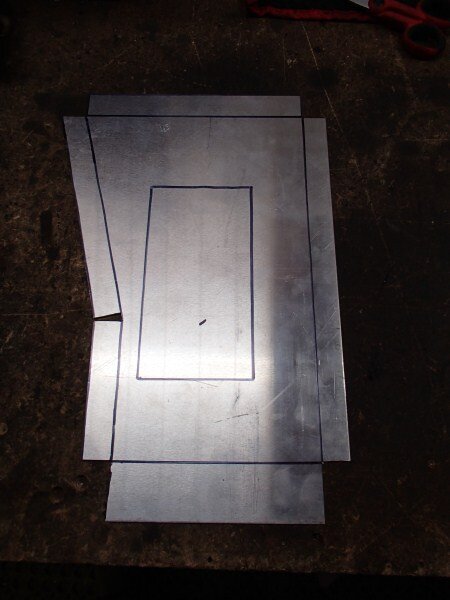
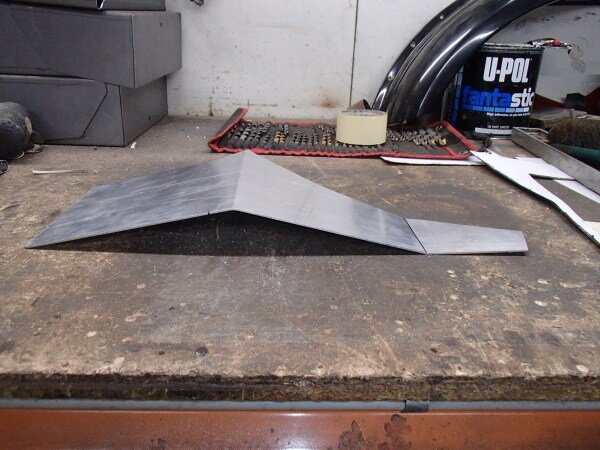
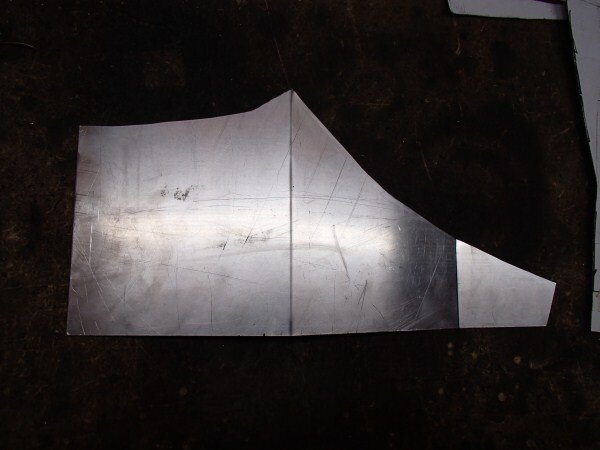
Transferred the size and shape onto aluminum allowing for a 25mm fold all the way around.


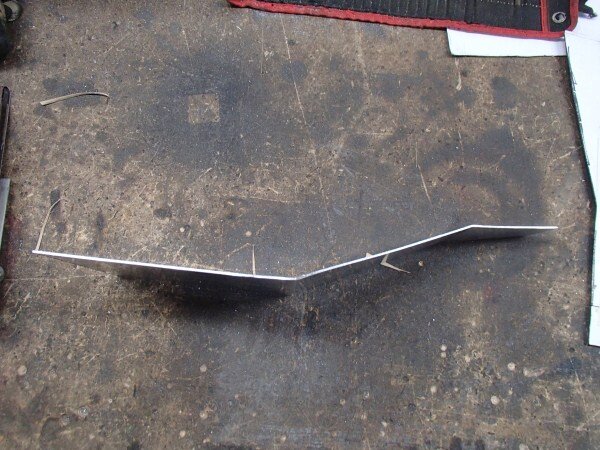
Cut the middle out and folded the edges.


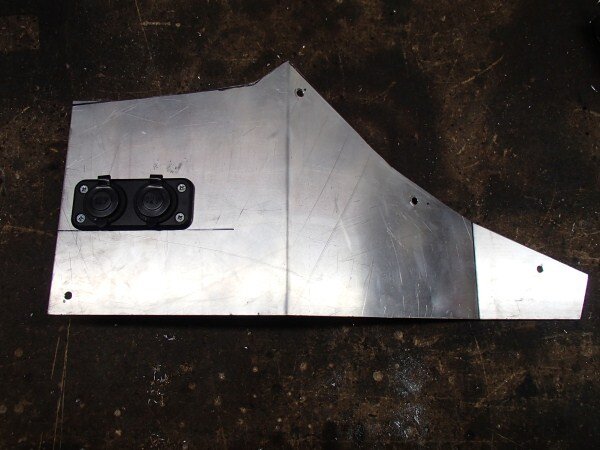
Made the sides.


Drilled and rivnuted.


Other side.


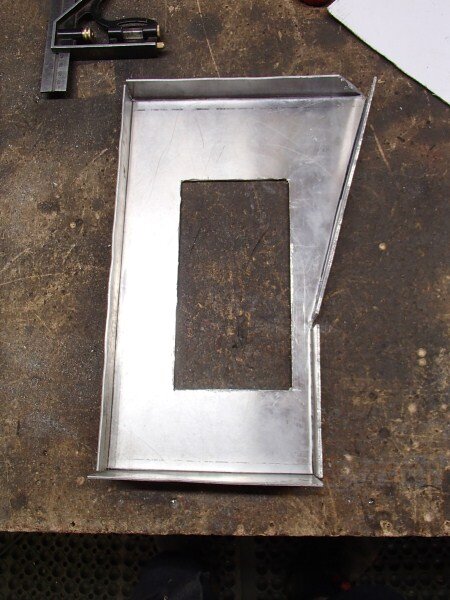
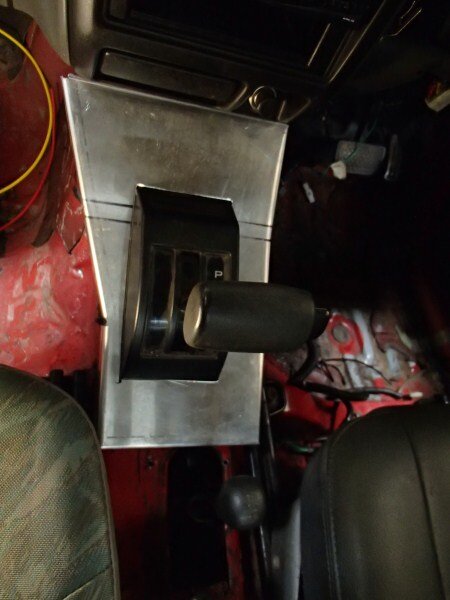
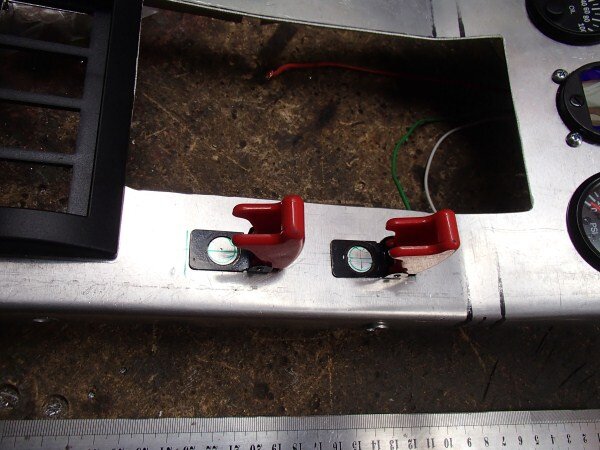
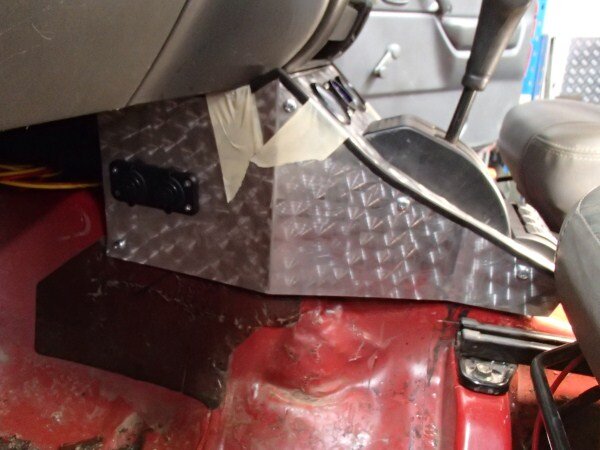
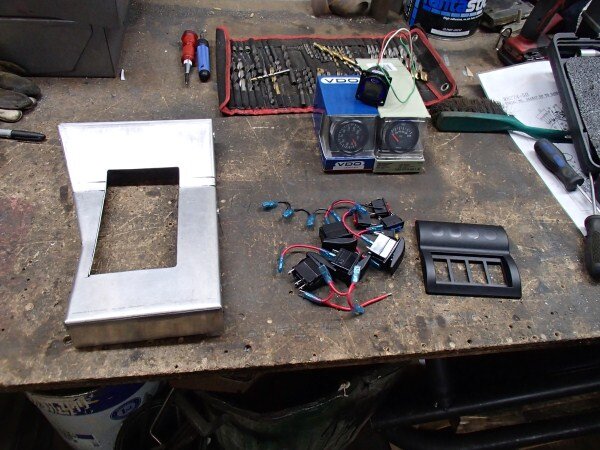
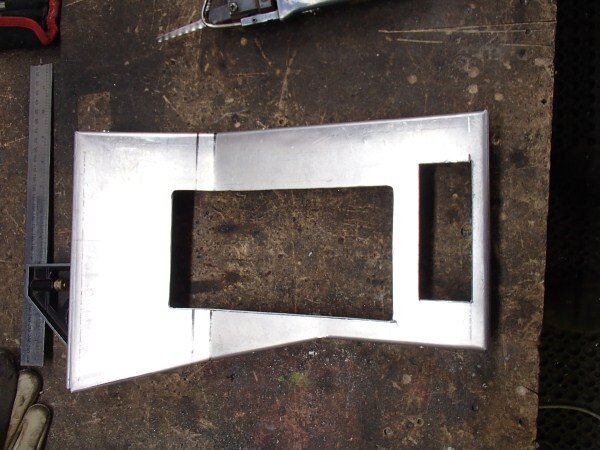
Switches and gauges next.


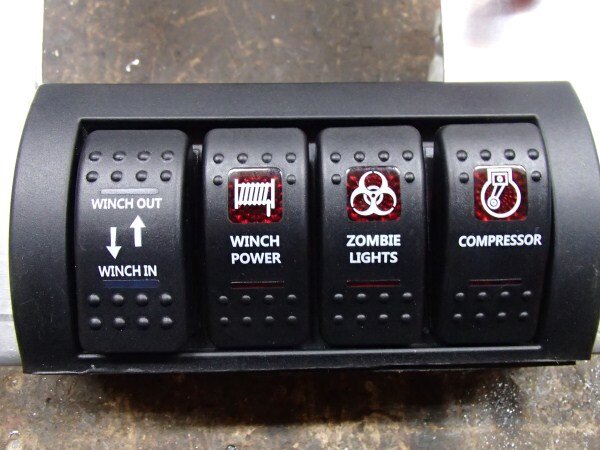
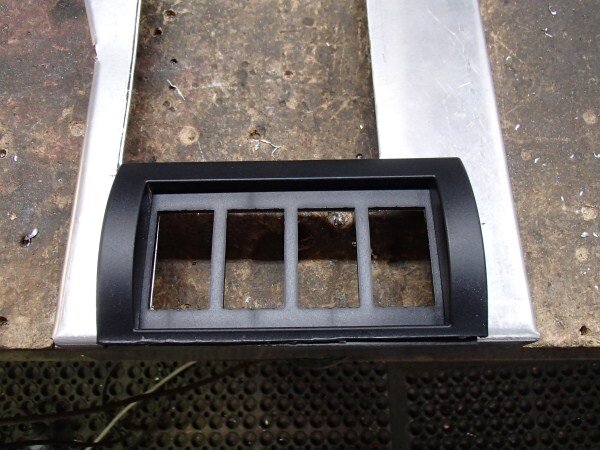
I decided to use a carling switch pod rather than cut out each individual switch slot in the aluminum.


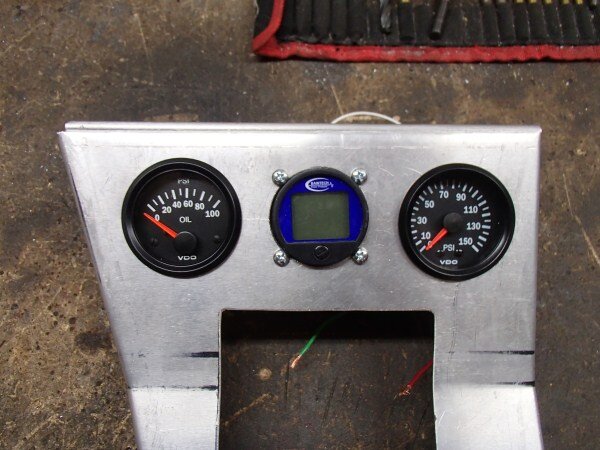
Gauges next.

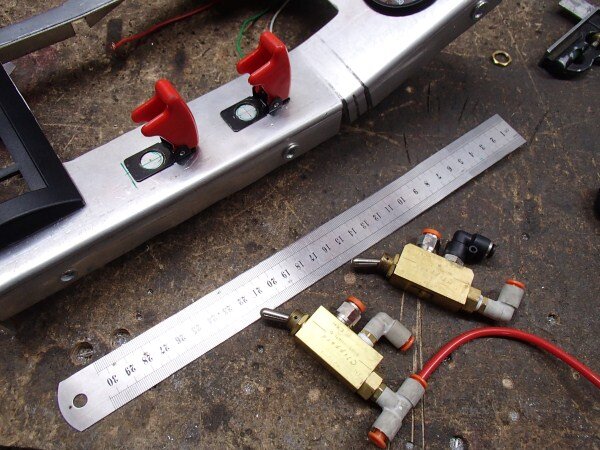
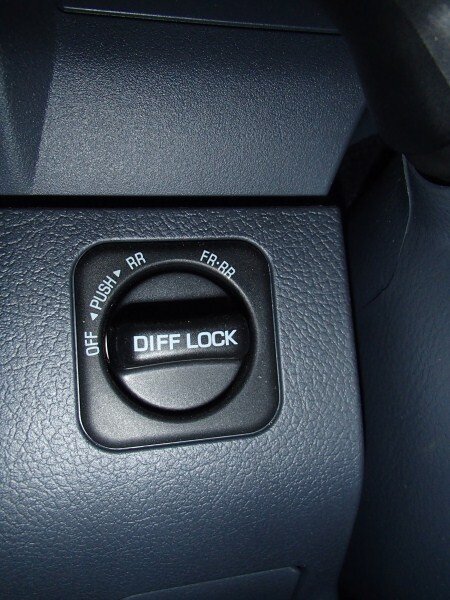
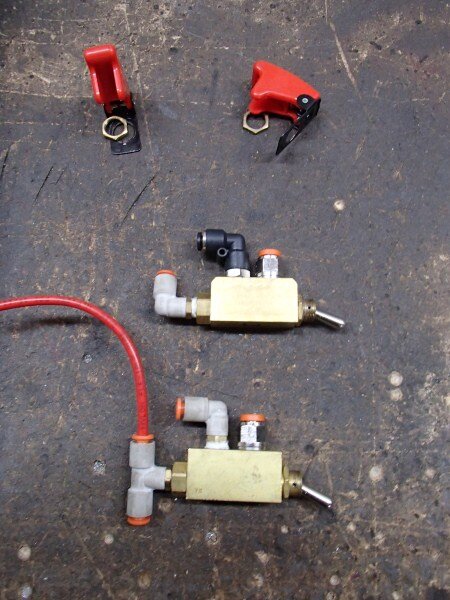
Pneumatic air locker switches next.


Added a double 12v socket.


Selected the carling switches. Id been waiting for an opportunity to use a Zombie switch since I first saw them in the huge tray of carling switches a few months ago.
(Apologies the pic is the wrong way around.)


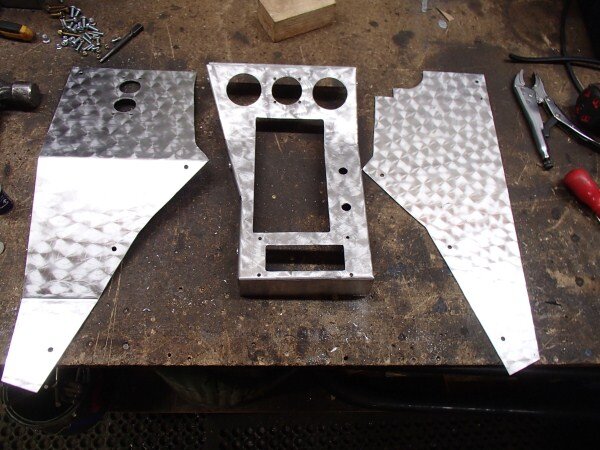
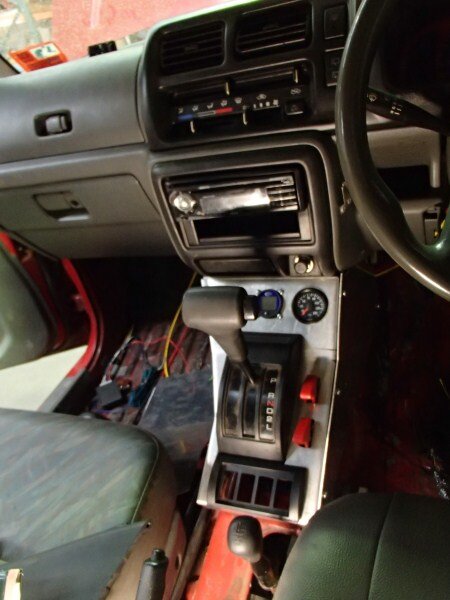
I was then ready to finish the aluminium.


The masking tape is there to hold the rubber trim in place while the silicon dries.


The vitara we sent to the paint shop has come back and looks great. Lots of work still to do but it will soon be looking good and ready to sell.


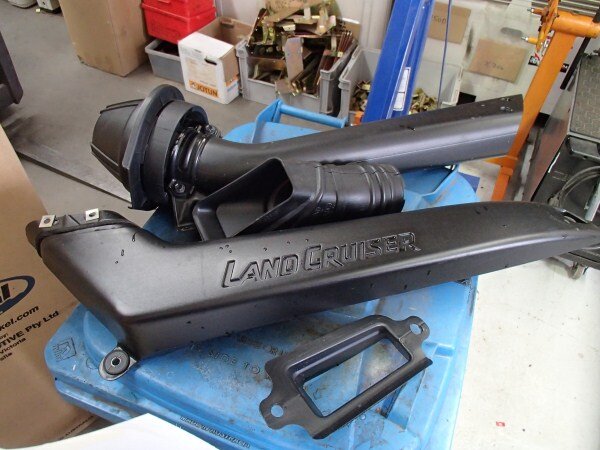
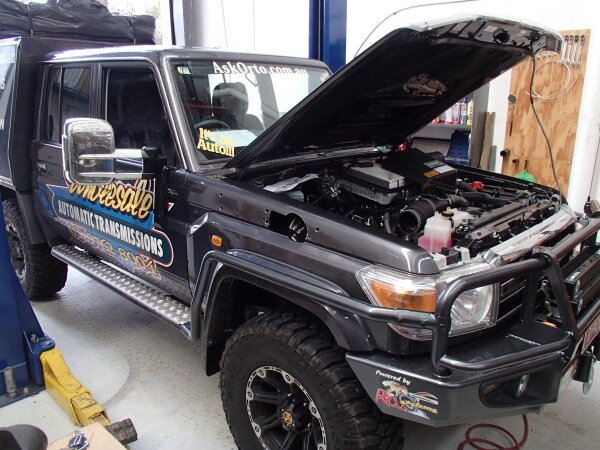
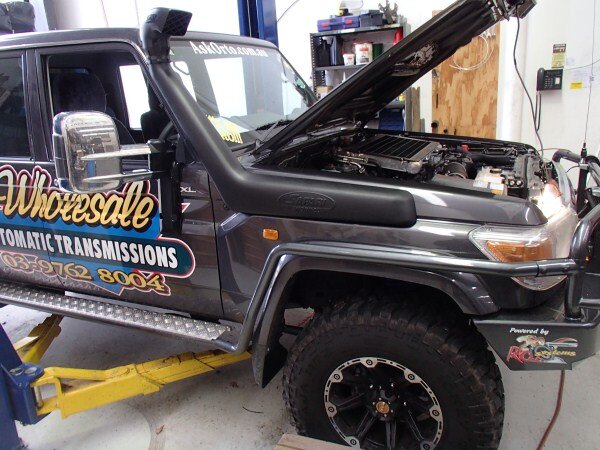
We had yet another 70 series in to have the standard Toyota snorkel changed as there not watertight! Still amazes me that Toyots fit 2 part snorkels that arnt watertight to these vehicles.
Old one off.

New Safari one fitted.


It was an almost brand new duel cab 70 series that had been converted to auto.

Apparently they buy brand new 200 series auto boxes and then mate that up to the V8 TD engine.


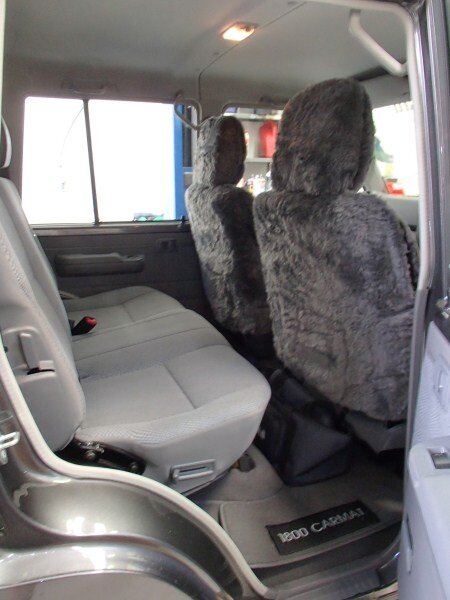
Loads of room inside the cab.


Factory lockers.

I'm sure the seats must be a lot higher in these new 70's than in older 70's like LJ.
When sat in LJ the top of the door is roughly half way up my chest, but sitting in this 70 it wasnt much higher than my hips.


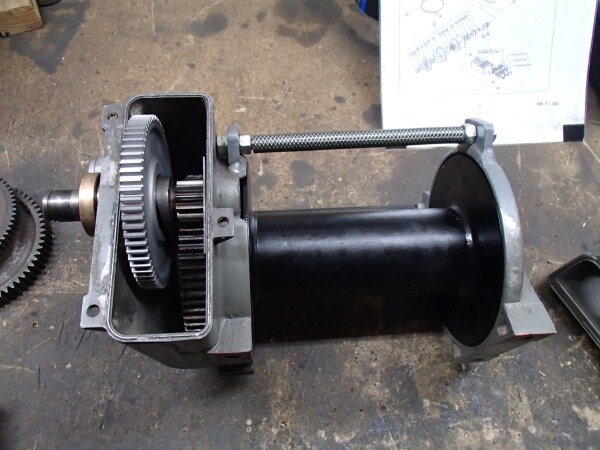
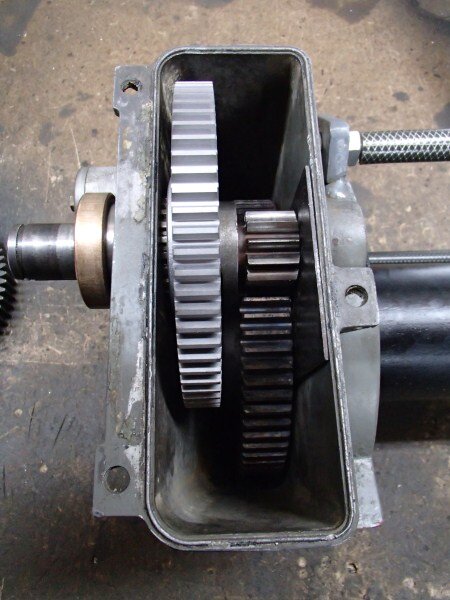
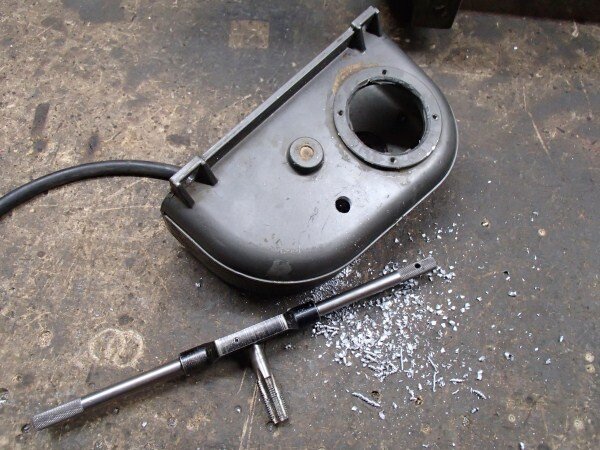
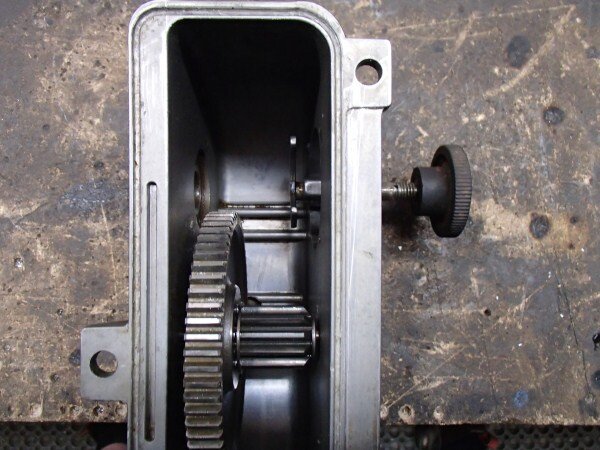
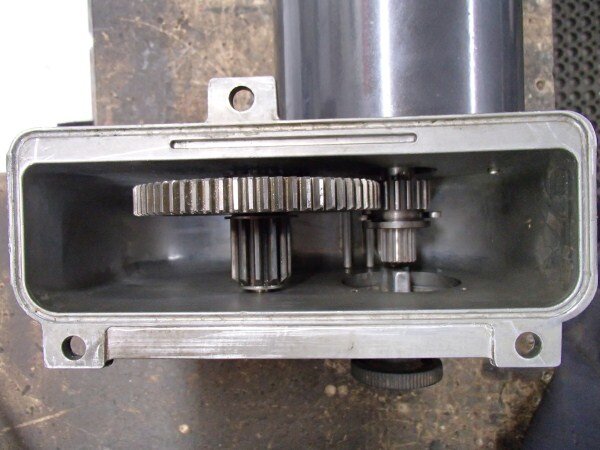
OK..........................Back to my winch rebuild.
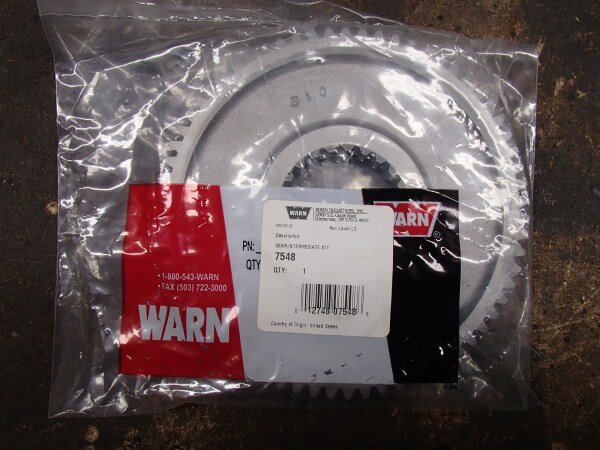
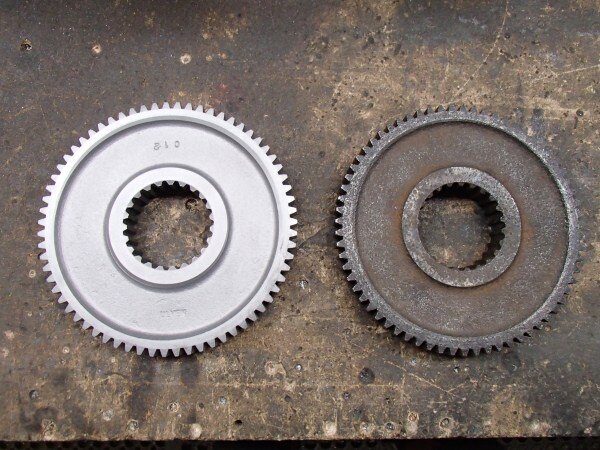
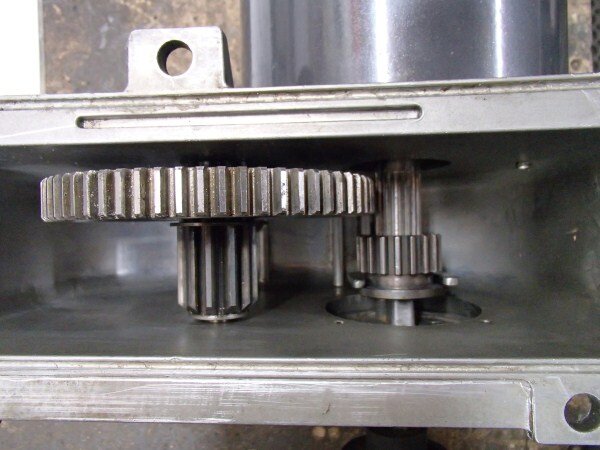
New intermediate gear as I'd decided the old one was a bit worn and as i'd changed all the others it seemed crazy not to change this one.


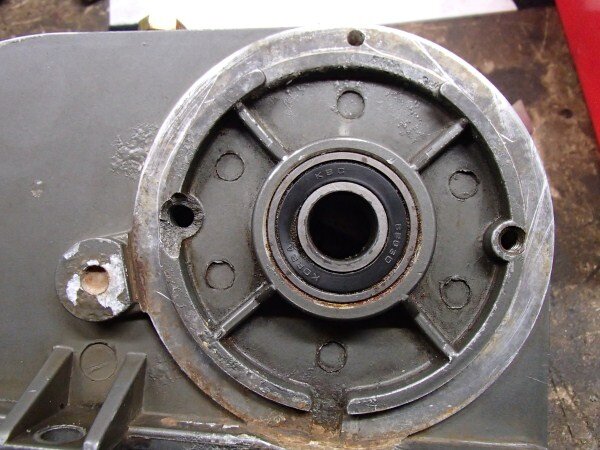
I needed to drill and tap the new top housing for the breather and oil fill plug.


Needed to swap the free spool bit off my old top housing onto the new one.


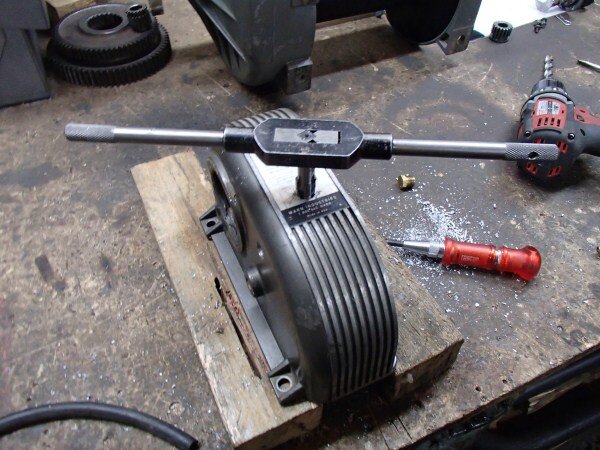
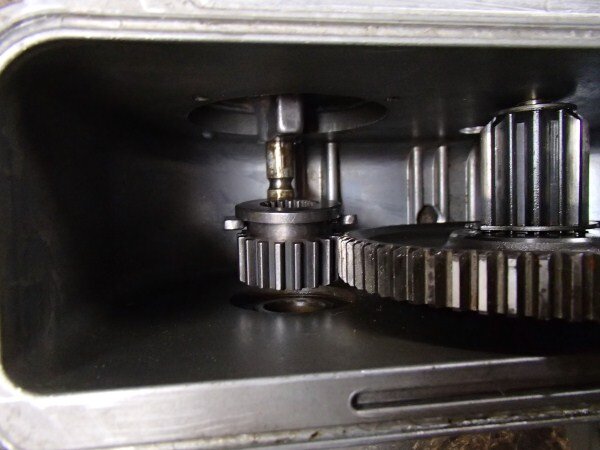
And fit the new 6HP winch motor gear.


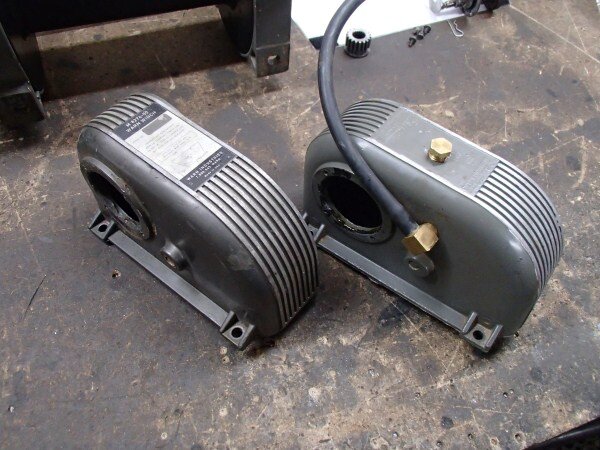
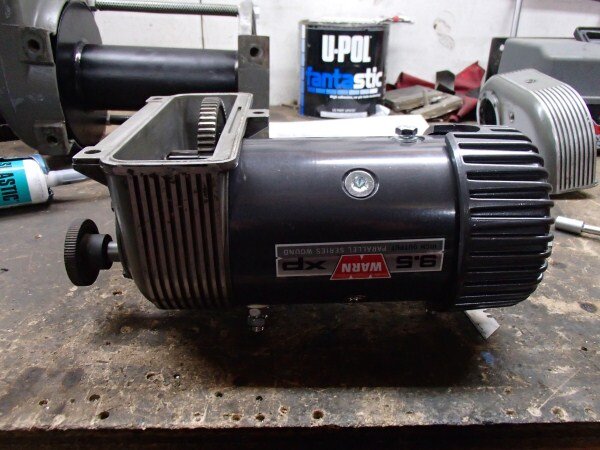
New motor next.

The free spool works by disconnecting the motor from the gears.
Free spool in.

Free spool out.

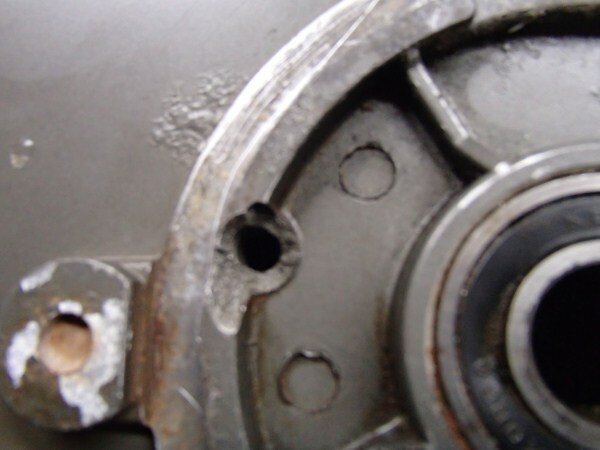
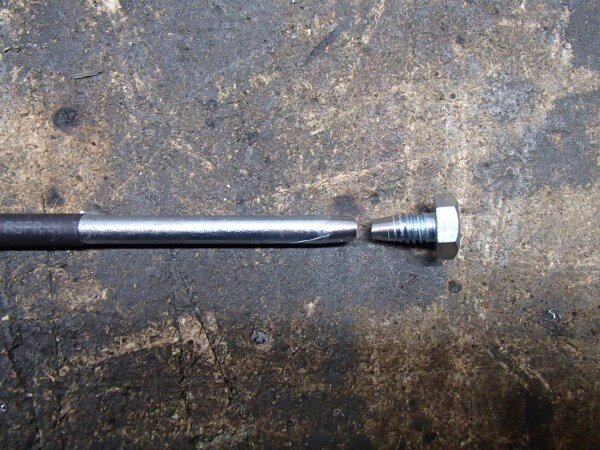
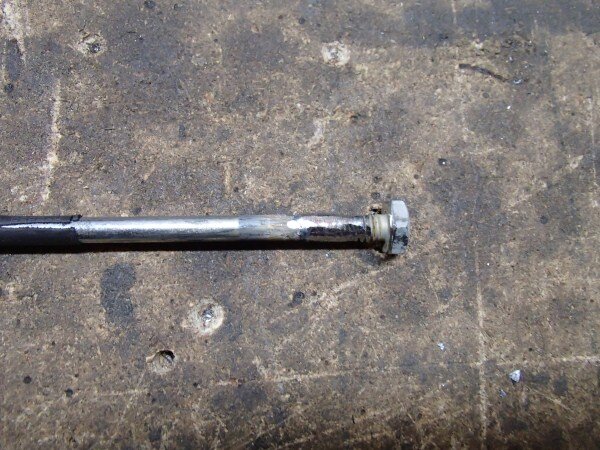
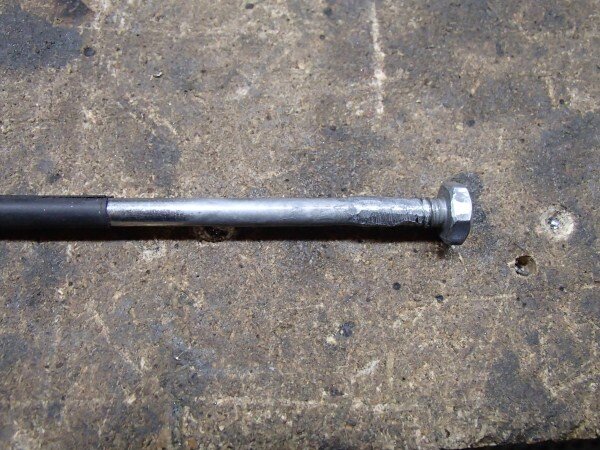
Came to tighten the 2 bolts up that hold the motor on and the first one was fine but the second one was just turning and not getting tight.
Took the motor off and realized that the top housing was damaged.


I considered using a hellicoil or welding up the hole and then drilling and tapping a new thread but I'm not that good with the fronius or TIG welders yet.
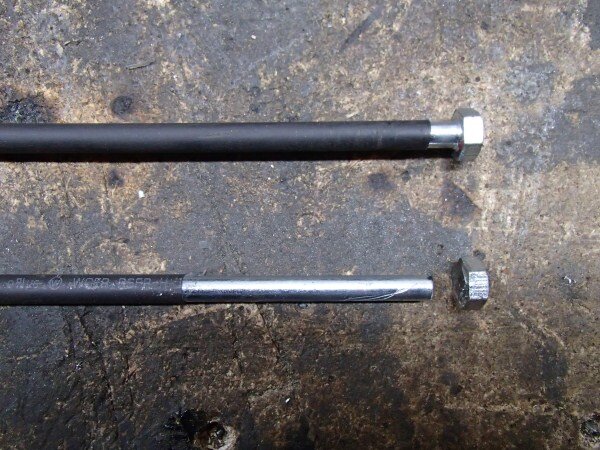
So a simple plan was formed.
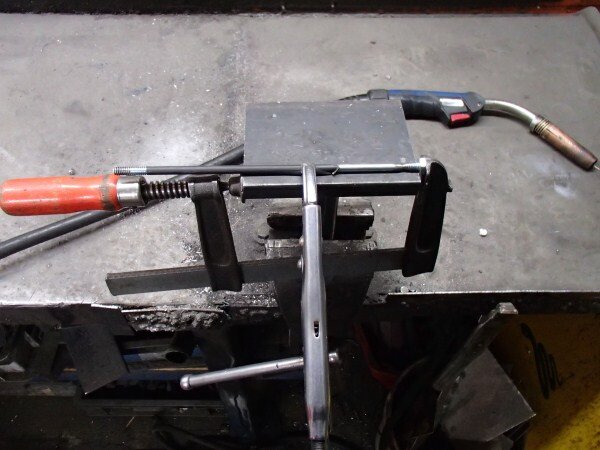
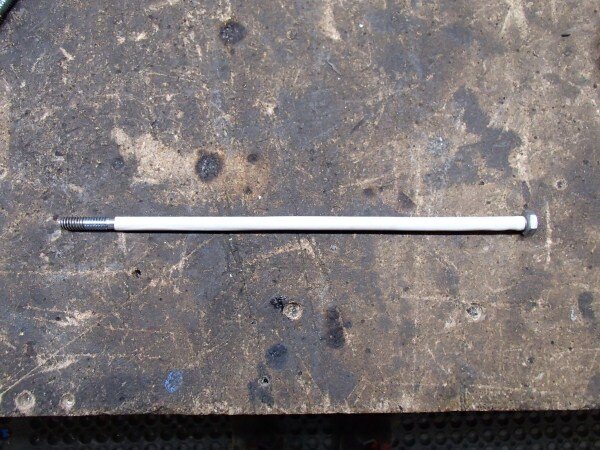
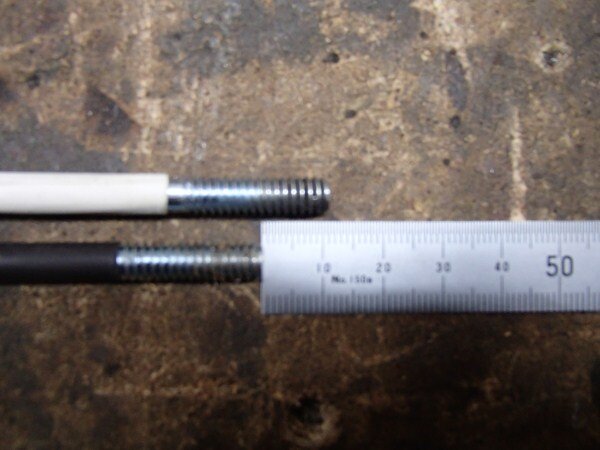
Cut the head off one of the bolts and cut some of the heat shrink back.


Cut and ground a suitable bolt to the correct size.

Clamped it all in place.


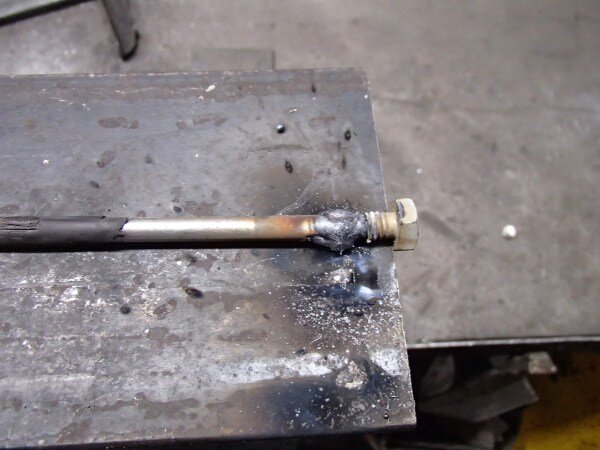
Welded it.

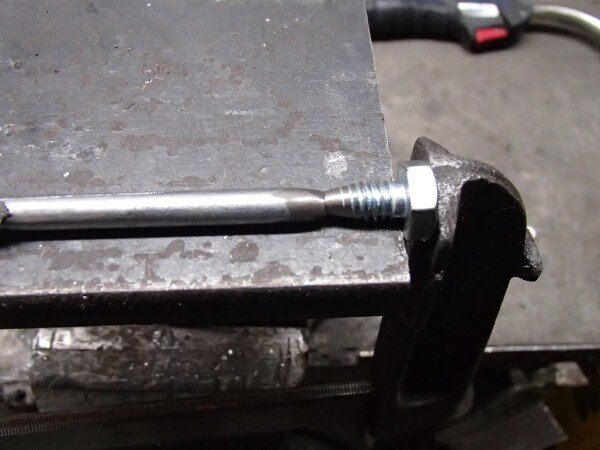
Ground the weld down.

Quick coat of paint.

New heat shrink.

10mm longer.


I was then able to use some plasticine to help hold the nut on the spanner.

And thread the spanner down inside the housing and onto the end of the bolt I'd just made.


Worked perfectly and I was able to get the motor nice and tight on the housing.

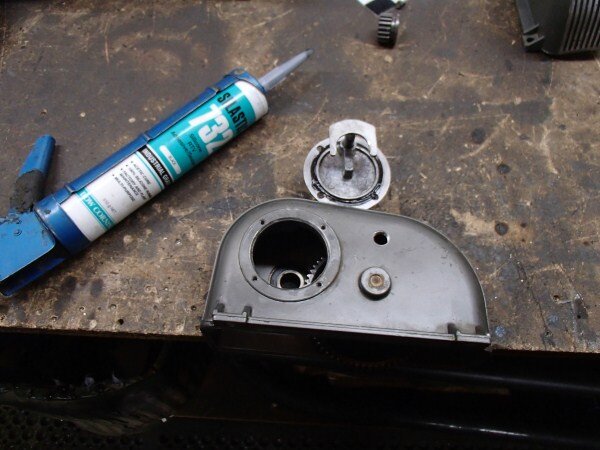
The next job was to bolt and silicon the top housing on.


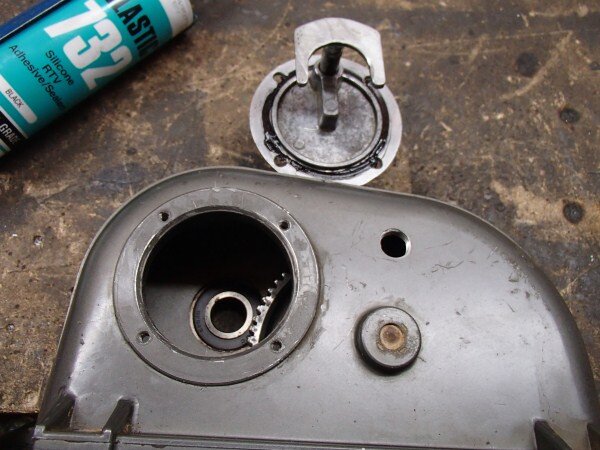
The next stage was to fit the brake assembly.


These 2 pieces of metal are used to help hold the brake assembly together so it can be fitted/removed from the winch.

Assembled and ready to have the center spring compressed and the 2 pieces of metal put in place.


Woodruff keys in next.

Followed by the circlip.

All the old parts.

Filled it with oil next.


Wired up and breather tube connected.

Rope on.


I love how fast and smooth it now is.
Last job was to run a twin core cable from the dash to the winch and use it to switch the thin negative wire going from the solenoid to the winch motor. This is to give me a winch power on off switch on the dash.


OK back to the overheating issue.
I found to remove the rad cowl I needed to remove one of the batteries as I couldnt get to the bolt any other way.


Also had to remove the bottom splash guard.

To get to the bottom mounts.


Cowl off.


The radiator does get quite a bit of air flow.

I took it for a drive without the cowl fitted and it was a lot better! It didnt get any where near as hot as it did with the cowl fitted, so the cowl must be preventing airflow. I think the fact it was so close (20mm) from the radiator and the fact it is square as apposed to chamfered towards the fan like the standard ones seem to be must have been affecting it.
Anyway.................
I took the cowl to work to modify it. This is only being down as a temporary measure so I can go on the next trip. When my viscous fan gets here I will build a new cowl and it will be almost pyramid shaped like the standard ones are so that the it slopes inwards towards the fan if that makes sense.
So Id worked out I could space the cowl and extra 30mm away from the rad which should improve air flow through the radiator when driving.


Cut a slot out so I dont have to remove the battery again.


I haven't had chance to fit the cowl yet but I'm hoping to tonight. Fingers crossed it fits.
I knew the bushes on the rear trailing arms were pretty shot so decided to swap the arms for my spare pair.
Couldnt believe quite how shot they were!


Sadly even my spare pair weren't much better.


So I need to get some new bushes ordered and fitted before this weekends trip.
So a few things still to do but I'm getting there.
Almost forgot.................
Work is still progressing on the house. The study and toilet are now practically finished. I spent most of Saturday painting them.
Before I gave the rooms there final coat of paint.


Study.


The next room were doing is the bathroom and that will take up the whole of November and should cover the rent for the next few months as there will be a lot of work in it. Were changing the layout so I will have lots of plumbing to do as well as loads of ceramic tilling.
But then I've got 5-6 weeks off work for my big road trip.
I've also got loads of work planned for LJ over the next few months.
Planning on pulling her all apart and completely re-wiring it and getting the electrics spot on. Its going to be a work of art!
Also want to get the body work done and the big re-spray.
Build an internal cage/cargo barrier.
And fit 3 batteries under the bonnet. I've worked out if I was to turn the 2 batteries so they face the other way I could get 3 batteries in that spot. So can have my 2 main starting and winching batteries and then also have a 3rd battery for powering my fridge. Will just need to design and build a battery tray and then build it and get it electro plated.
Oh I also picked up a new piece of glass for the rear door yesterday so I will get that tinted and fitted over the next few days.
OK so Frankenzuke first..................
I needed to fill in the inner guards after all the trimming to get the 37" tyres fitted.
Still need to do the fronts but the rears are done.
The next job was to build a center console to fit switches and gauges into.
Cardboard template first.
Transferred the size and shape onto aluminum allowing for a 25mm fold all the way around.
Cut the middle out and folded the edges.
Made the sides.
Drilled and rivnuted.
Other side.
Switches and gauges next.
I decided to use a carling switch pod rather than cut out each individual switch slot in the aluminum.
Gauges next.
Pneumatic air locker switches next.
Added a double 12v socket.
Selected the carling switches. Id been waiting for an opportunity to use a Zombie switch since I first saw them in the huge tray of carling switches a few months ago.
(Apologies the pic is the wrong way around.)
I was then ready to finish the aluminium.
The masking tape is there to hold the rubber trim in place while the silicon dries.
The vitara we sent to the paint shop has come back and looks great. Lots of work still to do but it will soon be looking good and ready to sell.
We had yet another 70 series in to have the standard Toyota snorkel changed as there not watertight! Still amazes me that Toyots fit 2 part snorkels that arnt watertight to these vehicles.
Old one off.
New Safari one fitted.
It was an almost brand new duel cab 70 series that had been converted to auto.
Apparently they buy brand new 200 series auto boxes and then mate that up to the V8 TD engine.
Loads of room inside the cab.
Factory lockers.
I'm sure the seats must be a lot higher in these new 70's than in older 70's like LJ.
When sat in LJ the top of the door is roughly half way up my chest, but sitting in this 70 it wasnt much higher than my hips.
OK..........................Back to my winch rebuild.
New intermediate gear as I'd decided the old one was a bit worn and as i'd changed all the others it seemed crazy not to change this one.
I needed to drill and tap the new top housing for the breather and oil fill plug.
Needed to swap the free spool bit off my old top housing onto the new one.
And fit the new 6HP winch motor gear.
New motor next.
The free spool works by disconnecting the motor from the gears.
Free spool in.
Free spool out.
Came to tighten the 2 bolts up that hold the motor on and the first one was fine but the second one was just turning and not getting tight.
Took the motor off and realized that the top housing was damaged.
I considered using a hellicoil or welding up the hole and then drilling and tapping a new thread but I'm not that good with the fronius or TIG welders yet.
So a simple plan was formed.
Cut the head off one of the bolts and cut some of the heat shrink back.
Cut and ground a suitable bolt to the correct size.
Clamped it all in place.
Welded it.
Ground the weld down.
Quick coat of paint.
New heat shrink.
10mm longer.
I was then able to use some plasticine to help hold the nut on the spanner.
And thread the spanner down inside the housing and onto the end of the bolt I'd just made.
Worked perfectly and I was able to get the motor nice and tight on the housing.
The next job was to bolt and silicon the top housing on.
The next stage was to fit the brake assembly.
These 2 pieces of metal are used to help hold the brake assembly together so it can be fitted/removed from the winch.
Assembled and ready to have the center spring compressed and the 2 pieces of metal put in place.
Woodruff keys in next.
Followed by the circlip.
All the old parts.
Filled it with oil next.
Wired up and breather tube connected.
Rope on.
I love how fast and smooth it now is.
Last job was to run a twin core cable from the dash to the winch and use it to switch the thin negative wire going from the solenoid to the winch motor. This is to give me a winch power on off switch on the dash.
OK back to the overheating issue.
I found to remove the rad cowl I needed to remove one of the batteries as I couldnt get to the bolt any other way.
Also had to remove the bottom splash guard.
To get to the bottom mounts.
Cowl off.
The radiator does get quite a bit of air flow.
I took it for a drive without the cowl fitted and it was a lot better! It didnt get any where near as hot as it did with the cowl fitted, so the cowl must be preventing airflow. I think the fact it was so close (20mm) from the radiator and the fact it is square as apposed to chamfered towards the fan like the standard ones seem to be must have been affecting it.
Anyway.................
I took the cowl to work to modify it. This is only being down as a temporary measure so I can go on the next trip. When my viscous fan gets here I will build a new cowl and it will be almost pyramid shaped like the standard ones are so that the it slopes inwards towards the fan if that makes sense.
So Id worked out I could space the cowl and extra 30mm away from the rad which should improve air flow through the radiator when driving.
Cut a slot out so I dont have to remove the battery again.
I haven't had chance to fit the cowl yet but I'm hoping to tonight. Fingers crossed it fits.
I knew the bushes on the rear trailing arms were pretty shot so decided to swap the arms for my spare pair.
Couldnt believe quite how shot they were!
Sadly even my spare pair weren't much better.
So I need to get some new bushes ordered and fitted before this weekends trip.
So a few things still to do but I'm getting there.
Almost forgot.................
Work is still progressing on the house. The study and toilet are now practically finished. I spent most of Saturday painting them.
Before I gave the rooms there final coat of paint.
Study.
The next room were doing is the bathroom and that will take up the whole of November and should cover the rent for the next few months as there will be a lot of work in it. Were changing the layout so I will have lots of plumbing to do as well as loads of ceramic tilling.
But then I've got 5-6 weeks off work for my big road trip.
I've also got loads of work planned for LJ over the next few months.
Planning on pulling her all apart and completely re-wiring it and getting the electrics spot on. Its going to be a work of art!
Also want to get the body work done and the big re-spray.
Build an internal cage/cargo barrier.
And fit 3 batteries under the bonnet. I've worked out if I was to turn the 2 batteries so they face the other way I could get 3 batteries in that spot. So can have my 2 main starting and winching batteries and then also have a 3rd battery for powering my fridge. Will just need to design and build a battery tray and then build it and get it electro plated.
Oh I also picked up a new piece of glass for the rear door yesterday so I will get that tinted and fitted over the next few days.
Attachments
-
 P4250001_zps5d259956.jpg79.3 KB · Views: 47
 -
 P4250003_zps701d54c7.jpg56.4 KB · Views: 47
 -
 P4250002_zps2b49702e.jpg75.6 KB · Views: 32
 -
 P4250004_zps35e5d3b7.jpg61.3 KB · Views: 37
 -
 P4250006_zpsd3918b90.jpg78.8 KB · Views: 42
 -
 P4250007_zps8c29b87f.jpg83.3 KB · Views: 44
 -
 P4250008_zpsd52d7266.jpg61.4 KB · Views: 32
 -
 P4250011_zps8b25811a.jpg46.6 KB · Views: 38
 -
 P4250013_zps50f76245.jpg34.9 KB · Views: 44
 -
 P4250015_zps4600a281.jpg68.6 KB · Views: 34
 -
 P4250016_zps14cf7fa9.jpg47.5 KB · Views: 34
 -
 P4250017_zpsa29f95c8.jpg45.4 KB · Views: 40
 -
 P4260018_zps65c2d647.jpg50 KB · Views: 37
 -
 P4260019_zps2b81be83.jpg71.5 KB · Views: 30
 -
 P4260020_zps11b019ac.jpg72.3 KB · Views: 39
 -
 P4260021_zps554286cc.jpg47.6 KB · Views: 42
 -
 P4260022_zps3a889dc9.jpg61.2 KB · Views: 39
 -
 P4260023_zps613f09e8.jpg59 KB · Views: 37
 -
 P4260025_zpsb73034d2.jpg53.7 KB · Views: 39
 -
 P4260026_zps60d25c88.jpg74.7 KB · Views: 38
 -
 P4260027_zpsbdf64540.jpg86.3 KB · Views: 33
 -
 P4260028_zps8bd4a002.jpg38.3 KB · Views: 34
 -
 P4260029_zpsca62d334.jpg83.7 KB · Views: 48
 -
 P4260030_zps59d352eb.jpg68.1 KB · Views: 37
 -
 P4260031_zps682e090a.jpg52.1 KB · Views: 42
 -
 P4260032_zps0afa8a3f.jpg60.7 KB · Views: 39
 -
 P4260033_zps48e8d831.jpg72.6 KB · Views: 34
 -
 P4260035_zps0e078a13.jpg82.6 KB · Views: 40
 -
 P4250001_zps5d259956.jpg79.3 KB · Views: 40
 -
 P4250002_zps2b49702e.jpg75.6 KB · Views: 42
 -
 P4250003_zps701d54c7.jpg56.4 KB · Views: 31
 -
 P4250004_zps35e5d3b7.jpg61.3 KB · Views: 40
 -
 P4250006_zpsd3918b90.jpg78.8 KB · Views: 36
 -
 P4250007_zps8c29b87f.jpg83.3 KB · Views: 36
 -
 P4250008_zpsd52d7266.jpg61.4 KB · Views: 27
 -
 P4250011_zps8b25811a.jpg46.6 KB · Views: 39
 -
 P4250013_zps50f76245.jpg34.9 KB · Views: 36
 -
 P4250015_zps4600a281.jpg68.6 KB · Views: 40
 -
 P4250016_zps14cf7fa9.jpg47.5 KB · Views: 46
 -
 P4250017_zpsa29f95c8.jpg45.4 KB · Views: 35
 -
 P4260018_zps65c2d647.jpg50 KB · Views: 33
 -
 P4260019_zps2b81be83.jpg71.5 KB · Views: 34
 -
 P4260020_zps11b019ac.jpg72.3 KB · Views: 34
 -
 P4260021_zps554286cc.jpg47.6 KB · Views: 37
 -
 P4260022_zps3a889dc9.jpg61.2 KB · Views: 32
 -
 P4260023_zps613f09e8.jpg59 KB · Views: 38
 -
 P4260025_zpsb73034d2.jpg53.7 KB · Views: 41
 -
 P4260026_zps60d25c88.jpg74.7 KB · Views: 42
 -
 P4260027_zpsbdf64540.jpg86.3 KB · Views: 37
 -
 P4260028_zps8bd4a002.jpg38.3 KB · Views: 45
 -
 P4260029_zpsca62d334.jpg83.7 KB · Views: 43
 -
 P4260030_zps59d352eb.jpg68.1 KB · Views: 36
 -
 P4260031_zps682e090a.jpg52.1 KB · Views: 36
 -
 P4260032_zps0afa8a3f.jpg60.7 KB · Views: 33
 -
 P4260033_zps48e8d831.jpg72.6 KB · Views: 35
 -
 P4260035_zps0e078a13.jpg82.6 KB · Views: 35
 -
 P4260036_zps797911cf.jpg65.5 KB · Views: 34
 -
 P4260037_zps4f1d9251.jpg57.6 KB · Views: 44
 -
 P4260038_zpsb4d3bb24.jpg83 KB · Views: 42
 -
 P4260039_zpsd966d7d5.jpg70.9 KB · Views: 39
 -
 P4260041_zpsf6dd8cc2.jpg87.1 KB · Views: 45
 -
 P4260043_zpsef28d8cf.jpg84.9 KB · Views: 36
 -
 P4260044_zpsec06b2cc.jpg67.4 KB · Views: 31
 -
 P4260045_zps9f306f96.jpg70.7 KB · Views: 41
 -
 P4260046_zps28ee00b8.jpg73.3 KB · Views: 36
 -
 P4260047_zps0c88c396.jpg68.1 KB · Views: 32
 -
 P4260049_zps2fbe22c9.jpg76.9 KB · Views: 34
 -
 P4260050_zpsc1179056.jpg88.3 KB · Views: 31
 -
 P4260051_zps04246c10.jpg67.3 KB · Views: 42
 -
 P4260052_zps28dc9fa3.jpg73.7 KB · Views: 37
 -
 P4260054_zps308c2d50.jpg85.9 KB · Views: 41
 -
 P4260055_zpsc8028e79.jpg56.4 KB · Views: 37
 -
 P4260056_zpse76d634c.jpg58.2 KB · Views: 34
 -
 P4260057_zpsda1a6049.jpg58.4 KB · Views: 38
 -
 P4260058_zpsae348ddb.jpg57.8 KB · Views: 36
 -
 P4260001_zpsa332a6ac.jpg56 KB · Views: 37
 -
 P4260002_zpsa9c6bb73.jpg48.9 KB · Views: 37
 -
 P4260003_zps155b8a3d.jpg80.2 KB · Views: 39
 -
 P4260004_zps3248aada.jpg62.3 KB · Views: 36
 -
 P4260005_zps5136536c.jpg69.7 KB · Views: 36
 -
 P4260006_zps81c4a76d.jpg77.2 KB · Views: 37
 -
 P4260007_zps8a789cfe.jpg77.6 KB · Views: 43
 -
 P4270008_zpsa0373ef0.jpg56.8 KB · Views: 36
 -
 P4270009_zps4cae9d66.jpg73.8 KB · Views: 38
 -
 P4270010_zps2212f862.jpg70.8 KB · Views: 38
 -
 P4270011_zpsc6a33981.jpg66.8 KB · Views: 37
 -
 P4270014_zps71d3831d.jpg83.5 KB · Views: 32
 -
 P4270015_zps360e00a5.jpg72.3 KB · Views: 32
 -
 P4270012_zpsf77e8c18.jpg70.2 KB · Views: 42
 -
 P4270013_zpsb2720963.jpg89.8 KB · Views: 30
 -
 P4270026_zps8edb0900.jpg87 KB · Views: 38
 -
 P4270016_zps4c443a27.jpg70.5 KB · Views: 47
 -
 P4270018_zps85dfa0c9.jpg89.1 KB · Views: 35
 -
 P4270019_zpsf523ff46.jpg95.9 KB · Views: 50
 -
 P4270021_zps96c55dd5.jpg54.1 KB · Views: 41
 -
 P4270025_zpsa4203033.jpg63.2 KB · Views: 39
 -
 P4270031_zpsb6ba1768.jpg82.2 KB · Views: 34
 -
 P4270033_zps89608be6.jpg66.6 KB · Views: 38
 -
 P4270034_zpse9e1210d.jpg55.4 KB · Views: 36
 -
 P4270036_zps5546919e.jpg67.5 KB · Views: 34
 -
 P4270038_zps0e826ae0.jpg61.8 KB · Views: 31
 -
 P4270041_zpse0216654.jpg95.7 KB · Views: 32
 -
 P4270042_zps2cd17a24.jpg73.9 KB · Views: 32
 -
 P4270044_zpsa63830b3.jpg90.4 KB · Views: 49
 -
 P4270045_zps8887cdf6.jpg68.5 KB · Views: 36
 -
 P4270046_zps6a46169c.jpg66 KB · Views: 35
 -
 P4270047_zps2e40523d.jpg78.8 KB · Views: 34
 -
 P4270048_zps80433301.jpg61.1 KB · Views: 33
 -
 P4270049_zps765b7d93.jpg86.9 KB · Views: 44
 -
 P4270050_zps3e1306f3.jpg87.2 KB · Views: 34
 -
 P4270051_zpsef425f14.jpg81.9 KB · Views: 36
 -
 P4270052_zpse9fd0314.jpg61.9 KB · Views: 40
 -
 P4270053_zpsf6c5fea1.jpg70 KB · Views: 39
 -
 P4270054_zps39bd9bc6.jpg73.9 KB · Views: 30
 -
 P4270055_zps41577923.jpg76.3 KB · Views: 32
 -
 P4270056_zps074eb7bc.jpg48.7 KB · Views: 32
 -
 P4270057_zps76e0e34e.jpg70 KB · Views: 34
 -
 P4270058_zpsd52597ac.jpg59.2 KB · Views: 42
 -
 P4270059_zpsafa44c53.jpg59.4 KB · Views: 32
 -
 P4270060_zps2c1d47a7.jpg76.5 KB · Views: 34
 -
 P4270061_zps7fcc46e6.jpg42.5 KB · Views: 32
 -
 P4270063_zpsc5eb148b.jpg99.7 KB · Views: 44
 -
 P4270064_zps3f76b672.jpg96.2 KB · Views: 37
 -
 P4270065_zps3661f765.jpg107.8 KB · Views: 33
 -
 P4270066_zps7016c859.jpg57.9 KB · Views: 35
 -
 P4270067_zps14afe9c1.jpg51.4 KB · Views: 33
 -
 P4270068_zps9890c22b.jpg57.3 KB · Views: 29
 -
 P4270069_zps48eb03e8.jpg95.4 KB · Views: 32
 -
 P4270070_zps7aa37d4b.jpg99.6 KB · Views: 46
 -
 P4270071_zps9fcbf68b.jpg95.5 KB · Views: 35
 -
 P4270072_zps0d39867b.jpg81.4 KB · Views: 31
 -
 P4270073_zpsfc83bd8b.jpg48.8 KB · Views: 37
 -
P4270074_zps47b79cce.jpg55.9 KB · Views: 0
-
 P4250001_zps5d259956.jpg79.3 KB · Views: 37
 -
 P4250002_zps2b49702e.jpg75.6 KB · Views: 41
 -
 P4250003_zps701d54c7.jpg56.4 KB · Views: 35
 -
 P4250004_zps35e5d3b7.jpg61.3 KB · Views: 34
 -
 P4250007_zps8c29b87f.jpg83.3 KB · Views: 35
 -
 P4250006_zpsd3918b90.jpg78.8 KB · Views: 42
 -
 P4250008_zpsd52d7266.jpg61.4 KB · Views: 34
 -
 P4250011_zps8b25811a.jpg46.6 KB · Views: 36
 -
 P4250013_zps50f76245.jpg34.9 KB · Views: 39
 -
 P4250015_zps4600a281.jpg68.6 KB · Views: 36
 -
 P4250017_zpsa29f95c8.jpg45.4 KB · Views: 36
 -
 P4250016_zps14cf7fa9.jpg47.5 KB · Views: 35
 -
 P4260018_zps65c2d647.jpg50 KB · Views: 41
 -
 P4260019_zps2b81be83.jpg71.5 KB · Views: 33
 -
 P4260020_zps11b019ac.jpg72.3 KB · Views: 37
 -
 P4260022_zps3a889dc9.jpg61.2 KB · Views: 36
 -
 P4260021_zps554286cc.jpg47.6 KB · Views: 40
 -
 P4260023_zps613f09e8.jpg59 KB · Views: 44
 -
 P4260025_zpsb73034d2.jpg53.7 KB · Views: 37
 -
 P4260026_zps60d25c88.jpg74.7 KB · Views: 40
 -
 P4260028_zps8bd4a002.jpg38.3 KB · Views: 36
 -
 P4260027_zpsbdf64540.jpg86.3 KB · Views: 34
 -
 P4260029_zpsca62d334.jpg83.7 KB · Views: 38
 -
 P4260030_zps59d352eb.jpg68.1 KB · Views: 39
 -
 P4260031_zps682e090a.jpg52.1 KB · Views: 33
 -
 P4260032_zps0afa8a3f.jpg60.7 KB · Views: 39
 -
 P4260033_zps48e8d831.jpg72.6 KB · Views: 38
 -
 P4260035_zps0e078a13.jpg82.6 KB · Views: 32
 -
 P4260036_zps797911cf.jpg65.5 KB · Views: 41
 -
 P4260037_zps4f1d9251.jpg57.6 KB · Views: 40
 -
 P4260038_zpsb4d3bb24.jpg83 KB · Views: 37
 -
 P4260039_zpsd966d7d5.jpg70.9 KB · Views: 39
 -
 P4260041_zpsf6dd8cc2.jpg87.1 KB · Views: 38
 -
 P4260043_zpsef28d8cf.jpg84.9 KB · Views: 40
 -
 P4260044_zpsec06b2cc.jpg67.4 KB · Views: 55
 -
 P4260045_zps9f306f96.jpg70.7 KB · Views: 33
 -
 P4260046_zps28ee00b8.jpg73.3 KB · Views: 37
 -
 P4260047_zps0c88c396.jpg68.1 KB · Views: 48
 -
 P4260049_zps2fbe22c9.jpg76.9 KB · Views: 42
 -
 P4260050_zpsc1179056.jpg88.3 KB · Views: 40
 -
 P4260051_zps04246c10.jpg67.3 KB · Views: 48
 -
 P4260052_zps28dc9fa3.jpg73.7 KB · Views: 32
 -
 P4260054_zps308c2d50.jpg85.9 KB · Views: 36
 -
 P4260055_zpsc8028e79.jpg56.4 KB · Views: 42
 -
 P4250001_zps5d259956.jpg79.3 KB · Views: 38
 -
 P4250002_zps2b49702e.jpg75.6 KB · Views: 39
 -
 P4250003_zps701d54c7.jpg56.4 KB · Views: 33
 -
 P4250004_zps35e5d3b7.jpg61.3 KB · Views: 40
 -
 P4250006_zpsd3918b90.jpg78.8 KB · Views: 33
Bravo Ben.
Great write up as usual, I hope you get to the bottom of your overheating problems. What a PITA that's been!
Great write up as usual, I hope you get to the bottom of your overheating problems. What a PITA that's been!
- Joined
- Oct 13, 2010
- Messages
- 6,058
- Country Flag
Thanks mate.
Today has been hectic!
Worked on LJ till 9.30pm tonight and its looking like tomorrow and Thursday will also be late ones as still got loads to do before this weekends big trip.
The modified radiator cowl is in and everything seems ok although I'd have liked more clearance between the crank and the back of the electric fan. Its only got about 10mm of clearance, but the engine doesnt seem to move much even at full throttle so fingers crossed it will be ok for the trip.
Want to get the new piece of glass for the rear door tinted and fitted tomorrow night and get all the camping gear sorted out and loaded. Then Thursday I need to get the new bushes pressed into the trailing arms and get the trailing arms fitted on the truck.

- Joined
- Jul 15, 2012
- Messages
- 2,178
I've just been on holidays for the past two weeks so was great catch up for me.
With the bull ants .... wait until you come across one of these beasts - the inch ant.
http://ngm.nationalgeographic.com/2007/05/bulldog-ants/moffett-text
Great to see you're getting the over heating issures sorted as well")
With the bull ants .... wait until you come across one of these beasts - the inch ant.
http://ngm.nationalgeographic.com/2007/05/bulldog-ants/moffett-text
Great to see you're getting the over heating issures sorted as well
Paddler Ed
Well-Known Member
Found paralysis ticks yet Ben? I've just been up to Coff's for a couple of days, and have had a couple of just normal bush ticks, luckily didn't find any paralysis ticks this time...
Start Ya Bastard is useful for killing the ticks before you pull them off, if you use that it knocks them out before they get a chance to regurgitate nasties into you.
Start Ya Bastard is useful for killing the ticks before you pull them off, if you use that it knocks them out before they get a chance to regurgitate nasties into you.
froggy Steve
Well-Known Member
- Joined
- Jul 26, 2012
- Messages
- 2,739
- Country Flag

Love it, Stuff "easy start", "start ya bastard" thats the way to go!
ha ha ha
We have lots of tick around the forest where we live. Wifey had one on her 'front bottom' a couple of years back - Wish I had some "start ya bastard" then!
Steve
ha ha ha
We have lots of tick around the forest where we live. Wifey had one on her 'front bottom' a couple of years back - Wish I had some "start ya bastard" then!
Steve
Similar threads
- Replies
- 6
- Views
- 399