Don't like the adverts? Click here to remove them
You are using an out of date browser. It may not display this or other websites correctly.
You should upgrade or use an alternative browser.
You should upgrade or use an alternative browser.
LJ70 Build Thread!
- Thread starter Ben
- Start date

Monster tyres don't help Ben. The ARB carrier is stronger than OEM but the ring and pinion are just the same. I appreciate that it was cracked perhaps as you say, but all locked and 37's is a tremendous strain on parts. Is it worth a re-gear?
Chris
Chris
- Joined
- Oct 13, 2010
- Messages
- 6,058
- Country Flag

I know what your saying Chris, and i agree with you, 37" aggressive tyres and lockers arnt healthy for the drive terrain. 
but i wasnt driving it aggressively on this trip. I certainly wasnt full on the power and then dumping the clutch, or slamming it from 1st to reverse as fast i could etc.
I have driven it like that before, but not on this trip.")
I was more just putting it in gear and letting it crawl over everything.
Im not sure about a re-gear.
With the 37"s on i can cruise at 70mph+ quite comfortably and the revs are nice and low. With my other tyres fitted, which are more like 33", when cruising at motorway speeds it revs a bit too high for my liking.
My other major consideration is OZ. Im pretty sure i wont legally be able to run 37" tyres.
but i wasnt driving it aggressively on this trip. I certainly wasnt full on the power and then dumping the clutch, or slamming it from 1st to reverse as fast i could etc.
I have driven it like that before, but not on this trip.
I was more just putting it in gear and letting it crawl over everything.
Im not sure about a re-gear.
With the 37"s on i can cruise at 70mph+ quite comfortably and the revs are nice and low. With my other tyres fitted, which are more like 33", when cruising at motorway speeds it revs a bit too high for my liking.
My other major consideration is OZ. Im pretty sure i wont legally be able to run 37" tyres.
Had a look on Toyo for you Ben and looks as though they fitted this ring and pinion into a couple of other vehicles in the Toyota stable
Part 41201?69285 (FINAL GEAR KIT, DIFFERENTIAL, REAR) was found on the following models:
Date range Model Frames/Options Found in diagram
08/1988-07/1997 TOYOTA HILUX RN1**,YN85,90,1**,LN85,90,1**,VZN130,KZN130 41-01: REAR AXLE HOUSING & DIFFERENTIAL
08/1987-04/1995 TOYOTA DYNA 100 YH81,LH80 41-01: REAR AXLE HOUSING & DIFFERENTIAL
01/1990-07/2001 TOYOTA LAND CRUISER BJ73,LJ7*,RJ7*,HZJ7*,PZJ7*,KZJ7* 41-01: REAR AXLE HOUSING & DIFFERENTIAL
Gives you more options while searching for a replacement
jeepmadmike
Well-Known Member
- Joined
- Feb 11, 2011
- Messages
- 229
That failure looks really odd, I have chewed a few CW/pinions in the past usually on escorts
Normally a tooth failure would trash a big chunk of the crown wheel? What does the pinion look like?
That said all the ones I have busted where while or after giving it lots of stick!
Suzukis usually total half shafts (they twist up ) when a locker is fitted, I guess Yota ones are tougher.
I can't believe non genuine oil seals are that awful, I rarely use genuine bits if a seal or bearing is available from a bearing supplier I get it from them, but they normally supply quality parts (SKF, Koyo, etc)
I not slagging off your efforts but early fails are usually due to installation.... Or contamination..... Can't think where swarf could have come from
I would not have driven it about once is was suspect TBH
Normally a tooth failure would trash a big chunk of the crown wheel? What does the pinion look like?
That said all the ones I have busted where while or after giving it lots of stick!
Suzukis usually total half shafts (they twist up
I can't believe non genuine oil seals are that awful, I rarely use genuine bits if a seal or bearing is available from a bearing supplier I get it from them, but they normally supply quality parts (SKF, Koyo, etc)
I not slagging off your efforts but early fails are usually due to installation.... Or contamination..... Can't think where swarf could have come from
I would not have driven it about once is was suspect TBH
- Joined
- Oct 13, 2010
- Messages
- 6,058
- Country Flag
Huge thanks to Karl for supplying me with another axle. 
He even cleaned it first.


left it to drain over night. oil looked ok.

tiny bit of swarf on the magnetic drain plug.

fingers crossed the ring and pinion are ok.
Ive ordered a dial gauge and mag base, so hopefully they will be here tomorrow.
Need to read and try and understand the FSM, ARB instructions and everything Roger taught/showed me, ready for the rebuild.
He even cleaned it first.
left it to drain over night. oil looked ok.
tiny bit of swarf on the magnetic drain plug.
fingers crossed the ring and pinion are ok.
Ive ordered a dial gauge and mag base, so hopefully they will be here tomorrow.
Need to read and try and understand the FSM, ARB instructions and everything Roger taught/showed me, ready for the rebuild.
Don't like the adverts? Click here to remove them
- Joined
- May 20, 2010
- Messages
- 5,822
No problem ben
Thought i would clean it whilst i waited the four hours over you were suppose to be with me
Thought i would clean it whilst i waited the four hours over you were suppose to be with me
Ben said:Huge thanks to Karl for supplying me with another axle.
He even cleaned it first.

:
fkn Hell, I dread to think what it looked like when it was DIRTY!!!
- Joined
- Oct 13, 2010
- Messages
- 6,058
- Country Flag
karl webster said:No problem ben
Thought i would clean it whilst i waited the four hours over you were suppose to be with me
- Joined
- May 20, 2010
- Messages
- 5,822
- Joined
- Oct 13, 2010
- Messages
- 6,058
- Country Flag
After pressure washing all the mud off the axle, i got it in the garage and got the half shafts out.
Bearings look OK, so will be nice to have a spare of shafts with decent bearings.

The diff was a little more difficult than i thought it would be, to get it out of the axle.

but eventually i managed to get them apart.


looks ok.

left it to drain over night.

my new dial gauge turned up, so hopefully i will be able to set the backlash properly.

been reading up on what i need to do.

Hopefully make a start stripping and cleaning everything tonight.
Bearings look OK, so will be nice to have a spare of shafts with decent bearings.
The diff was a little more difficult than i thought it would be, to get it out of the axle.
but eventually i managed to get them apart.
looks ok.
left it to drain over night.
my new dial gauge turned up, so hopefully i will be able to set the backlash properly.
been reading up on what i need to do.
Hopefully make a start stripping and cleaning everything tonight.
- Joined
- Oct 13, 2010
- Messages
- 6,058
- Country Flag
Graham said:Some one is up early, and it's not me
Gra.
yup. joys of starting work at 7.30am.
- Joined
- Oct 13, 2010
- Messages
- 6,058
- Country Flag
started stripping down my diff last night.


pinion didnt look too bad, but the imput flange felt very stiff to turn, and on closer inspection theres a piece of swarf jammed in the bearing race.


needed to tap the broken ring gear off the locker, so i spaced it up on wooden blocks, so as not to damage the bearing.

tapped all the way around with a copped mallet.


quick read of the distructions.

checked the backlash.

and started stripping the new one down.


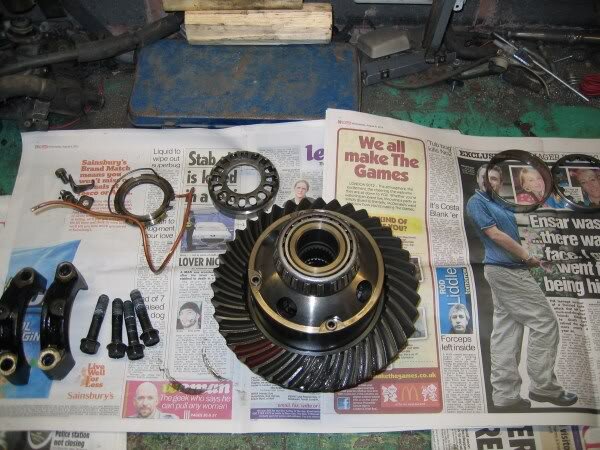
all the bits went in a tub of petrol to be scrubbed clean.

tapping the new ring gear off.


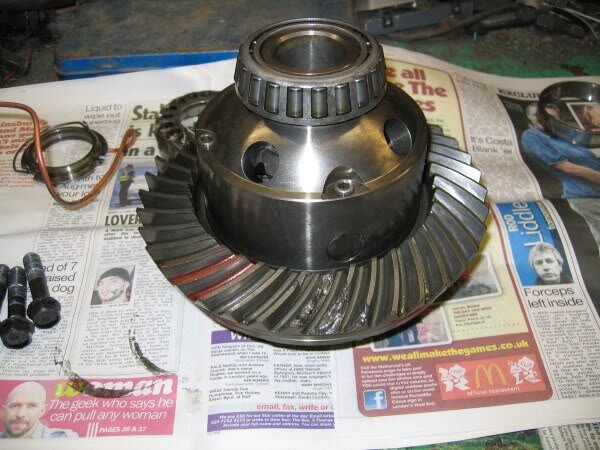
needed to give it a really good clean, so it could be carefully inspected for hairline cracks.

everything cleaned and laid out ready to re-assemble.


pinion didnt look too bad, but the imput flange felt very stiff to turn, and on closer inspection theres a piece of swarf jammed in the bearing race.
needed to tap the broken ring gear off the locker, so i spaced it up on wooden blocks, so as not to damage the bearing.
tapped all the way around with a copped mallet.
quick read of the distructions.
checked the backlash.
and started stripping the new one down.
all the bits went in a tub of petrol to be scrubbed clean.
tapping the new ring gear off.
needed to give it a really good clean, so it could be carefully inspected for hairline cracks.
everything cleaned and laid out ready to re-assemble.
Attachments

- Joined
- Oct 13, 2010
- Messages
- 6,058
- Country Flag
Graham said:Looking a whole lot cleaner now.
The new (replacement) ring gear was crack free?
Gra.
its looking that way.
When me and Roger stripped my front diff down to fit the locker, we cleaned everything, but didnt spot the hairline crack.
It was only when we cleaned it again, and checked it carefully in the light that we spotted the crack.
going to give it another clean tonight and check it thoroughly again.
- Joined
- Mar 1, 2010
- Messages
- 1,301
- Country Flag

You can get some stuff you put on that will show any cracks. I just can not for the life of me remember what it is called.
- Joined
- Oct 13, 2010
- Messages
- 6,058
- Country Flag
Simon got it for me.
took about 6 weeks to get to the UK from Japan.")
Parts Manager, Steven Eagell Toyota - email: [email protected] (discounts to club members)
Theres 7 or 8 altogether.
took about 6 weeks to get to the UK from Japan.
Parts Manager, Steven Eagell Toyota - email: [email protected] (discounts to club members)
Theres 7 or 8 altogether.
- Joined
- Oct 13, 2010
- Messages
- 6,058
- Country Flag
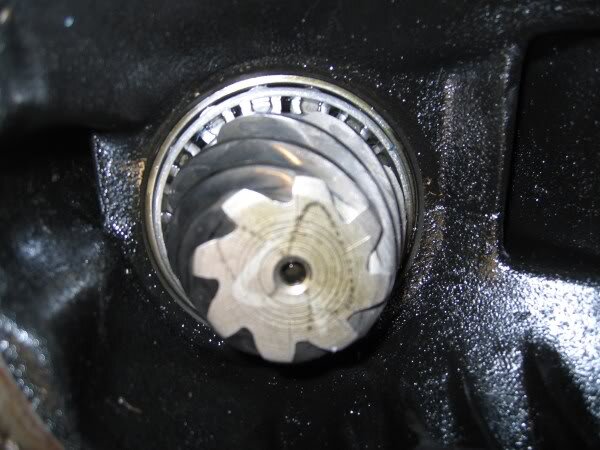
First job was to drill, tap and fit the brass air line fitting.

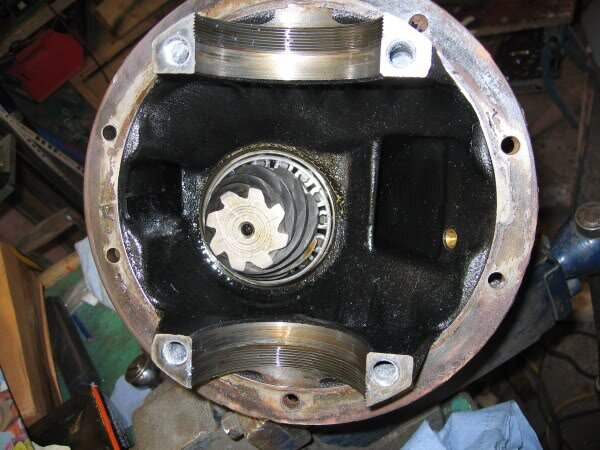
On the above pic my original diff on the left has more ribs cast into it, than the older one on the right.
So obviously between the earlier 1989-1993 models, toyota decided the LJ70 diff needed to be made stronger?
So i needed to remove this bit, and fit it in the new one.


marked and centre punched.

filled the inside with paper towel, and covered the top piece in grease to catch the swarf.

razor sharp dormer drill bit and cutting fluid, made light work of drilling the hole.

drilled and tapped.

wrapped the fitting in PTF tape and screwed it in.

Soaked the ring gear in boiling water, as per the FSM.

After drying it with compressed air, i dropped it on the diff, and once it was cool, fitted all the bolts with thread lock, and torqued them all up.


I managed to set the ring gear backlash easily enough, using my new dial gauge.


Im hoping I set the bearing preload correctly.
all back together and ready to fit.


I then cleaned the inside of the axle out and found a lot of chunks of metal.


couldnt find any RTV sealant, so had to settle for normal silicon.

Diff back in and air line connected.

£40 worth of genuine seals.

pulled the old seal out.


new seal fitted, O ring and silicon.

half shaft back in.

onto the other side, old seal out.

prop back on.

So today, i just needed to clean and refit the brakes, and then bleed them.
Only it was persisting it down!
Wasnt prepared to let something like the weather get in the way of what i wanted to do with my day, so out with the tarp....................

Brakes done i went on a 12mile test drive. Everything seemed OK, no abnormal noises and she drove perfectly.
When i got back i checked everything over and one thing i did notice, is that the diff was too hot to touch. Is this normal?
Ive never touched the diff after driving before so not sure how hot they get?
My broken aerial arrived back from JW this week, all fixed and looking good as new.
Thanks John, excellent work as always.


needed to add another exhaust mount, as the incompetent guys at the exhaust place had only fitted 2 on the whole system.
This one is only temporary, until i get a new system made.

welded the bolt on and gave it a quick spray of paint.

clamped another bolt to the chassis cross member.

and welded it in place.

and fitted a rubber mount.

So that was today, and my truck is back on the road!
Providing ive rebuilt the diff correctly and it doesnt self destruct.
If im able to pick up some metal this week, ive got an exciting little project I want to do, before next weekends epic 3 day laning and wild camping trip!
On the above pic my original diff on the left has more ribs cast into it, than the older one on the right.
So obviously between the earlier 1989-1993 models, toyota decided the LJ70 diff needed to be made stronger?
So i needed to remove this bit, and fit it in the new one.
marked and centre punched.
filled the inside with paper towel, and covered the top piece in grease to catch the swarf.
razor sharp dormer drill bit and cutting fluid, made light work of drilling the hole.
drilled and tapped.
wrapped the fitting in PTF tape and screwed it in.
Soaked the ring gear in boiling water, as per the FSM.
After drying it with compressed air, i dropped it on the diff, and once it was cool, fitted all the bolts with thread lock, and torqued them all up.
I managed to set the ring gear backlash easily enough, using my new dial gauge.
Im hoping I set the bearing preload correctly.
all back together and ready to fit.
I then cleaned the inside of the axle out and found a lot of chunks of metal.
couldnt find any RTV sealant, so had to settle for normal silicon.
Diff back in and air line connected.
£40 worth of genuine seals.
pulled the old seal out.
new seal fitted, O ring and silicon.
half shaft back in.
onto the other side, old seal out.
prop back on.
So today, i just needed to clean and refit the brakes, and then bleed them.
Only it was persisting it down!
Wasnt prepared to let something like the weather get in the way of what i wanted to do with my day, so out with the tarp....................
Brakes done i went on a 12mile test drive. Everything seemed OK, no abnormal noises and she drove perfectly.
When i got back i checked everything over and one thing i did notice, is that the diff was too hot to touch. Is this normal?
Ive never touched the diff after driving before so not sure how hot they get?
My broken aerial arrived back from JW this week, all fixed and looking good as new.
Thanks John, excellent work as always.
needed to add another exhaust mount, as the incompetent guys at the exhaust place had only fitted 2 on the whole system.
This one is only temporary, until i get a new system made.
welded the bolt on and gave it a quick spray of paint.
clamped another bolt to the chassis cross member.
and welded it in place.
and fitted a rubber mount.
So that was today, and my truck is back on the road!
Providing ive rebuilt the diff correctly and it doesnt self destruct.
If im able to pick up some metal this week, ive got an exciting little project I want to do, before next weekends epic 3 day laning and wild camping trip!