Don't like the adverts?  Click here to remove them

LJ70 Build Thread!

Ben I Wana know how that wood got in ur tyre!! :0

also did u get a red light on ur turbo appear??
 
We were on a 4WD trip in the High Country and we were struggling to find a camp spot as everyone was full, it was getting dark, we had been driving for 10+ hours, came round a bend and clipped a log at the side of the track! :doh:

I thought I only just brushed it, but there was an almighty bang and an instant flat! :thumbdown:

The red turbo light has been a bit intermittent! Almost like there is a loose wire. Its come on briefly a couple of times but only for a second or 2 then gone off.
But I havent taken it up to highway speed yet, I've only pottered to work at about 50mph max and it didn't come on then. :icon-biggrin:
 
Yea that's ok then thanks Ben just makes me feel so much better knowing someone else's comes on Aswell lol
bet that wasn't what u had in mind then as nearly dark ... I had look at that pic twice lol
 
Hey ben the oz bundera's have the ac switch in the blank spot you were talking about..also are the larger v6 4runner calipers fine with the stock master cylinder? I was under the impression you had to fit a 80 master....or was that when going rear disc maybe
 
Last edited:
Thanks Gary. :thumbup:

Hey ben the oz bundera's have the ac switch in the blank spot you were talking about..also are the larger v6 4runner calipers fine with the stock master cylinder? I was under the impression you had to fit a 80 master....or was that when going rear disc maybe

Interesting! :think:

I really dont know! The brakes are working OK at the moment but I am hoping to do a rear disc brake conversion and when I do that I will look at changing it for an 80 series one. :thumbup:

I'm currently trying again to get the X-ENG transfercase disc hand brake working. If I can get it to work it will mean I can use my old front calipers on the rear, maybe even the discs too. :pray:
 
Don't like the adverts?  Click here to remove them
I've just ordered parts for a rear disc conversion, running subaru front calippers, patrol discs and 80 series master and hoses :p
 
I did think of going down that route and I still might, but I would love to do it using parts I've already got if possible.

How much have all the parts cost you in total? :think:

Where did you source the Subaru L series calipers? The only place I could find new/refurbed ones was out of the USA. :icon-biggrin:
 
Fortunatley i live in Sweden and wreckers have lots of them ;) So i'm not buying new calippers..

And all the parts in the build description minus the calippers cost me €400 Calippers should land around €50 for the pair i believe, maybe €100.. Then i gotta figure out how to get the handbrake connected good!
 
Hey Ben
Loved the trip report of Portugal.:icon-cool::icon-cool: As usual always interesting following what you are up to with LJ.Especially the parts with the Air Con install as i still have to get the Air Con on my BJ regassed and then hopefully all sweet for the summer.Loving the read mate.:thumbup: Hopefully the weather will start to warm up soon mate.:pray::pray:
 
Fortunatley i live in Sweden and wreckers have lots of them ;) So i'm not buying new calippers..

And all the parts in the build description minus the calippers cost me €400 Calippers should land around €50 for the pair i believe, maybe €100.. Then i gotta figure out how to get the handbrake connected good!

Cool. :icon-smile:

I've been doing some searching and I found a thread where a guy in NZ has used Toyota MR2 rear calipers, which also have the handbrake mechanism on them.

I believe this might be a better option, rather than the Subaru L series front brake calipers. :think:

http://www.pirate4x4.com/forum/toyota-truck-4runner/740643-1kz-runner-coil-sas-2.html

Hey Ben
Loved the trip report of Portugal.:icon-cool::icon-cool: As usual always interesting following what you are up to with LJ.Especially the parts with the Air Con install as i still have to get the Air Con on my BJ regassed and then hopefully all sweet for the summer.Loving the read mate.:thumbup: Hopefully the weather will start to warm up soon mate.:pray::pray:

Thanks mate. :thumbup:

Was a great holiday and definitely some where I want to go back to in the future. :icon-biggrin:

I'm pleased with how the aircon install has gone! Just need to source a pump and all the brackets now. I can get a pump very easily but its the mounting bracket and belt tensioning bracket that I'm struggling with. Could always make them but would be nicer to just bolt the factory ones on. :think:

Fingers crossed on the weather front mate, its bloody freezing at the moment still! :thumbdown:

Its one of the main reasons I'm going to move up to Queensland! :icon-cool: :dance:
 
Update.................

I've been building the solar panel frames for the roof of the Solar Suzuki. Its been time consuming and challenging designing a system that is light, strong and quick and easy to fold out.

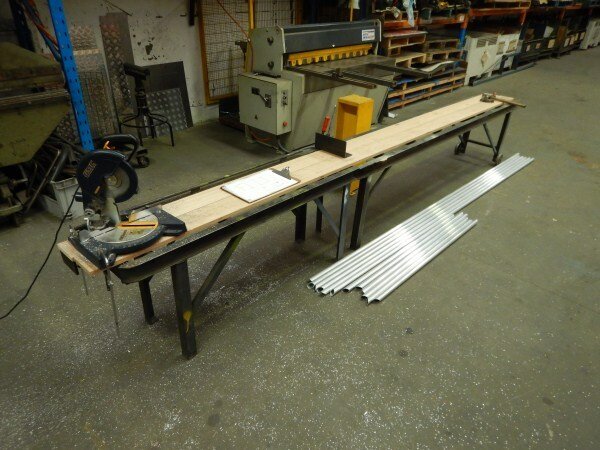
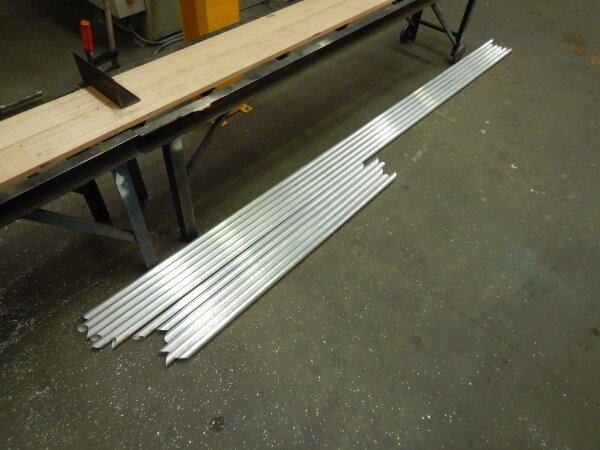
Firstly I cut some alluminium tube.

DSCN2145_zpsjue8oo61.jpg


DSCN2146_zpsynpozkia.jpg


The welding bay was just wide enough for the length of the frames.

DSCN2147_zpsf4vmt9h4.jpg


DSCN2148_zpssztzv12g.jpg


DSCN2149_zpsxsiqqbfn.jpg


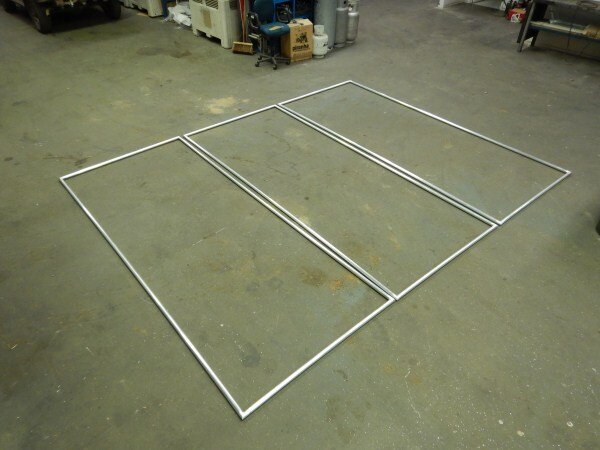
So my design brief was to construct 3 frames that will fit on top of the roof of the Suzuki, each containing 4 x 180amp solar panels. They will be hinged together with 1 folding out one side and the other folding out the other side.

DSCN2181_zpsdoskxrx8.jpg


I started cutting some 40mm flat which will be welded in position and will have another loose strip bolted on top of it with the panel sandwiched between the 2.

DSCN2182_zpsygdlarfa.jpg


DSCN2183_zpsepiuvutn.jpg


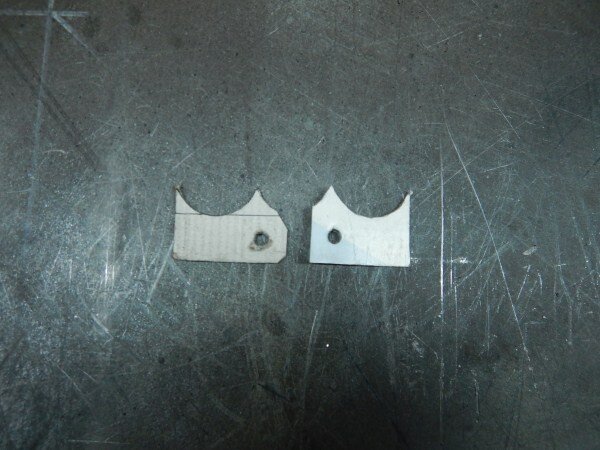
I designed some hinges and made some cardboard prototypes.

DSCN2195_zpsuxwkjc58.jpg


I wanted to ensure maximum movement.

DSCN2196_zpsgyfqagqt.jpg


DSCN2197_zpsef58mo4l.jpg


DSCN2198_zpshjl6sy5h.jpg


I could then make the hinges in alluminium.

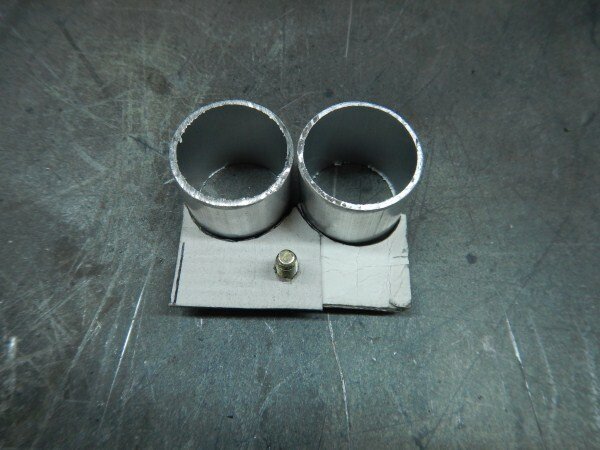
Stack drilled/hole sawed 5 strips of alluminium.

DSCN2199_zps2oioocd5.jpg


DSCN2200_zpsrsbpnla6.jpg


Ended up with this.

DSCN2201_zpsftx3ufuk.jpg


A bit more trimming on the guillotine followed by some grinding.

DSCN2202_zpsplcnrllm.jpg


More stack drilling.

DSCN2203_zps8udjxgd2.jpg


I opted for some needle bearings between hardened steel washers bolted between the leaves of the hinges.

DSCN2207_zpsznesmxny.jpg


DSCN2208_zpshcqfncsy.jpg


DSCN2209_zpsytfh9jks.jpg


All assembled and ready to weld on.

*I swapped the nylon lock nuts for normal nuts at this point to avoid the nylon melting (worst smell ever, I hate it!)

DSCN2210_zpspw3q8ka4.jpg


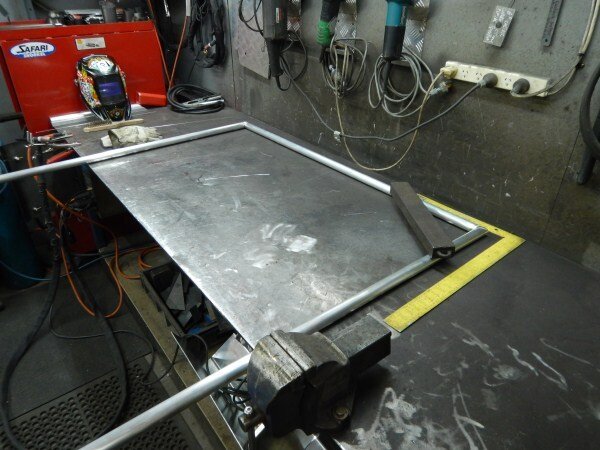
Clamped in position and ready to weld.

DSCN2212_zpsm88myhni.jpg


DSCN2213_zpshikvaohu.jpg


DSCN2214_zpsu0eg4tic.jpg


Tacked in position.

DSCN2215_zpskzekogbh.jpg


DSCN2216_zpsbxhcxhgf.jpg


DSCN2218_zpsg5uic3ti.jpg


So they will be folded flat while crossing the desert.

DSCN2219_zpsjwwzwixn.jpg


Then when stopped recharging they will fold out.

DSCN2221_zps1mlexipv.jpg


DSCN2222_zpssk1ynzyv.jpg


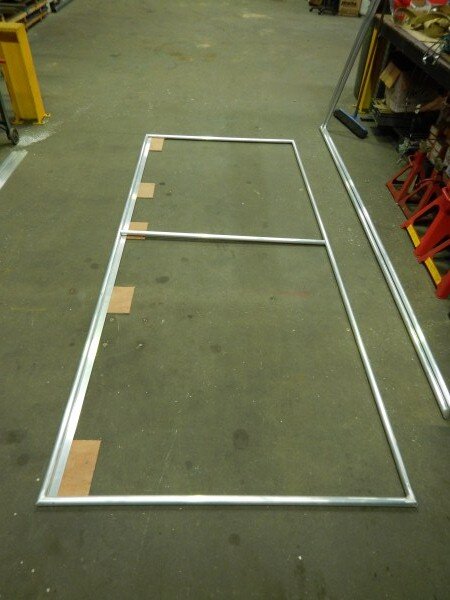
Next I needed to design the other hinges, which needed to be off set to allow the other frame to fit in between.

DSCN2258_zpstwooz7hm.jpg


Cardboard template.

DSCN2259_zpsoyk4sfpf.jpg


Again I was going for maximum movement.

DSCN2260_zpsxyey0zoh.jpg


DSCN2261_zpssb27jbma.jpg


DSCN2262_zpscbj99b33.jpg


More stack drilling.

DSCN2263_zpsx8a1agzx.jpg


DSCN2264_zpsksmss2eh.jpg


DSCN2265_zpslo6jzchx.jpg


Lots of trimming and grinding later and I had all the bits.

DSCN2274_zpseuv04ibp.jpg


Again they would be assembled with needle bearings and a normal nut for welding, which would get changed for a nylon lock nut afterwards.

DSCN2275_zpsuot2icrl.jpg


Assembled and ready to weld on.

11944827_10207315124539311_385137271_n_zpsxc7yn2au.jpg


11911483_10207315124419308_451783896_n_zpszd5voefu.jpg


11911178_10207315122779267_936366361_n_zpshfm20aok.jpg


Tack welded in position.

11940317_10207315121539236_2070638077_n_zpsfne1vlkx.jpg


11948109_10207315121779242_1538855278_n_zpskbzcjbqj.jpg


DSCN2276_zpsi3h4ofrc.jpg


So imagine the frames are on top of the Solar Suzuki.

The one folds out.

DSCN2277_zpsiyys1wtz.jpg


DSCN2278_zpso7ghylq5.jpg


DSCN2279_zpsiuzamj38.jpg


Then the other one folds out.

DSCN2280_zpsh59wihqr.jpg


They will of course have poles and guy ropes to help secure the frames at the correct angle to maximise the efficiency of the panels as they track the sun across the sky.

DSCN2281_zpsz8gqgwbo.jpg


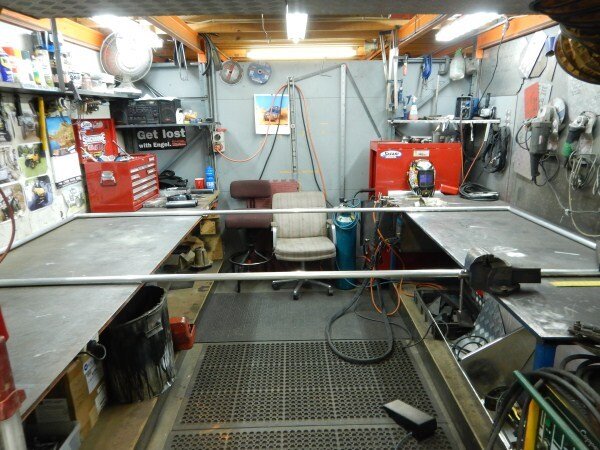
I then dismantled the 3 frames and got them on the bench one by one to fully weld the hinge leaves on and to weld in the 40mm flat for the panels to bolt to.

DSCN2282_zpsyjpbbt68.jpg


DSCN2283_zpsggbckpzx.jpg


DSCN2285_zpsaedniml4.jpg


I've been doing some work on LJ and a couple of little projects of my own after work in the evenings.

Projects first.............................

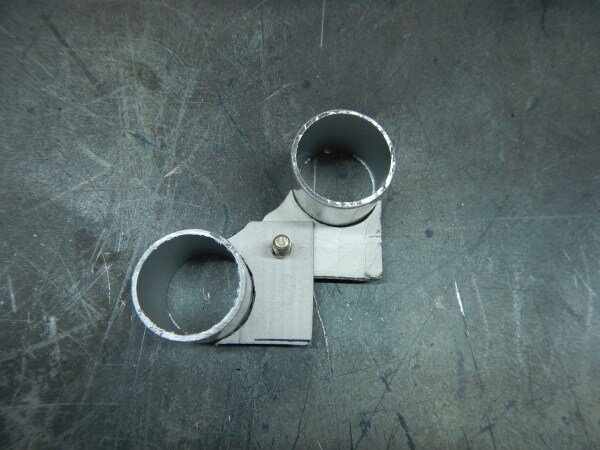
A few years ago I built an adapter for my trolley jack, after seeing Roger's one.

The only issue was that I just used some of the tube pieces out of one of my pairs of axle stands and this meant that some times I didnt have enough sets of axle stands.

DSCN2163_zpsaippd8jx.jpg


So these tube sections belonged in my axle stands and the holes wernt really spaced properly for the trolley jack anyway.

DSCN2164_zpszxhqitxy.jpg


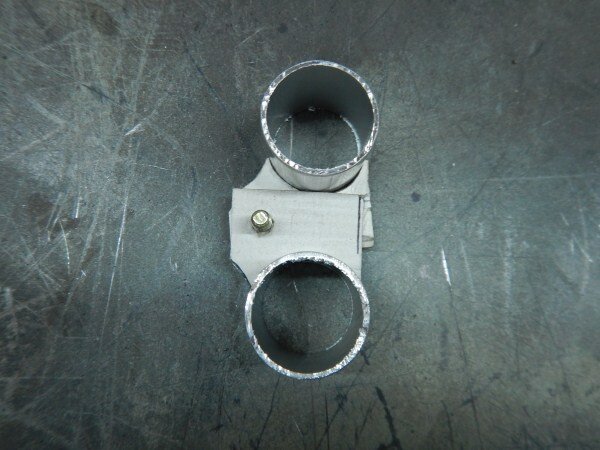
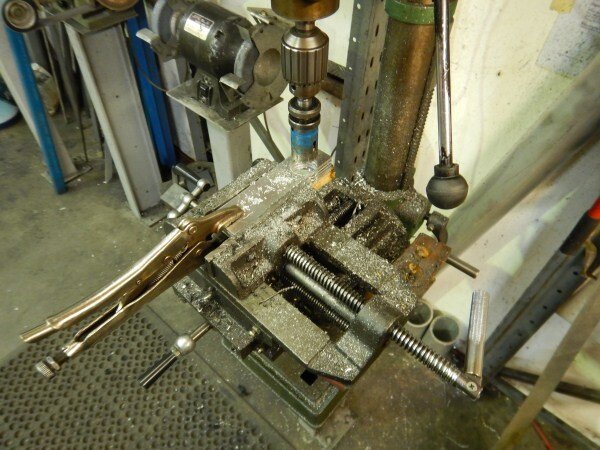
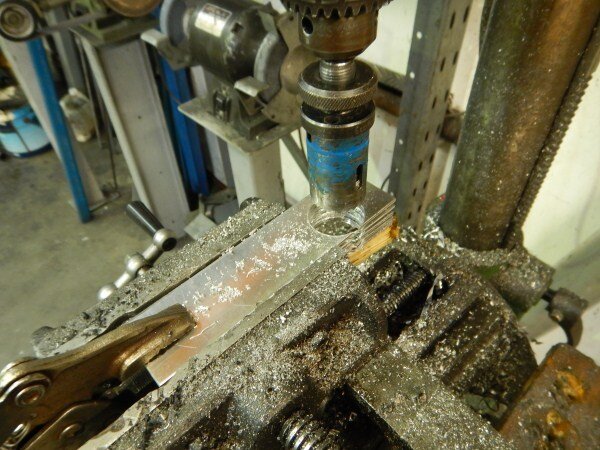
Bent some 6mm plate.

DSCN2150_zpskommpqfy.jpg


Cut and drilled some tube.

DSCN2151_zpsvpd6y2ce.jpg


Welded the 2 together.

DSCN2152_zpsquchldcu.jpg


DSCN2153_zpstww6kcn4.jpg


Test fitting.

DSCN2154_zps4apgizdf.jpg


Cut the threaded ends off some big bolts.

DSCN2155_zpsab26oj8j.jpg


To use as pins.

DSCN2157_zpspca4mfra.jpg


Welded some chains on.

DSCN2158_zpsxixtt5bw.jpg


DSCN2159_zpst25atwn4.jpg


Finished!

DSCN2160_zpsvasphtdj.jpg


This means I now have 2 usable pairs of smallish axle stands again.

DSCN2165_zps1snoduua.jpg


And a better jack adapter setup.

DSCN2166_zpskyn2dg9b.jpg


DSCN2167_zpsgze8msih.jpg


Another project I'm working on is to produce 2 more stands to match the huge HGV ones I've also got.

These stands are awesome and very handy but I only have 2, so to have 2 more will be perfect!

DSCN2168_zps8l1ipcl6.jpg


They sit just over 2ft high normally.

DSCN2169_zpsx9ziprnw.jpg


And go up to almost 4ft!

DSCN2170_zpsikay4v0j.jpg


Being able to get the chassis of a 4wd 4ft off the ground would be very useful for certain jobs or for a ground up restoration on a beautiful 40 series! :whistle:

OK............................

What I've been doing on LJ! :dance:

So as I mentioned previously LJ is going to be used for the up coming house renovations and needs to be able to tow heavy trailer loads of building materials and building waste.

Cut some receiver hitch box section to size and drilled a 17mm hole through the middle.

DSCN0001_zpsx7bj9cmp.jpg


The drop hitch I picked up last weekend slides nicely into place.

DSCN2143_zpsknpp7yyx.jpg


DSCN2144_zpsevosap5o.jpg


Got a tow ball.

DSCN2161_zpsbwpteuna.jpg


Just needs the excess thread cutting off.

DSCN2162_zpsenfi8ate.jpg


Cut and drilled some 8mm steel plate.

DSCN2180_zpshi74coef.jpg


Welded it to the receiver hitch.

DSCN2184_zpsuu3aibti.jpg


Got some little D shackles.

DSCN2185_zpslzjkufxj.jpg


DSCN2186_zps56kidnqn.jpg


DSCN2187_zpsofem0nwu.jpg


DSCN2188_zps6i4so1sf.jpg


Got LJ in and removed the rear bumper.

DSCN2266_zpsn7hprqe5.jpg


DSCN2267_zpskbxdssny.jpg


Worked out the position of the receiver hitch.

DSCN2269_zpsanqbqr3r.jpg


Welded it on.

DSCN2271_zpsmapbat9n.jpg


DSCN2273_zpsgmecahn6.jpg


DSCN2272_zpsg2fmvwfm.jpg


Gave it a coat of black paint.

11913055_10207315117379132_1105580222_n_zpssk4v8qea.jpg


11920422_10207315118739166_1751377459_n_zpstsxfkrw2.jpg


Re-fitted it.

DSCN2288_zpszo2s36mv.jpg


DSCN2289_zps4zih5xiq.jpg


DSCN2293_zpshizpqnjg.jpg


DSCN2294_zpsxf780zqd.jpg


I can also add a recovery point if I dont want to use my normal recovery point mounted above the reciever hitch. This recovery point would be stronger as the one above is relying on the threads on the M12 bolts.

DSCN2296_zpsitlroiel.jpg


DSCN2295_zpstatj8gau.jpg


I popped the grill back off.

DSCN2172_zps62qvqvxl.jpg


And tidyed all the wiring up.

DSCN2179_zpsvrgyj3oq.jpg


DSCN2177_zpsgjkhdbdu.jpg


DSCN2178_zpsb2z4euxu.jpg


I'd love to be able to make use of some of the old front brake parts I have.

DSCN2189_zpsvmshgblo.jpg


And if I could lose the handbrake off the rear axle then I could, well at least use the calipers.

So I wanted to look at getting the X-Brake working.

DSCN2190_zpsyrw7mulv.jpg


Jacked the rear end up using the nice new jack adaptor bits.

(The safest way to quickly raise an axle with an off set diff)

DSCN2191_zpszo07cch0.jpg


DSCN2192_zpsknfjs0to.jpg


Bolted the caliper back on.

DSCN2193_zpsqza88ed7.jpg


DSCN2194_zpsy4hbfxnc.jpg


Ran out of time with that little project, but will come back to it soon.

Another little project.............................

This is the wooden box I knocked together before my Simpson trip to stop my 2 x 10 litre water containers from rolling around.

DSCN2250_zpsmsfhrpt1.jpg


DSCN2251_zpscvcb74q9.jpg


It was a struggle to lift the water containers up and out of the box, even more so since I fitted the roof storage cage.

Bec really struggled and on 4wd trips she would have to ask me to get the water out as and when she needed it.

DSCN2253_zpsabuj6icl.jpg


Something needed to be done!

Brought the water containers to work for a measure up.

DSCN2204_zpshuqee1wx.jpg


Technical drawing.

DSCN2205_zpsq4dp9qob.jpg


Using the left over alluminium from my fuel tank build.

DSCN2206_zps4rianfo8.jpg


Cut the corners out.

DSCN2225_zpsadhvsbiz.jpg


Using the awesome new folder I folded it up.

DSCN2226_zpszvody9ig.jpg


Had to remove some of the fingers, but thats the beauty of these machines is that you can, in order to fold boxes! :dance:

DSCN2227_zpsnbhoj4lp.jpg


DSCN2228_zpsk3pregje.jpg


One folded box, all from one sheet of alluminium!

DSCN2229_zpsry3q05zz.jpg


DSCN2230_zpsjtzrgb6j.jpg


The containers fitted beautifully.

DSCN2231_zpsyyaotvno.jpg


DSCN2232_zpsorppidsd.jpg


A few sexy TIG welds later.

DSCN2235_zpslnldvy1h.jpg


DSCN2237_zpsgpmigtey.jpg


I was thinking of how best to keep the top of the containers restrained.

I was thinking of using a rubber strap but couldnt think of a way of making it work which I was happy with.

DSCN2233_zpsxxtcsxcb.jpg


DSCN2234_zpsqiv4jash.jpg


In the end I went for the humble fridge slide strap.

DSCN2238_zpsspmjmhgr.jpg


DSCN2239_zpsrfvugpbj.jpg


DSCN2240_zpsx54fki1d.jpg


Bolted on.

DSCN2241_zpsc1mtwa3b.jpg


DSCN2242_zpsn2koozt2.jpg


DSCN2244_zpshfjsn5nh.jpg


I left the strap long enough so it can be slackened off enough to remove the container(s) without having to un thread the strap each time out of the buckle.


Test fitting.


For the pricely some of $10 (£5ish) I got it powdercoated satin black. :icon-cool:


Straps bolted back on.


And fitted the water containers back in.


It needs screwing down into the false floor in the back of LJ when it goes back in, as currently I've pulled it all out!


I had to pull it all out so I could find my trailer socket which I'd left inside the drivers side rear quater panel as I didnt think I would need it again/for a while as I didnt have a tow bar fitted.

Its also made mounting the fuel filter and pump a lot easier.


The fuel pump switch is all wired up in the blank on the heater/aircon controls. I would have prefered it up the top with the rest of the carling switches so all the switches are neat and together. I cant stand having a 4wd with random aftermarket switches dotted all over the place. But obviously there isnt any space so I think this was the next best place.


The switch is all wired up to switch a relay mounted under the bonnet, using an ignition live and I've run the wire back into the cab and just need to connect it up to the fuel pump.

The fuel pump is ready to be plumbed to the main tank. I've drilled a hole through the floor and have fitted a grommet (you may have spotted it in the pic above looking down at the fuel filter and pump) so now I just need to push the hose through and connect it up.

Then I need to mount the trailer socket and then put all the interior back together.

Then I need to get serious with the rear disc brake conversion, X-Brake hand brake, anti roll bar modifying and refitting and fixing the air leaking rear diff lock.

I also want to tidy the body work up a bit and give the sides another few coats of blue, but that wont be for a few months till the weather warms up a bit. :thumbup:
 

Attachments

  • DSCN2145_zpsjue8oo61.jpg
    DSCN2145_zpsjue8oo61.jpg
    76.2 KB · Views: 42
  • DSCN2146_zpsynpozkia.jpg
    DSCN2146_zpsynpozkia.jpg
    61.8 KB · Views: 44
  • DSCN2147_zpsf4vmt9h4.jpg
    DSCN2147_zpsf4vmt9h4.jpg
    91 KB · Views: 57
  • DSCN2148_zpssztzv12g.jpg
    DSCN2148_zpssztzv12g.jpg
    71 KB · Views: 54
  • DSCN2149_zpsxsiqqbfn.jpg
    DSCN2149_zpsxsiqqbfn.jpg
    73.5 KB · Views: 43
  • DSCN2181_zpsdoskxrx8.jpg
    DSCN2181_zpsdoskxrx8.jpg
    50.1 KB · Views: 70
  • DSCN2182_zpsygdlarfa.jpg
    DSCN2182_zpsygdlarfa.jpg
    71.5 KB · Views: 40
  • DSCN2183_zpsepiuvutn.jpg
    DSCN2183_zpsepiuvutn.jpg
    46.3 KB · Views: 62
  • DSCN2195_zpsuxwkjc58.jpg
    DSCN2195_zpsuxwkjc58.jpg
    63.6 KB · Views: 46
  • DSCN2196_zpsgyfqagqt.jpg
    DSCN2196_zpsgyfqagqt.jpg
    57.9 KB · Views: 47
  • DSCN2197_zpsef58mo4l.jpg
    DSCN2197_zpsef58mo4l.jpg
    65.3 KB · Views: 41
  • DSCN2198_zpshjl6sy5h.jpg
    DSCN2198_zpshjl6sy5h.jpg
    59 KB · Views: 46
  • DSCN2199_zps2oioocd5.jpg
    DSCN2199_zps2oioocd5.jpg
    80.9 KB · Views: 55
  • DSCN2200_zpsrsbpnla6.jpg
    DSCN2200_zpsrsbpnla6.jpg
    85.7 KB · Views: 54
  • DSCN2201_zpsftx3ufuk.jpg
    DSCN2201_zpsftx3ufuk.jpg
    47.9 KB · Views: 46
I must admit i am a bit envious of your X-eng.. I hope you get it working properly!
 
Might be for sale if your interested Victor. :icon-wink:

I picked up some new rear brake calipers today which have a manual hand brake built into them, so thinking of pulling the X-ENG X brake off. :icon-biggrin:

From the research I've done, a transmission hand brake wont be road legal in Queensland. :thumbdown:
 
Ben mate you put us all to shame with the amount you get done. I've not even washed the 80 for the last however long Never mind done any bits I want to do.
I'll admit not even done that much at work either lol, new job role keeps taking me away from real work.
 
If you want ultimate on road handling the rear anti roll bar off a lj78/kzj78 will bolt up to your rear axle and all you need to mod is the drop link chassis mounts which is just 2 holes each side :thumbup: I'm running one on mine with front removed and its tight so with both it would be like a sports car :D
 
Ben mate you put us all to shame with the amount you get done. I've not even washed the 80 for the last however long Never mind done any bits I want to do.
I'll admit not even done that much at work either lol, new job role keeps taking me away from real work.

Thanks mate. :thumbup:

I'm pushing to get everything I want to do on LJ done before the responsibilities of a real job, house renovations and kids come along! :icon-biggrin:

That sucks mate, hope your enjoying the new job role as master technician, even if it does mean less time for working on the cruiser! :thumbup:

If you want ultimate on road handling the rear anti roll bar off a lj78/kzj78 will bolt up to your rear axle and all you need to mod is the drop link chassis mounts which is just 2 holes each side :thumbup: I'm running one on mine with front removed and its tight so with both it would be like a sports car :D

Very interesting! :think:

Do you have any pics/could you get some please?

Is the rear bar very different to the front? I've got 2 front ones so just wondering if I could make a front one work.

Think I would struggle to find a 78 rear one down here. Only ever seen one 78 on the road, although I'm sure there must be a few around. :think:
 
Last edited:
Thanks mate. :thumbup:

I'm pushing to get everything I want to do on LJ done before the responsibilities of a real job, house renovations and kids come along! :icon-biggrin:

That sucks mate, hope your enjoying the new job role as master technician, even if it does mean less time for working on the cruiser! :thumbup:
:


Yeah new job role is good, made me realise how much stuff I was already doing and not getting paid for lol. Had to sign a new contract and have more responsibility now!! Been out of the workshop a fair bit too.

Kids will soon take up your spare time when it comes round to having them, worth it though. Now lily goes out laning etc with me it's great fun, been teaching her how the winch works and about using lockers etc.
 
Hey Ben, huge fan of your topic.

Make sure that the next time you come to Portugal to send me a PM so i can show you some nice Land Cruisers over here.
 
Back
Top