Don't like the adverts?  Click here to remove them

LJ73 1UZ build/repair in Dubai

good thread Mick , I'm looking forward to the next post.I had my heart set on a coll spring 70 before I bought the 95 but they were like rocking horse shit in the UK.Mich better the a overweight 80....IMHO. of course
 
Thanks mate. Will try to keep the progress going....

Lol, you might be opening a can of worms regarding the 80 :)
 
Thanks mate. Will try to keep the progress going....

Lol, you might be opening a can of worms regarding the 80 :)
can of worms? more like rolling a smoke grenade into the tent....
 
So after a bit of an interlude I think I am sorted. Pretty much everything in front of the block has been replaced.

Will eventually post some of those details up if anyone is interested.

After it was all stitched back together it was running fine. I put all the covers back on an went for a test drive all good.

Went and got my wallet (with licence) and was about to go for a proper test drive. It started firing on 4 cylinders and sounded a bit like a WRX boxer engine. Got my automotive multimeter out and found out only the right coil was firing (my right, engines left). The 1UZ uses a cross over spark system where each coil fires 2 cylinders on each bank.

So it has taken me a few evenings and some frustrated web research to try and work out what was happening. I was sure I had connected all the plugs properly and everything was where it should be.

Anyway tonight I was frustrated and just decided to spray all the connections with contact cleaner. This is when I found the 2 wire plug to drive the coil was not quite right. I noticed the pins inside were offset

IMG_20161222_0052446.jpg


Tried to line up the pins when I reinstalled the coil and they physically popped out the back of the plastic housing

IMG_20161222_0054563.jpg


So I ended up throwing the housing to the shit house and connecting the pins directly to the male plug.

Even the female pins were a bit loose so a push with a small screw driver to tighten up the connection was required.

After this I fired it up and all was good. Went for a little sideways test drive on the dirt road behind my house and the old girl was a strong as ever. A huge sense of relief came over me which was long overdue after stressing about this for a long time.

I guess an electrical issue is like losing your car keys, you always find it in the last place you look.

Anyway I am supposed to be going to the desert on Saturday with two other 70s, will try to make everything fool proof by then. Maybe just add some heat shrink to the terminals and cable tie/tape it all together as I won't be able to get a proper housing until I order it online somewhere. Local dealers here would only sell me a whole loom going by previous experience.
 
Great work finding the fault. :thumbup:

I'm dreading fault finding on mine! :icon-rolleyes:

Looking forward to some 70's desert pics! :icon-twisted:
 
Don't like the adverts?  Click here to remove them
Lovely looking car mate.

You said your previous car was a 79 series V8, how was that out of curiosity? i'm currently in the market looking for one.
 
Sorry I live in Middle East and we only get petrol engines here. So it was the 4.5L inline six (1FZ-FE).

Never been in the V8 but would like to one day.
 
Have been very slack in updating this thread...

After fixing the water pump and engine issues, a very bad thing happened. I was doing 120kph down the highway when very bad grinding noises started. Got off on the first exit and was trying to pull over in a safe place when I lost a back rear wheel. Turns out the studs on the wheel spacer sheared. The wheel took off down the road towards a pedestrian precinct at maybe 80 kph. Was very concerned it was going to run someone over.

Luckily it bounced off a taxi and came to a stop in the gutter. Recovery truck #2.

Ripped off half my fender flair and damaged rear quarter panel a bit.

IMG-20161225-WA0029.jpg
 
Not long after, my friends FZJ71 started leaking oil from the front diff, where the carried bolts into the axle. I owed him some free labour since he helped a bit on my engine, so we stripped down the front end and after a few trips to Toyota spare parts we got the job done.

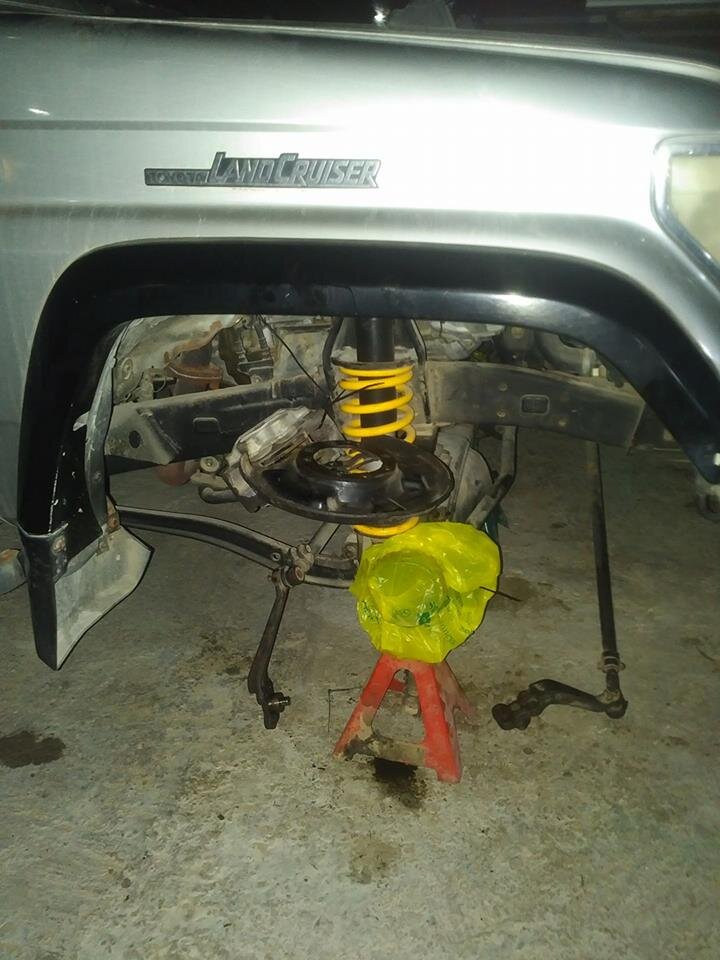
Since my front end was making some weird noises in 4WD, we then tore my front axle apart for a repeat performance. Mostly went smoothly and the ring and pinion looked to be fresh with no broken teeth. I didn't remove the brake callipers, but tied them up out of the way using cable ties. When I went to reinstall them, found the ancient hard piping had cracked. For some reason I have hard piping as standard between the calliper and swivel housing bracket. Anyway I got some custom Goodridge lines made up and they even fitted on the second attempt.

This is a halfway pic, with the plastic bag in situ to keep the sand storms out of my axle

17103580_10155517368942289_8320653761929046724_n.jpg
 
Anyway it took me a while to save up for a pair of genuine H&R wheel spacers. There are lots of fake products in the marked here and considering the previous set back with the low quality spacer, I wanted to take no chances.

And it should also be noted that the various wheel sets that I have won't fit without spacers, wrong offsets. The rims were rubbing on the frame.

In the mean time I did a 100 little jobs, and more and more I was finding that the previous modifications were done by trained monkeys. Stupid things like the bolts holding on the rock sliders were too long, and the exposed thread was hitting the radius arm under suspension travel. Theses were cut down and the stock side steps removed.

Also the rear axle panhard bolt was fitted backwards, so once again the exposed thread was kicking the spring out of the bucket. I bought some heavy duty spring compressors and we removed the springs, flipped the bolt, and reinstalled both springs back in the buckets correctly.

Other boring stuff like new after market window washer bottle and pump, new battery terminals, etc were added and re-routing of wires and hoses were done. New steering stabiliser was added, came without one. New antenna, new wing mirror, etc.

Finally got the wheel spacers fitted and got her to the desert for first proper drive.

IMG_20170602_0829530.jpg


18622598_10155787388377289_6202524587960777240_n.jpg


Unfortunately had some overheating problems, but apart from that proved the 73 is a fun desert car.

With the low differential ratios of the diesel, with the free revving V8, traction was an issue for the all terrain Yokos.
 
One extra mod was the addition of the Toyota bonnet emblem. Seemed something was missing without it. Few nerves drilling holes in a perfectly good bonnet right in the line of eyesight, but ended up ok.

IMG_20170601_2333294.jpg


That's just dust all over the paint, not scratches.
 
Anyway after removing the thermostat, and pressure testing and addition of new gasket material, still had over heating problems. One bonus was I found a new product, much better than your typical RTV stuff.

IMG-20170612-WA0001.jpg


After confirming no leaks, I tried to swap over to a standard mechanical fan, instead of the twin electric fans that were fitted when I bought it. I don't know what the twin fans nor the radiator were from, but when removing the fans I saw the wiring has NISSAN printed on the relays.

So after going to the scrappy, I got standard parts for a 1UZ-FE backwards running (to convention) fan.

IMG_20170605_2012309.jpg


The blades of the fan were only clashing by 2-3" with the hose, nothing to see here :(

I then got a bit stupid and bought the same radiator as my friends FZJ, as it has an inlet parallel to the length of the radiator instead of perpendicular like mine. When I went to fit it I noticed my chassis cross member will foul, and I can't move the radiator closer to the engine as the thermo-clutch on the fan sticks out a long way. Also the oil filter on the 1UZ projects well forward, taking up much needed space. At least this radiator was also from a scrap yard and not too expensive.

Next plan was to find a stock radiator with thicker cores to fill the gap I have. Every single item I found had at least one major issue, clashing somewhere or inlet/outlet in wrong position or just too big overall.

In the end I decided to get a custom aluminium cross flow radiator made. Sketched this one up :

radiator fabrication drawing.jpg

I went over to South Africa for a quick one week holiday, and it was fabricated by the time I was ready to fly back. 9kg cardboard box in my luggage and made it on the plane with grams to spare.

IMG_20170630_1017182.jpg


So now I am moving the AC condensor to the front of the cross members right near the grille, and the 68mm thick radiator will sit under the sheet metal crossmember that holds the bonnet latch.

Need to re-route my AC lines, and also the power steering lines and cooler. Need to fab up a few custom brackets for all this to happen.

The filler cap for the radiator is top right in the picture above, it is offset to allow filling of the radiator without clashing with the sheet metal.

In theory this should all fit with no clashes and allow the stock mechanical fan to be used.

This is basically up to date now, so hopefully tonight I will see if theory and practice are aligned. :)
 
Nice work and lucky with the wheel coming off that it wasnt more serious. :thumbup:

Make sure you fit a radiator cowl/shroud as it wont be very efficient at cooling without one. ;)
 
Nice work and lucky with the wheel coming off that it wasnt more serious. :thumbup:

Make sure you fit a radiator cowl/shroud as it wont be very efficient at cooling without one. ;)

Hey mate. We must be switch hitting as I am just finished up for the night. It's still 34C here at 11PM so plenty hot enough.

I had 3 tabs per side welded on to fit a shroud. Don't know how yet, but the tabs will hold onto something ;)
 
So had a busy night. Had move the hoses around on the AC condenser, move the power steering hoses and some wires. All just temporarily held in place at the moment.

I added a temporary shelf leg I cut down to cable tie the condenser onto

IMG_20170703_2021430.jpg


Messed around with some many configurations, wasted about 30 cable ties to get something right. I thought I was going to need new end terminations on the hoses that feed into the condenser, but after moving the receiver across and rotating 90 degrees i got it to work through a hole where the horn was.

The I had to grind away a bunch of sheet metal that was in the way. It had already been cut before by the PO, and it was doing nothing but get in my way. I managed to get through it all with the cordless DeWalt grinder, which was a Xmas present to myself that I quite enjoy using on the cars.

After that I shoe horned the new radiator in.

IMG_20170703_2224358.jpg


The radiator will drop a few mm when I drill the holes for the pins at the bottom, it will laterally locate the radiator in the cross member.

The radiator sits in perfectly aligned with the cross member, and there is not really any space to the left or the right. You can see the 3 tabs on one side I have added for a shroud to be fixed. Also visible is the offset filler cap which I added to avoid clashes with the sheet metal which holds the bonnet catch.

IMG_20170703_2227368.jpg


So some good progress, I am aiming to get this back on the road ready for another desert test run this weekend. I am very happy that the AC hoses won't need to be cut, means I can just gas it up and have AC working for the weekend.

Now I know where everything needs to sit, I will make new brackets for the condenser to sit back some more, allowing the front grille snap connectors to fit in the holes I am currently using to holder the shelf leg bracket.
 
It's looking really smart now Ako, you must be getting heaps of satisfaction sorting out all those niggly stupid mistakes others have made.

Hope you get the cooling sorted, there's nothing worse than an engine you can't trust, especially with the temperatures where you are.

I'm surprised it's only 34C but I guess it's warmer in the daytime and it's not high summer there yet!

Nice work, good luck fitting the rad.

Don't be tempted to space the AC rad too far from the engine cooler rad, they're supposed to be close together to get best air flow efficiency.
 
Last edited:
  • Like
Reactions: Ako
Will try to put that condenser as far back as possible. Think I will end up with a 40mm gap due to a cross member. Will have to see how that goes.

I did a hectic tool store run in lunch break today and picked up my heavy duty riv-nut tool. This one goes up to M12, previous one could only manage M4 to M8. Previous owner has done all modifications with just a nut on the back, so to remove the rear side mounted seats I will need two people. Also to remove jerry can holder I need to remove all the door trim. Also the fuel filer bracket you need one hand in the engine bay and one in the wheel arch. Will eventually get all these swapped out as well.

Tonight I drilled the holes through the lower cross member to allow the radiator pins to drop in. I put some rubber washers on either pin and managed to get the pins in the holes without the washers falling off. Might have to work out a more permanent solution. Will also change out the black bolts, they are annoying me already.

IMG_20170704_2024514.jpg


Then I added riv-nuts to either side of the radiator :

IMG_20170704_2234046.jpg


Then I made some brackets to tie the radiator to the new threaded hole. It is pretty rough as I didn't have any flat bar lying around, had to cut up some old 50 x 50 angles. Anyway just want to get everything fixed in the right spot before I start worrying about pretty brackets. I will end up replacing them though because things like this annoy me everytime I see them.

IMG_20170704_2233028.jpg


Now I just need to put in a 30mm spacer where on the bolt shank.

Since standard radiators are normally on a bush of some sort, I thought something with a bit of give would be best.

I could use nylon round bar, rubber bushes, or even a heavy spring.

If the collective forum brains trust could chip in it would be most appreciated.
 
Will try to put that condenser as far back as possible. Think I will end up with a 40mm gap due to a cross member. Will have to see how that goes.

I did a hectic tool store run in lunch break today and picked up my heavy duty riv-nut tool. This one goes up to M12, previous one could only manage M4 to M8. Previous owner has done all modifications with just a nut on the back, so to remove the rear side mounted seats I will need two people. Also to remove jerry can holder I need to remove all the door trim. Also the fuel filer bracket you need one hand in the engine bay and one in the wheel arch. Will eventually get all these swapped out as well.

Tonight I drilled the holes through the lower cross member to allow the radiator pins to drop in. I put some rubber washers on either pin and managed to get the pins in the holes without the washers falling off. Might have to work out a more permanent solution. Will also change out the black bolts, they are annoying me already.

View attachment 129817

Then I added riv-nuts to either side of the radiator :

View attachment 129815

Then I made some brackets to tie the radiator to the new threaded hole. It is pretty rough as I didn't have any flat bar lying around, had to cut up some old 50 x 50 angles. Anyway just want to get everything fixed in the right spot before I start worrying about pretty brackets. I will end up replacing them though because things like this annoy me everytime I see them.

View attachment 129818

Now I just need to put in a 30mm spacer where on the bolt shank.

Since standard radiators are normally on a bush of some sort, I thought something with a bit of give would be best.

I could use nylon round bar, rubber bushes, or even a heavy spring.

If the collective forum brains trust could chip in it would be most appreciated.

You might be able to find some lightweight exhaust mount bobbins, you know the type I mean, a rubber block with bonded washers and a stud protruding from each end. They're stiff enough to hold tight, but with some flex to stop vibration cracking. Just a thought.

Otherwise I'd be inclined to put a length of heavy duty hose over those bolts, just long enough to be compressed a bit, when tightened up.
 
I think we are on the same page Clive. ;)

Here are the mounts on my friend's 71 series :

IMG_20170611_2204244.jpg


I also need to replace my fuel filter. To fit the filter around the battery box, the PO installed a filter with a 90 degree bend in the inlet. I was looking for a 1UZ filter, but that has threaded ports and I couldn't find a 90 degree barb. In the end I worked out it is a 2UZ filter from 100 series.

IMG_20170618_1650074.jpg


When I removed the old one a whole bunch of rusty brown fuel poured out the inlet side. I guess it's better than being on the outlet side, but glad I got the new one ready to go in.
 
Back
Top