Don't like the adverts?  Click here to remove them

'SWAMPY' MY 02 LWB 3.0 D4D GX Colorado

Well done that man! :icon-cool:

Always an inspiration to lazy bar stewards like me! I keep meaning to do mine but always get put off for more urgent/important items.

My "D" light has been out for a few years now!! Plus half the heater control lights..... :icon-rolleyes:
 
I've just done the same job on the GX, It somehow transforms the driving experience. Its a bit like having a new windscreen fitted ( which I have just had). It is my intention to have every single component working on this one.

Andy
 
Now I feel that I've been shamed into doing mine...:oops:

I'll have a bit more of a think about it after all this.

Apart from the dash illumination, there's very little else still working. None of the heater panel is illuminated now! :?
 
Just checked through the electrical schematics and it would appear that the reversing lights have no interaction with any of the vehicles ECU's :)

That's alright then. I had visions of the ECU seeing Drive and Reverse at the same time and going "What *ARE* you doing?" :laughing-rolling:
 
The interior illumination thing has been a job well worth doing and I'm very happy with the outcome :) I think I spent longer trying to identify what switches should have lamps and were not illuminated due to blown lamps. Some items such as the clock and the heater controls have more than one lamp and if only one is blown it's not so easy to say if they require any! Then there's the things that you think should be illuminated but are not?! Like the electric window and door locking switches in the drivers door or the dimmer wheel for the interior illumination! Thank god for ToyoDiy :) ;) About 50% of the lamps that I've replaced you can just bye from your local motor factors for example the lamps in the clock, heater controls and the illumination for the instrument cluster, but the switches and some of the lamps in the cluster are OE only and not cheap!!! My favourite thing that now shines in the dark is not the heater controls or the temp gauge or the rear heater control switch, but the gear shift position panel next to the gear stick :icon-cool: and that lamp came straight from the local motor factors :)


That's alright then. I had visions of the ECU seeing Drive and Reverse at the same time and going "What *ARE* you doing?" :laughing-rolling:
I couldn't imagine it being a problem even if it was conected to the ECU in some way as the chances of a stuck on reversing light switch must be high considering how many cars I've seen over the years doing 70mph forwards whilst apparently in reverse :lol:
 
Last edited:
Just for interest I had a quick tally up on what I spent on replacing all of the illumination lamps in Swampy :shifty: :icon-smile:

I bought twelve lamps from a main dealer at a cost of £18.44 plus postage and another twelve lamps from my local motor-factors at a cost of £18, but only used 11 of them :)

So I spent with postage about £40 replacing 23 lamps! Nineteen of the lamps I replaced had actually blown the other four I did just because I had it apart and had the lamps that fitted :)
 
Last edited:
Don't like the adverts?  Click here to remove them
Ever since I've owned Swampy when ever I've gone to use to screen washers the bottle has been empty despite having been filled and had little or no use. Suspecting a leak it took me some time to discover that the screen wash bottle was emptying through one of the headlight washer jets mounted on the bumper, so when I had the bumper off for repair I discovered that each headlight washer jet has a sprung valve that opens when the pressure in the pipe increases and one of these had failed allowing the washer bottle to slowly empty overnight! When I placed the order for all of the interior illumination lamps I also ordered a new valve and have now got it fitted :thumbup:

IMG_9232_zpsf628f7a1.jpg


IMG_9240_zpsb1c6ac87.jpg

It takes quite some pressure to open the valve as I could not blow it open myself and had to use the ol' ARB compressor to check its operation!

IMG_9243_zps379d1308.jpg


IMG_9258_zpsa20f8c0c.jpg


IMG_9260_zps7ad387f5.jpg
 
I had exactly the same problem Steven, but I wasn't clever enough to realise where the leak was so I ended up buying a very expensive replacement washer bottle.... for nothing :oops:


Eventually I found it (of course) and it's an easy fix.
 
Don't do yourself down Clive! I only stumbled over the problem myself while repairing the bumper there was no clever diagnostics involved. I could never see any sign of a leak as it was the winter and the ground and truck were always damp or wet. Not a cheap part either in the UK it's about £30!!!
 
Had a few bits and bobs turn up today :)

The cheapo digital temperature sensor arrived. I still can't wrap my head around the sub £8 price tag?! I'll need to extend the sensor wires and I still can't decide where to put the sensor. What have the rest of you done that own one of these things?

IMG_9524_zps1b901475.jpg


IMG_9525_zps2c2bb571.jpg

And as spare locking wheel nut key :)

IMG_9527_zps653ae913.jpg

My best purchase of the day though was this Mottez 3 bike 4x4 bike rack for just £25 that I picked up local to me :)

IMG_9533_zpsdd7670c2.jpg


IMG_9534_zps473b159d.jpg


IMG_9535_zpsf0831fbe.jpg


IMG_9536_zps4b8c73d3.jpg


IMG_9537_zpsba6b451f.jpg


IMG_9538_zps325724df.jpg


IMG_9549_zpsce0cce07.jpg


IMG_9550_zpsf40e93df.jpg


IMG_9551_zps7d5c3841.jpg

I also finished off the wiring for my accessory socket isolator and reversing lights override switch :)

IMG_9528_zps2a5dced7.jpg


IMG_9529_zps47c81a77.jpg


IMG_9530_zps3d8c6c9a.jpg


IMG_9531_zps06a400ed.jpg

I had to jack the truck up and remove a wheel just to replace this one missing rivet!

IMG_9552_zpsc80018a8.jpg


IMG_9553_zps10ba0eca.jpg

Removed, straightened and replaced this body molding support bracket.

IMG_9554_zps6cb03c3a.jpg

Finished installing the CB aerial coax :)

IMG_9555_zpsfda0d6dc.jpg


IMG_9556_zps10d78115.jpg

Found some more Lincomb sand!

IMG_9558_zps29b950d7.jpg


IMG_9559_zps1ad787ff.jpg

Finished repairing and fitting the damaged rear body molding :)

IMG_9560_zps0dd12e01.jpg


IMG_9561_zps7c4a7fef.jpg


IMG_9562_zpsbf0e0205.jpg
 
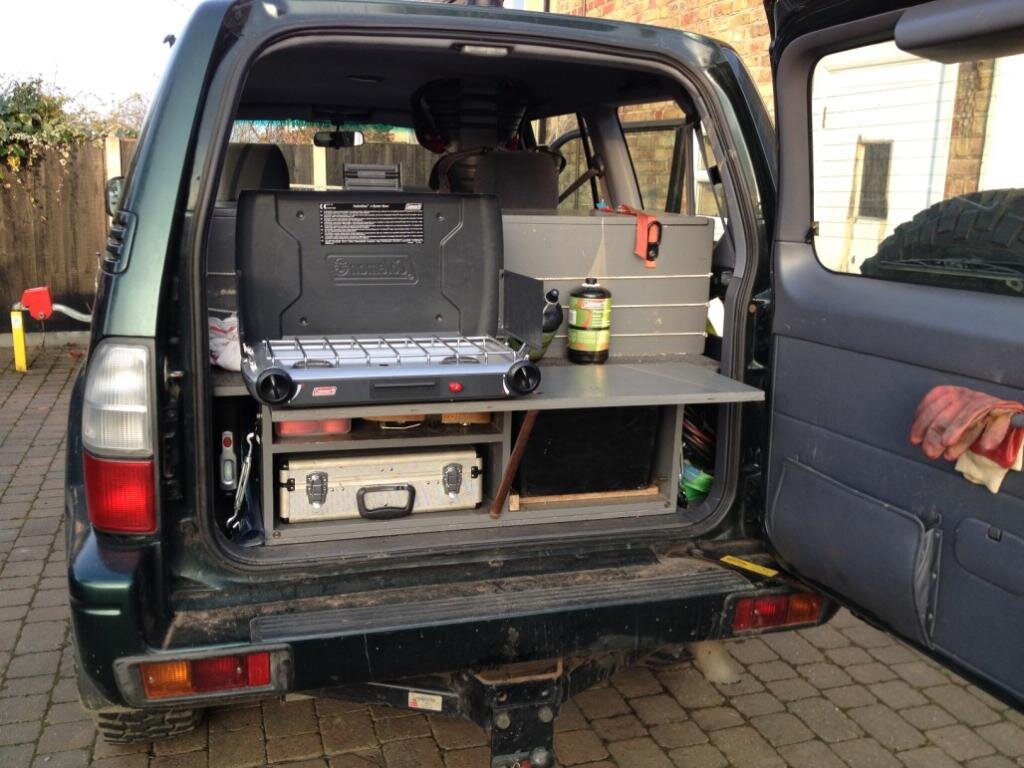
Been having a play with my new Coleman Perfectflow instant start two burner propane stove and seeing how I may fit it into the truck when I'm away. All joking aside it really is very easy to set up and has a real roar to the flame that I've not been used to with the butane powered Bistro Stoves. Can't wait to cook my first meal on it now :)

IMG_9128_zps645f8016.jpg


IMG_9129_zps16e940f4.jpg


It actually works very well stored and used to the left side of the rear of the truck :) I had been considering removing the solid pipe and replacing it with some kind of flexible connection, but having had a play with it I think I'll keep it as is :)

IMG_9130_zps0c6dd1fb.jpg


IMG_9131_zpsd4909c21.jpg


I think it would be easy enough to adapt though as all of the connections are threaded and although I have no idea what the thread is it would not surprise me to find it's BSP.

IMG_9132_zpsa4b2590e.jpg


IMG_9133_zps5ab28197.jpg


IMG_9134_zpsdc2377f9.jpg


IMG_9135_zps35e43404.jpg


IMG_9136_zps89651878.jpg


IMG_9137_zps13521af6.jpg


IMG_9138_zps136a0cea.jpg


IMG_9139_zps9061ac5f.jpg


IMG_9140_zps214193eb.jpg


IMG_9141_zpsb1ec4a57.jpg


IMG_9142_zpsaaf20fe4.jpg


IMG_9143_zps395919a4.jpg


IMG_9144_zps5b0d1c0f.jpg


IMG_9145_zpsde2eb9a7.jpg
 

Attachments

  • IMG_9128_zps645f8016.jpg
    IMG_9128_zps645f8016.jpg
    106.6 KB · Views: 44
Last edited:
Looking good Steven.

And as spare locking wheel nut key :)

IMG_9527_zps653ae913.jpg

May I ask where you got the spare wheel nut key from and how did you suss out if it was the correct one as I have managed to snap half the "wavey" bit out of mine?
Cheers
Ian
 
Hi there Ian :)

i only very recently bought a brand new set of five McGuard Evo5 locking wheel nuts so I had the key code to hand. I just went on- line to the firm that I bought them from entered my key code and a few days later it arrived. It really was ve easy and not a rip off either, the spare key was about a tenner and te set of five locking wheel nuts where about £38. Not bad considering they are considered to be the among the best available in terms of attack resistance :) If you have the OE fit TriLock ones they are also made by McGuard, but are the little sister to the Evo5's and don't fare so well in attack resistance tests. What ever ones you have I'm guessing that you'll need the key code to get a replacement.
 
Thanks Steven,
Mine are actually off my Mitsi Shogun and the main stealer say they can't get just the key but are happy to sell me a new set of locking wheel nuts for £40 something. Doesn't help me get the old ones off though. I tried to get one off with the knackered key today and although being careful, I snapped the rest of the "wavey" bit off :doh: so I guess I'm going to have to find someone to weld a nut on each one to get them off.
 
I guess I'm going to have to find someone to weld a nut on each one to get them off.

Go to a tyre fitting place, they'll have 'em off in 5mins flat, that's what I had to do when I lost my 'key'
 
Might have to do that Chas. Problem is, it failed the mot because of bald tyres so can't drive it to a tyre fitters unless it's one that does mot's as well. Plus it's got ridiculous 285/55R18 tyres and they are bloody expensive.
Ian
 
Might have to do that Chas. Problem is, it failed the mot because of bald tyres so can't drive it to a tyre fitters unless it's one that does mot's as well. Plus it's got ridiculous 285/55R18 tyres and they are bloody expensive.
Ian

Sorry Steven, didn't mean to hijack your thread, very rude of me :oops:
Ian
 
Problem is, it failed the mot because of bald tyres so can't drive it to a tyre fitters unless it's one that does mot's as well.
Mobile tyre fitter? There are locking wheel nut removal sockets available, or you can use a sacrificial socket and hammer it on (brute force and ignorance), to remove the bolt.

Steven - Swampy is looking good :thumbup: I'm looking forward to seeing her in action at Lincomb.
 
That no worries Ian, it is all relevant and of interest :)

i think I may have got the names of the top two makes of locking wheel nut muddled in my earlier post now that I've looked back at my previous posting on the locking wheel nut subject.

I think that some form of locking wheel nut is better than none! If the locking wheel nut key I have for Swampy wasn't broken or I had the key code for it so I could get another I wouldn't bother replacing the OE Evo Trilock ones that most Land Cruiser's seem to come with. As I need to replace them though I shall probably go for the Mcguard Ultra's at just £35ish for a set of five and a second key is about a tenner. They are not infallible, but they've come out on top in a couple of tests that I've read. They are not only the hardest to get off, but the noisiest requiring drilling & grinding causing almost certain damage to the wheel and taking more than 120 seconds each to remove! The Evo MKV TriLock comes a close second normally loosing out on price. The OE Evo Trilock as fitted from standard on a lot of Toyotas is always way down the list getting removed very easily as you say by an untrained chimp with a tool bought from eBay for a fiver in no time at all.

the ones I bought in the end were the Trilock Evo5's as they come out on top for attack resistance only loosing out to the McGuards on price :)
 
Just to continue Ian's Hijack, I lost the locking nut key to a set of mcgard nuts once - I emailed them a couple of photos of the nuts on the car & they sent me out a new key. I can't be sure but they may not have even charged me :wtf:

Worth a punt though... :icon-cool:


Truck is looking great Ste :thumbup:
 
Last edited:
YYY
Back
Top