Don't like the adverts?  Click here to remove them

Wet drivers footwell when it rains!! Help pls.

stevoyorke

Active Member
Joined
Mar 27, 2010
Messages
99
Got a wet drivers side carpet, sundaresan rubbers look ok or can they be deceiving? Any suggestions or knowledge of known problems that causes this? I was wondering if the grill at the top of the bonnet has piping which goes thru the inside of the car? Any help please thanks
 
You might check the drains from the sunroof they run down in that area.

I recall reading something on here

Good luck
 
Thanks for that, Got a sunroof so will look into that, if anyone knows more about where the plm is likely to be do tell ! Thanks
 
While you are having a root about check out this. I have copied this from another site, it is well known rust trap on the 80's, I checked mine a few months ago and both were full of water :shock:

Toyota design fault can cause RUST

Vehicle? 1993 Australian spec 80 Series GXL wagon – turbo diesel.
Other models? Most likely all 80 Series wagons.
Fault? Rust can develop on the left and right hand firewall.
Where? Around the inner mudguard mounts.
History? This vehicle is not garaged and does not do much beach work. Due to a lack of rust elsewhere, it would appear that these factors probably have little bearing on the fault anyway.
Cure? Read on…….


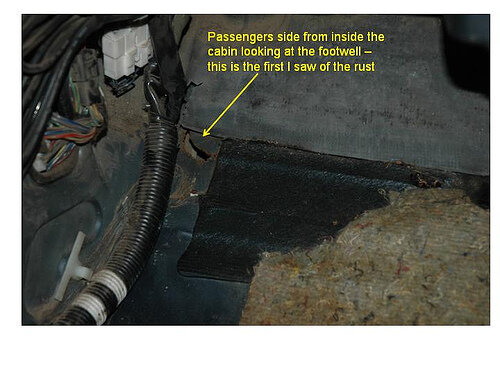
After spilling some milk in my 80 series, I removed the carpets in order to clean them and remove that incredible smell that milk manages to make after a few days in a hot vehicle in the sun.

I had removed the carpets and was doing a general clean up of the painted metal surfaces inside the cabin, and there it was, the dread of any vehicle owner ….. RUST. It was just to the left of where the front seat passengers feet would be when normally seated with legs stretched out.

2148865560_74ccde87f7.jpg


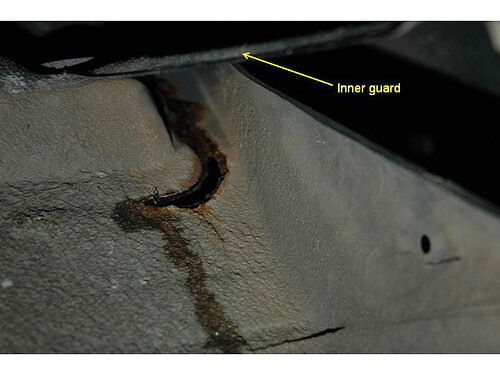
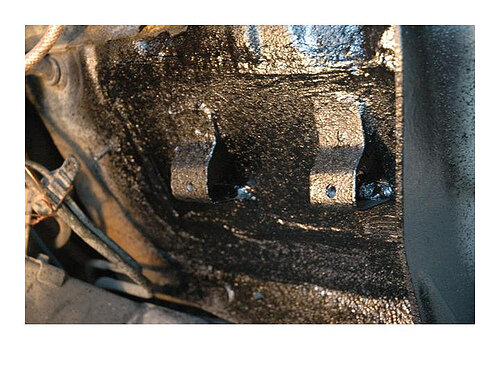
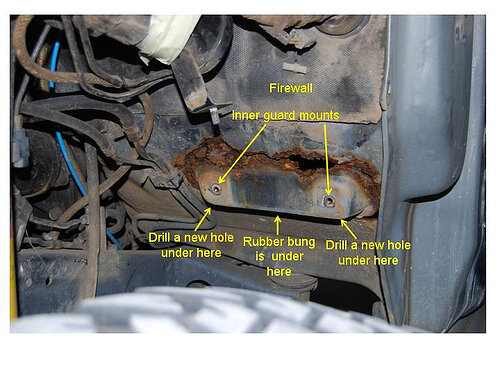
When I got under the vehicle and had a look and feel around it didn’t take long to realise that I had a small problem. Looking straight up, I could see the rust around the lower edge of the inner guard mount. My panel beater referred to this panel as the skirt. The skirt mount is on the sloping part of the firewall. The next photo is what I could see when looking straight up. It even still had a dribble of moisture visible.
2148071169_af9d48a9f3.jpg

You cannot see the firewall above the skirt mount, although you can get your hand up there, I had a feel around and could feel large flakes of rust. In the middle of the mount on the bottom edge and just left of the above shot there is a hole about 10mm diameter which has a rubber bung in it.

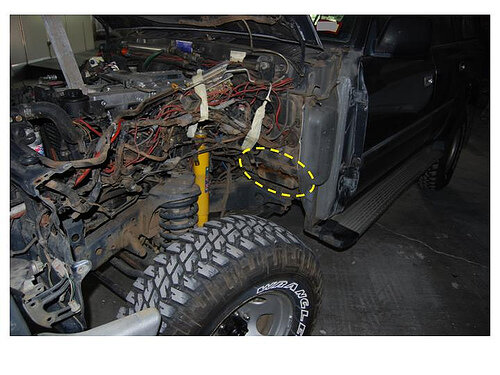
Next day I was off to a panel beater I have used before for tidying up the vehicle paintwork. A few hours later he had the bad news for me – the rust was more extensive that I had seen and it was on both sides of the vehicle, in similar positions. The bad news was that the mudguards would have to come off, which meant all components inside the engine bay mounted to the mudguards would have to be removed. The exhaust would also have to be removed to provide access to the offending areas.
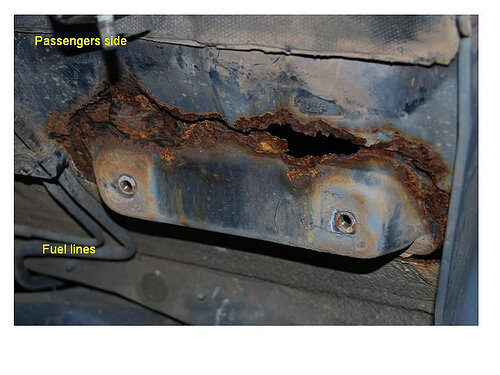
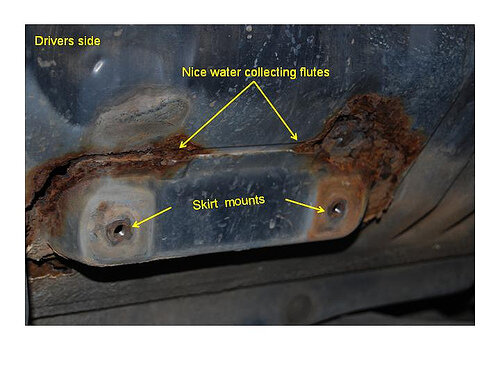
With the mudguards removed this is what was visible:-
2148865482_f6cbf33d90.jpg

2148071539_d13d741a62.jpg

Those two bolt holes are where the skirt is mounted.
The drivers side wasn’t quite as bad. Note the nice flutes pressed into the top edge of the mount. I am guessing the designer at Toyota was having a bad hair day the day he designed these mounts and put the drains on the top edge instead of the bottom. They therefore became water collecting flutes instead of drains. The rubber bung and a good dose of body deadener around the bottom edges of the mount ensure that any water that gets in there is likely to stay for quite a while.
2148865746_451629e74f.jpg

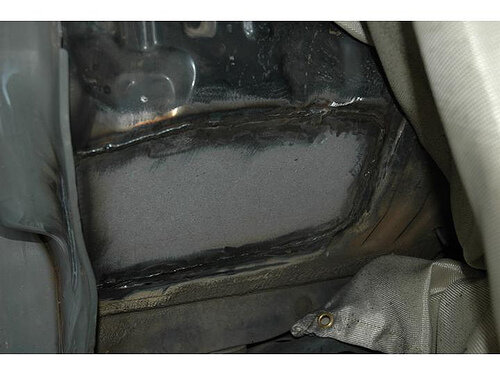
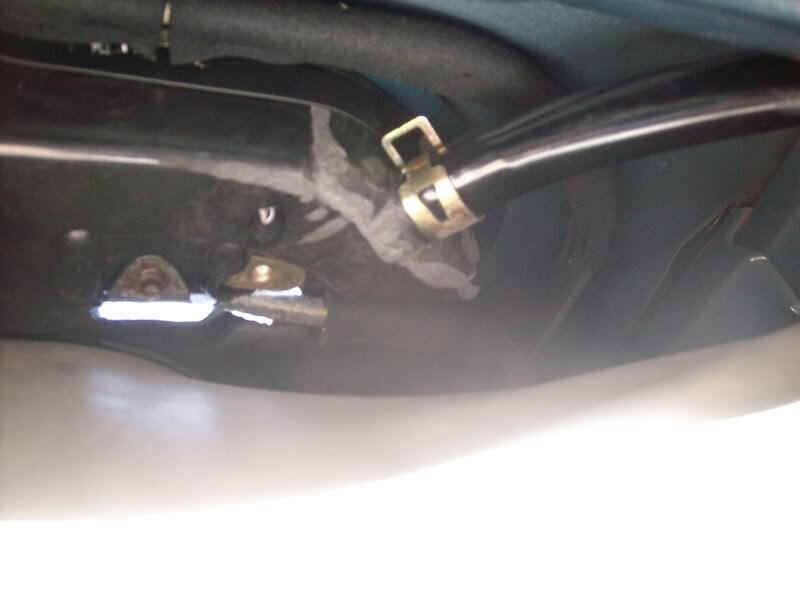
The panel beater cut the affected areas out and welded in new plates – 1.6mm zinc anneal sheet. This is the drivers side again with fireproof curtains visible.
2148865824_cee65d8ebc.jpg

The panel beater then fabricated and welded on some simple brackets which will not hold any moisture. The plates and brackets were then zinc painted and treated with a dose of Tectyl rust preventative and then body deadener..
2148071781_0327125c28.jpg

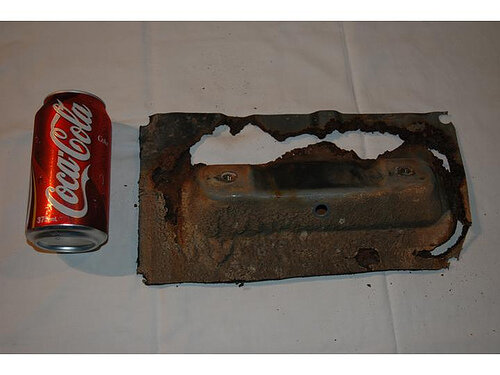
To give you an idea of the size of the sections that were removed see the 375ml Coke can. This is the passengers (left ) side mount.
2148071879_7217f70a9d.jpg

I had a look at a couple of other listers 1997 80 series vehicles and we removed the rubber bungs. One vehicle had no water but had a slight rust coloured weep mark on the edge of the seam, but the other vehicle dumped 100ml to 150ml of water out of the bung holes of both of the skirt mounts. The disturbing thing was that this vehicle had not been wet for about three months and had held the water since then or before. Thankfully there was no sign of rust in the water, nor inside the chamber of the mount.

My panel beater believes the best preventative measures to overcome this problem before the rust starts are:-
1 Remove the rubber bungs.
2 Drill additional holes in the bottom face of the mounts.
3 Spray plenty of slightly thinned Tectyl rust preventative into the chamber. Do not replace the bungs. He uses Septone brand and only recommends thinning with mineral turpentine.
2148865346_48404b4a12.jpg

All up, the repair cost me a bit less than $2000, and I hope the information I have provided above may help others prevent this unnecessary cost.

If only Mr Toyota had not been having a bad hair day that day…..…
 

Attachments

  • 2148865560_74ccde87f7.jpg
    2148865560_74ccde87f7.jpg
    89.9 KB · Views: 2,113
  • 2148071169_af9d48a9f3.jpg
    2148071169_af9d48a9f3.jpg
    71.5 KB · Views: 2,099
  • 2148071539_d13d741a62.jpg
    2148071539_d13d741a62.jpg
    91.7 KB · Views: 3,443
  • 2148865482_f6cbf33d90.jpg
    2148865482_f6cbf33d90.jpg
    103.3 KB · Views: 2,720
  • 2148865746_451629e74f.jpg
    2148865746_451629e74f.jpg
    81.6 KB · Views: 2,632
  • 2148071781_0327125c28.jpg
    2148071781_0327125c28.jpg
    112.9 KB · Views: 1,959
  • 2148865824_cee65d8ebc.jpg
    2148865824_cee65d8ebc.jpg
    75.9 KB · Views: 1,937
  • 2148071879_7217f70a9d.jpg
    2148071879_7217f70a9d.jpg
    69.4 KB · Views: 1,933
  • 2148865346_48404b4a12.jpg
    2148865346_48404b4a12.jpg
    110.5 KB · Views: 2,486
I'm no engineer but i thought 80's were all galvanised?

I thought galvanised means no rust...
 
Common problem, as already said check sunroof drains, also windscreens are prone to leak around the rubber gaskets, another place is around the wiper stems, there's a rubber gasket around the base that can go hard & brittle & leak.
 
Don't like the adverts?  Click here to remove them
Blimey looks major there in those pics, hope it comes to summat simpler to deal with, will get a full top half cover till I can get a good day to look at it properly cos raining at moment!! Sleepless night tonight I guess heh. Gotta get it sorted thou asap! Thanks for info
 
Check those rubber bungs in the floor Steve... Muxley got flooded a couple of weeks back in a big, deep puddle when we were laning... Once I had the seats out & the carpet removed, it was apparwent that a number of the bungs were displaced which had let the swampwater in...

Stinky poo :(

Jet washed the carpet & hosed out the inside of el camino - hope re-fit PDQ as he's a noisy chap without...
 
Tommo&Claire said:
I'm no engineer but i thought 80's were all galvanised?
I don't think they're galvanised, unless there's a form of galvanising that looks like and scratches like undercoat :)
 
Stevo

Mine was the bottom corner of the windscreen and some of the water took out a part of my wiring loom. Not trying to worry you but thought you need to be aware.
 
Thanks, footwell flooring looks solid at first glance but will check out that windscreen as it does have I little bit of whitening in the laminate on the bottom edge which is a sign of water ingress, will get the hose out ans try the sunroof, windscreen, grill and wiper rubber mounts with my son under the dash! Will do over weekend if rain can give me a break!! Thanks and keep them coming in
 
The scary rust issue shown in Bat21's pics are definitely worth checking - mine were full - but gladly no rot!

Mine actually turned out to be the sunroof - as suggested above.

I posted some links on this a few months back - see half way down this page:

http://www.landcruiserclub.net/forum/viewtopic.php?f=15&t=7898

You can lift the carpet and pull the drain plugs in a few mins - so worth doing now what ever the cause IMO...

Hope this helps

J
 
Another place to check is around the area by the phillips screw in the piccie below, water gets under this area onto the headlining & runs down the A pillar onto the floor, i sealed mine with clear silicone.

Various430.jpg


Various430.jpg
 
Another pic looking under the headlining, you can see the white part in the pic is daylight which is what i sealed, also the pipe in the top right of the pic is the sunroof drain, these have been known to become unatached.

Various434.jpg
 

Attachments

  • Various434.jpg
    Various434.jpg
    43 KB · Views: 2,114
Once you've checked your drain pipes are secure, it is quite likely to be your sunroof gutters being overwhelmed and water pouring over your headlining, down the a pillar and down the back of the dash. this was the case with mine. sealing up as joinerman suggests will help as this is where it overflows. it is also important to make sure your sunroof is sealing as best it can so that the gutters don't get overwhelmed.

I spaced up the glass with washers to make sure it was sitting as flush as possible with the roof and added the tails of tie raps into the groove of the seal to make it seal more tightly against the metal of the roof.

Not had any problems since and have been able to finally banish the smell from the car.
 
have made a start on looking for the leaks, the fire wall mounts i took the rubber plugs out, the mounts have no rusts, however on the passenger side, alot of water poured out, but no rust staining in the water and looking inside looked clean so sprayed some anticorrosive solution in the hole and left those rubber plugs out so any future water can drain away. thanks for the guys on this one as done the preventive thing there.

sunroof has water and dirt in the drainage area, roof lining feels bone dry from inside, can't see where the drainage pipe actually leads to down at the floor level, any pointers?

firewall under the dash looks dry and clean, no indication of a leak from windscreen seals as yet, getting that feeling sunroof is very suspect!! waiting for my son to get over and help with hose test.
 
The sunroof drain runs from the front corners of the sunroof (behind the headlining) (as per joinerman's post) to down inside the foot well. If you remove the inside molding/kick panel from the PS and DS foot well you will reveal a square hole in the a-pillar... root around here and you should be able to find the other end of the 15mm black hose...

This hose dumps all the drain water from the sunroof into the a-pillar / door cavity - you'll need to pop out the drain plugs in order to empty any water trapped in here (similar to the ones on the firewall).

Note: you have two sets of drain plugs - one for the foot well and one for the a-pillar / door cavity...

The permanent fix is to extend the black hose through the door cavity drain hole (as per links on IH8MUD).
You can pull out the loose end to add on an extension peice etc.. but don't pull the hose downwards as you risk pulling it off the sunroof connector!
 
the drivers side sunroof forward facing drain was about 2mm in diameter, other side much larger, and with some cleaning, it was dirt shrinking the drain hole, think when it gets overwhelmed with water,this goes in the roof lining which on the backside is plastic so doesnt show by just looking up on the roof lining and trickles down the inside of the door seal on the front pillar onto the floor. The hole now equal to the other side in diameter, i then did the hose test everywhere and typical, nothing seems to leak in the test, drains seems to work fine, i think that the cleaning of the holes did the trick, but have placed tissue in the pillar so next time it rains, this should get wet if there still is a problem. Carpet should start drying out, should it still get wet when it rains( car standing overnight), i think the next thing is to camp out in the car in the rain with some whisky!!( for warming purpose) heh. will post on the forum if it gets better or not, i have learned alot from you who have posted helpful advice and wish to thank you all for your help. :thumbup:
 
Steve

One thing that may shoot your tissue paper theory down. When mine is warm inside and it is cold outside I get a lot of condensation on the inside of the exterior panels (another reason for drain holes in the bottom of doors etc)
I think your tissue will show wet even if you no longer have a leak.
Best bet is an electric heater overnight if you are able (a window or two slightly cracked open to allow moisture laden air out) then see if your carpet gets wet again.

Good luck, it's a bu**er trying to find where water gets in but sounds like you may have solved it :thumbup:
 
Back
Top