Don't like the adverts?  Click here to remove them

Fox Slinky install... Finally begins!!

Its a bit late now to reconsider, but when remote reservoirs where mentioned, I remember seeing that EMU, make one now.....

Sales pitch
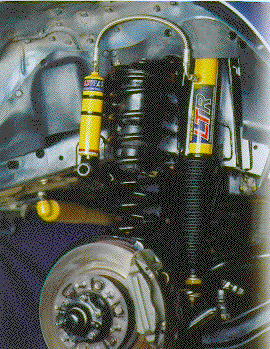
"Extreme Performance Long Travel Remote Canister 4x4 Shock Absorber 18mm hard chrome shaft massive oil volume with total gas separation remote canister with sliding piston, separates oil from the gas no oil aeration and fade remote canister is charged with Nitrogen gas to maintain pressure on the oil heavy duty 2mm thick pressure tube walls, greater area allows heat dissipation fully rebuild-able stainless steel braided Teflon hose tough powder coated outer surface Polyurethane mounting bushes These shocks will withstand a full day over rough terrain at 80kph and never fade."

Stephen
 

Attachments

  • EMU.gif
    EMU.gif
    46.3 KB · Views: 625
As most it all comes down to cost. Fox shocks are better than OME, but cost a lot more. I have a set of OME shocks here to fit, but I am still running Procomp shocks that I got 4 years ago, they were seconed hand when I got them!!! As you can tell I am a tight git, but I will spend money when I need to, or just make it myself ;) For overlanding then I think Koni shocks (the big red ones) would be good, if not the best, but I know these cost quite a lot.

Paul
 
Pics of fronts going on:

DSC_0479.jpg

Slinky Vs OME.

DSC_0483.jpg

Old coils and shocks removed.

DSC_0485.jpg

Fox Shock and slinky coil fitted. Those Fox's are a b*stard to compress. Nitrogen charge in them is 200psi at the moment.

DSC_0481-1.jpg

Fox Vs OME

DSC_0494.jpg

DSC_0495.jpg


All fitted. I have 4.5" of compression available. Not bad really. Though I'd have a bit less than the rears...

DSC_0487.jpg

DSC_0486.jpg


Now onto extending the brake lines, bump stops, sway bars brackets and panhards. Once all that's done then onto moving the rear shock mounts up.
 
Don't like the adverts?  Click here to remove them
looks good! :thumbup:

cant wait to see some pics of it articulating once its all done. :cool:
 
Oi, Ryan!!! These any use to you mate?

Just such a pity you can't make Lincomb. Ahh, well I am sure someone will take them off me :whistle:

Now all I have to do is figure out what to do with the three wheelie bins of SWARF that's covering the workshop floor. What a nightmare. :roll:

First and last set I can tell you.


Chris

[attachment=0:32hzh45c]P1000891.JPG[/attachment:32hzh45c]
 

Attachments

  • P1000891.JPG
    P1000891.JPG
    158.9 KB · Views: 401
Looking very nice :thumbup:

Gotta say I love seeing a drawing come to life.
CoilSpacer.jpg

Top Job Chris.

Ya, pity bout Lincomb. :thumbdown: Going to have to make sure my 80 is pimping for the next one... :cool:

Swarf you say? what's that... :shifty:
 
If only we knew someone who could pick them up and take them down for you :whistle:

Just hope the drawing was right, as they are bang on to your dimensions.

Chris
 
If you want I can bring them back to mine.... not a million miles from you.....


Edit: Nice work Chris
 
Finally got a bit further with this setup over the weekend.

I fitted the coil spacers Chris made up for me. It seems my drawings need a bit of tweaking, well maybe alot of tweaking :oops: 
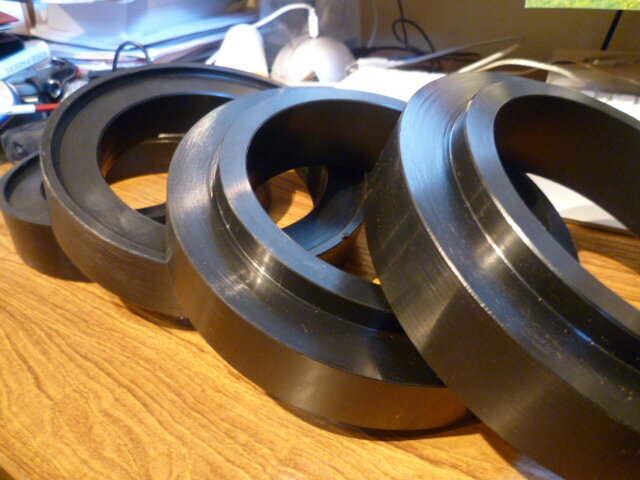
I'm embarrassed at how much I had to butcher these to get them to fit... :sick: Main issue with the rears was that the inside diameter was too small and the spacer wouldn't fit over over the coil perch and with the fronts the outside diameter was too wide. But hey ho they are on and seem to be doing the job. :shifty:

Next up were the bump stop spacers. For the front I used a section of 50mm HDPE Round bar and cut two 65mm sections and drilled a 9mm hole through the middle and used M8 x 100mm allen head bolts to replace the stock bolts, which snapped. Glad I had a M8 tap on hand to clean the threads out as I had to drill the old bolts out.

You can see the butchered coil spacer and drop block here:

DSC_0004-2.jpg


DSC_0002.jpg


Next up was to fab up some rear drop blocks, this was pretty straight forward. I used some 60mm x 5mm plate, cut and drilled to suite, and welded a 90mm section of 80mm x 40mm x 3mm box section.
DSC_0006.jpg


Only issue here (math clearly isn't my strong point :roll: ) is that I got my sums wrong with regards to the length of the brop bracket. I thought a 100mm drop would suffice without modifying the upper mount and 75mm if I did go ahead and modify the upper mount. That should in fact have been 100mm if modifying the upper mount and 125mm if not... :wtf: :angry-screaming: :angry-banghead:

So now I either redo the bump stop brackets or have a go at trying to raise the upper mount an inch... so much for the bolt in setup... :roll:

On the plus side getting to put the welder to good use :D

Also all brake lines have been replace with stainless braided hoses from Llama4x4, the axle-chassis ones were extended. Gotta say service and quality from them was great :thumbup:
 
If you knew how much work went into getting those spacers spot on to your drawings. :roll:

Good to see them on now. I have managed to get rid of the last of the swarf. Man, machining plastics might be nice, but the waste could fill a skip.

Chris
 
"I have managed to get rid of the last of the swarf"

yes i remember seeing those piles of swarf on your lathe in May!
 
We now have indestructible bird's nests around here. Going to last a million years :whistle: :whistle:

Chris
 
So how are the shocks performing.

Can you remember what you compressed and extended lengths of the shocks.

What was your up travel before putting the spring spacers in.
 
Back
Top