Don't like the adverts?  Click here to remove them

LJ70 Build Thread!

69 my favourite number! :p

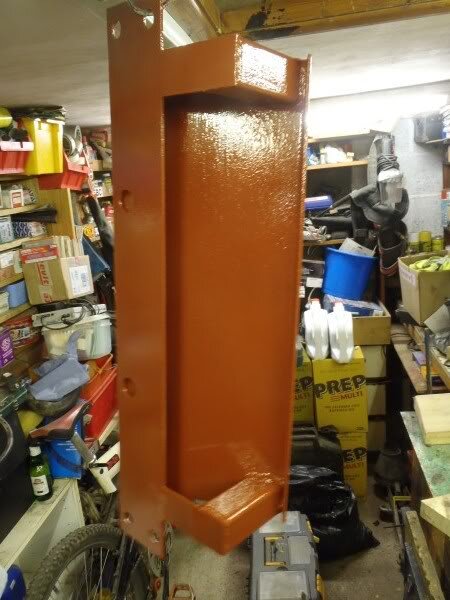
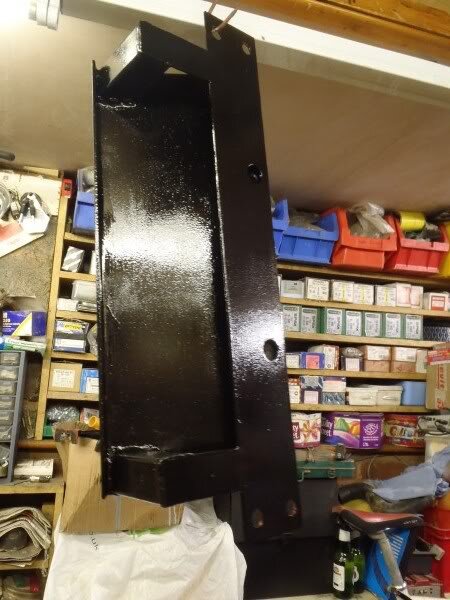
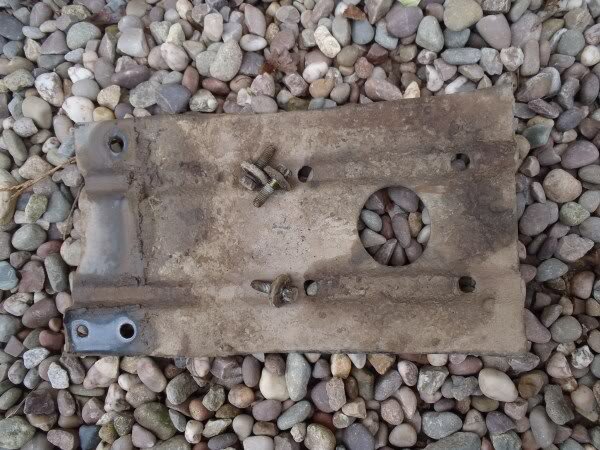
so i got the steering guard painted in the week.

first in red oxide primer.

P1220001.jpg


then in black enamel.

P1250004.jpg


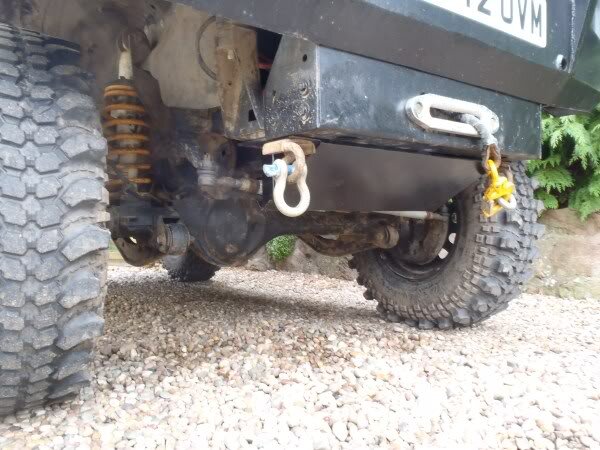
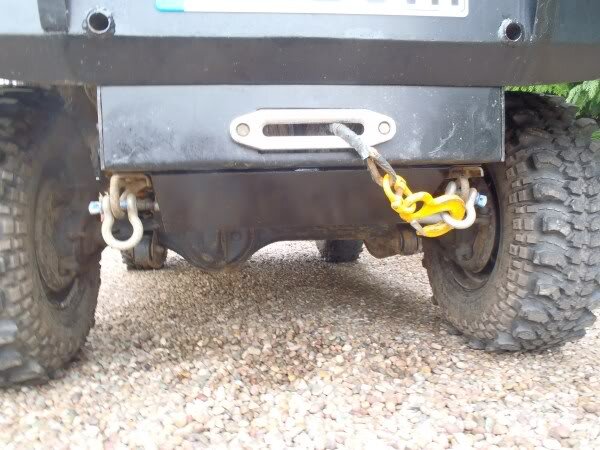
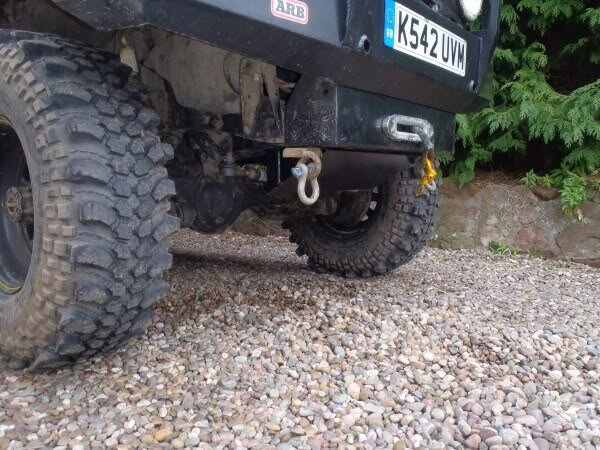
so got it bolted on today.

P1290012.jpg


P1290013.jpg


P1290014.jpg


P1290015.jpg


P1290016.jpg


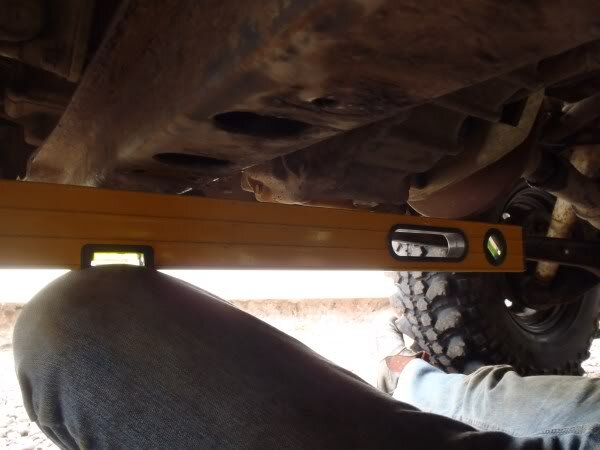
i unbolted the little tin toyota guard from underneath the transfer box.

P1290019.jpg


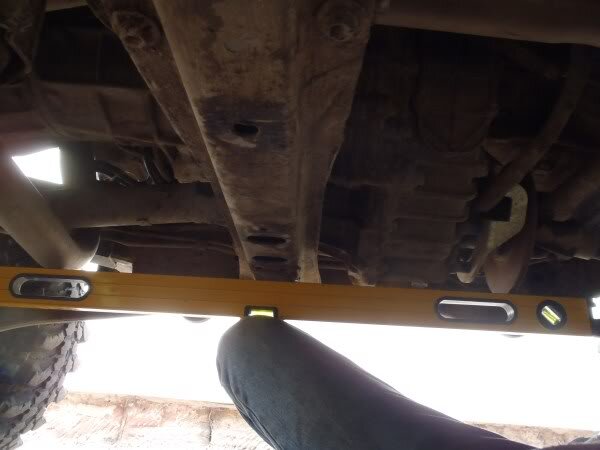
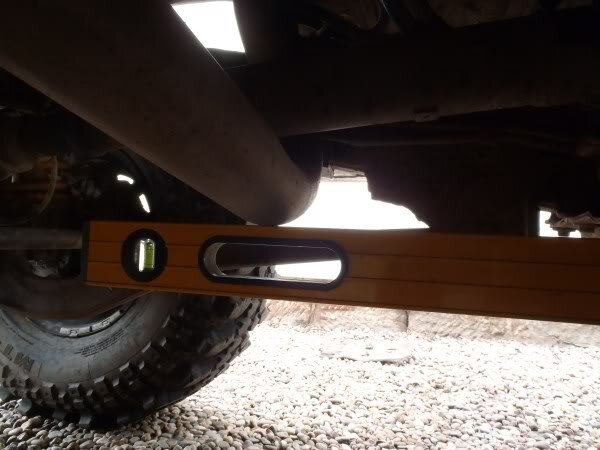
and then began measuring up for the guard im going to make.

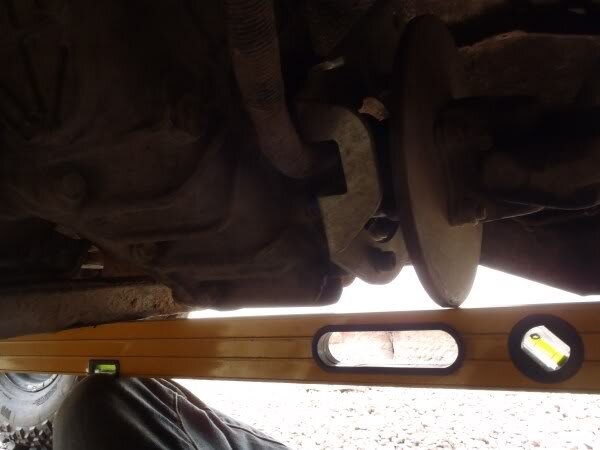
it will protect the exhaust at the front, then the transfer box, and then the X-ENG hand brake disc at the back.

i used a straight edge to gauge where if any the bends in the sheet metal would need to be.

and found that the exhaust, gearbox cross member and handbrake disc are all virtually in line.

P1290020.jpg


P1290021.jpg


P1290022.jpg


P1290023.jpg


so the plan is is to use some thick gauge box section to space the guard down slightly off the cross member, and at the very back there will be 1 possibly 2 legs that will brace the guard back to the round chassis cross member.

the sheet metal for the guard will have a 45 degree bend front and back, with a small 20mm upstand. thinking of using 6 or 8mm plate and will probably put a load of holes in it with a 50mm hole saw.

hoping to get the steel next week. :dance:

while under there i noticed the amount of play in the output bearings, on the rear of the transfer case is getting worse.
so i will have to get the box dropped out and new bearings fitted soon.

not looking forward to lying on my back on the gravel drive, removing the box. :thumbdown:

ive been following Sam's drawer thread with great interest, and have been particularly impressed with Chris's idea about using electrical cable tray. :clap:

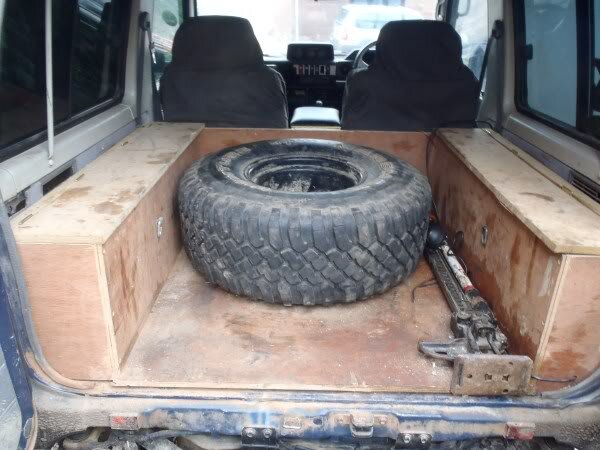
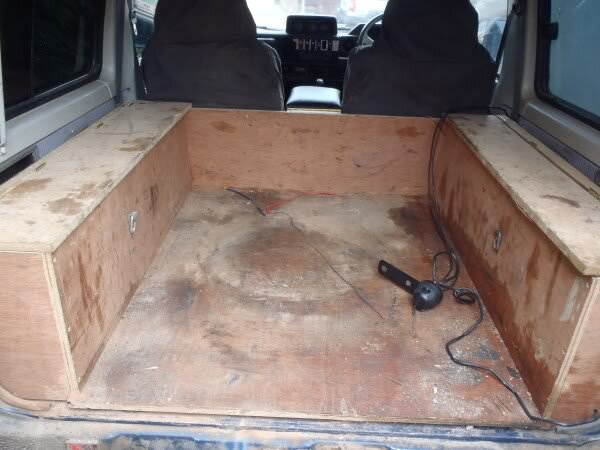
so i decided i wanted to do something similar in the back of my 70. the wooden boxes i made over the arches, have worked well in the last 6months or so that theyve been fitted. but its not always easy to get stuff in and out, and what i need is usually right at the bottom. :doh:

so how the wooden boxes looked.

P1290005.jpg


emptied everything out.

P1290006.jpg


P1290007.jpg


unscrewed and removed all the wood.

P1290008.jpg


P1290009.jpg


then used a straight edge to gauge how high i can make them.

P1290010.jpg


my original plan was to make 2 drawers both the same size, side by side. but that would mean having to open both back doors to open either drawer.
so then i thought about making one of the drawers smaller, so that it can be opened with only one door open.

P1290011.jpg


but then i thought the other drawer might be too large, and be too heavy to open and close when full of stuff.

so i need to look into the possibility of having 3 equally sized drawers, but this will depend on how much drawer space i will loose with the bits in between the drawers that will have the bearings bolted onto, and also the alloy box section that im thinking of using between the bearings. :think:

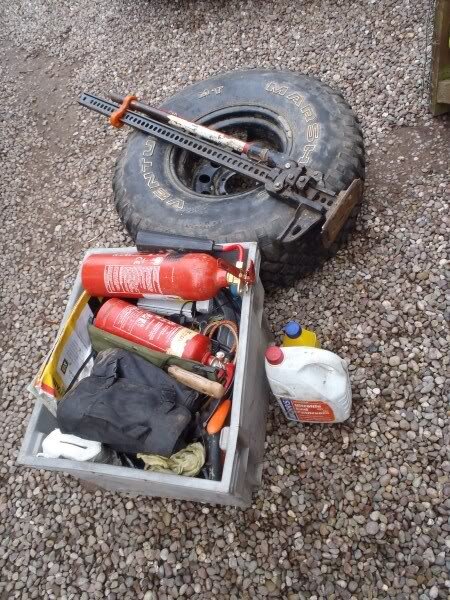
ive got a lovely big sheet of 6mm alloy that will go over the whole lot afterwards. some where on this the spare will have to be mounted.

i did think it might be cool to have a slide out shelf/table above the drawers, but under the main top, which would be useful when camping for cooking on.

the space ive got in the boot for the drawer unit, measures 1025mm wide, by 180mm heigh (could go more, if i like, thats just to the tops of the wheel arches) by 1080 deep. so the drawers are going to be quite deep. :thumbup:
 

Attachments

  • P1220001.jpg
    P1220001.jpg
    54 KB · Views: 74
  • P1250004.jpg
    P1250004.jpg
    58.3 KB · Views: 80
  • P1290012.jpg
    P1290012.jpg
    61.9 KB · Views: 87
  • P1290013.jpg
    P1290013.jpg
    55.9 KB · Views: 78
  • P1290014.jpg
    P1290014.jpg
    80.8 KB · Views: 78
  • P1290015.jpg
    P1290015.jpg
    86.1 KB · Views: 98
  • P1290016.jpg
    P1290016.jpg
    80.2 KB · Views: 98
  • P1290019.jpg
    P1290019.jpg
    73.6 KB · Views: 79
  • P1290020.jpg
    P1290020.jpg
    26.3 KB · Views: 89
  • P1290021.jpg
    P1290021.jpg
    40 KB · Views: 79
  • P1290022.jpg
    P1290022.jpg
    30.1 KB · Views: 86
  • P1290023.jpg
    P1290023.jpg
    26.1 KB · Views: 73
  • P1290005.jpg
    P1290005.jpg
    50.9 KB · Views: 73
  • P1290006.jpg
    P1290006.jpg
    102.6 KB · Views: 82
  • P1290007.jpg
    P1290007.jpg
    44.5 KB · Views: 75
  • P1290008.jpg
    60.7 KB · Views: 0
Lowenbrau on Mud made up a set for the back of his 70 with one small and one large. he has been running that setup for quite a few years with no issue ...
 
Ben.

You'll find it a lot easier to have all 4 wheels at least 150mm off the ground when you get drop the g/box, otherwise the bell housing may foul on the chassis rails when you pull the box clear.

Roger
 
Don't like the adverts?  Click here to remove them
ok thanks Roger. ive got some huge axle stands and some ramps so will get it as high as i can. :)

my plan is to have a day off one friday and take the box off. then the next day shoot down to yours with the box, where hopefully with your guidance fit all the new parts. then sunday re-fit the box back on my truck, ready to drive it to work on the monday. :thumbup:

hoping to re-fit the X-ENG calliper, and hopefully get the X brake working once the box is back in. :thumbup:
 
it wasnt mine its my mates. had a slight incident a few months ago and havnt used it since. :?
 
Draws, What draw runners are you planning on using Ben?

I made a pair of draws for my navara a few years ago, I used unistrut channel and cheap bearings which are 35mm OD with 10mm ID so can be bolted on with 10mm bolts

They worked a treat and survived 3 years of daily use with 200kg in each draw they where 1500mm long and travelled if I remember correctly travelled 1100mm dead easy to open and close as long as your parked on the level.......

The draws where 12mm birch ply and survived without any issues.

When I replaced the truck I sold the draws on eBay!
 
going to use some alloy box section, bolted to the side of my drawers, with bearings top and bottom. very similar to the ironman drawer system.

cant decide what to make the actual drawer from. ply would be easiest, but id rather use metal really.

hoping to pick up the lengths of cable tray tomorrow. then need to get the alloy box section next time im in Shrewsbury. thinking of using 2" x 1" box with quite a thick wall.

still very unsure about what to make the drawers from and what catches to use. :think: :)
 
went into city electrical today to buy the 225mm cable trays.

i wanted to get them then and there, so that i could start work on the drawer project tonight, but they were out of stock. but..............they did have them in stock at the other telford branch, but i couldnt justify driving over to the other branch, in works time. :doh:

will be going past the other branch tomorrow so will pick up 2 3m lengths. i did get a price on them though, £11.50 +VAT each. so £27.60 for the 2 with VAT if my maths is correct. :dance:

it looks like my newly built, and fitted steering guard will be for sale very shortly too, if what ive been planning for a while comes off! :twisted:
 
What, are you planning to drive round things, rather than straight into them....? :whistle:
 
:lol:

i dont think you will be disappointed when you see what ive got planned, if it comes out as good as im hoping it will! :dance:
 
picked up the cable tray today. :dance:

only just fitted in my workshop, really must make sure i build the next one much bigger!

P2010001.jpg


got one 3meter length of the 75mm medium duty tray.

P2010002.jpg


and 2 3meter lengths of the 225mm standard cable tray.

P2010003.jpg


so first step was to mark the 225mm tray ready for cutting and bending.

once i knew my overall length which was 2490, i centred this up to make sure that both ends would have the holes in the same places.

marked it.

P2010004.jpg


once it was cut, i turned it around ready to cut the other end.

P2010007.jpg


P2010009.jpg


these are the cutting discs i use, there inox specials and because there only 1mm thick they slice through thin sheet metal very quickly.

P2010010.jpg


next i marked where i wanted my bends, making sure i also marked the edges.

P2010012.jpg


put a cut where the bend needed to be.

P2010013.jpg


i then used some pliers to tweak the metal apart slightly.

P2010017.jpg


then i cut a piece of fire wood to the exact internal size of the tray. this would be my former block.

P2010018.jpg


i then clamped this firmly in place where i wanted the bend.

P2010019.jpg


i then bent the metal around the wooden former. i found using a rubber mallet helped me get a perfect corner.

P2010020.jpg


P2010021.jpg


P2010022.jpg


P2010023.jpg


P2010024.jpg


P2010025.jpg


once the metal was all bent i drilled through the corners.

P2010026.jpg


and then riveted the metal together.

P2010028.jpg


P2010029.jpg


rivets are ideal for this because there lighter than bolts, and unlike bolts they wont rattle loose over thousands of K's of corrugated roads! :cool:

the riveted corners made the whole structure feel very strong, and this wouldnt have been possible if id cut V's out. it is also a lot less work to cut 1 slit than to mark and cut V's.

i then tried the first one in place to see how it fitted.

P2010030.jpg


P2010031.jpg


P2010032.jpg


P2010033.jpg


i then brought it back into the workshop and began on the next one. so i laid the first one onto the next tray so that i could get the end cut off in exactly the right place.

P2010034.jpg


P2010035.jpg


once i was happy with the position i clamped the 2 together and then cut the end off with the grinder.

P2010036.jpg


marked where the cut needed to be for the bend.

P2010037.jpg


P2010038.jpg


did all my cuts where the bends needed to be, and then flipped it around and marked where the end needed to be cut off.

P2010039.jpg


clamped the wooden former in place and again bent the metal, hitting it with the rubber mallet as i bent it.

P2010040.jpg


P2010041.jpg


i then drilled and riveted all the corners top and bottom.

P2010042.jpg


P2010043.jpg


P2010044.jpg


i then tried it in the vehicle and it fitted perfectly.

P2010045.jpg


P2010049.jpg


P2010050.jpg


P2010051.jpg


run out of room in the workshop, so set some trestles up in the garage. next job is to bolt the 2 together.

P2010052.jpg


quite pleased with my how my 2 hours on this went. reminds me of mechano. :thumbup:
 
I am delighted that you are both road testing my idea. :idea: It is certainly saving me a whole load of work planning mine. Not completely convinced that this is the cable tray that I originally looked at though. But seems to be working fine. Keep going!

Looking forward to the drawers next. :dance:

Chris
 
Probably a stupid question, but apart from aesthetics, why do you want the holes to line up? Have a missed something?
 
Back
Top