Don't like the adverts?  Click here to remove them

1kz-te Rookie!

I’m currently working on the ECU. And here’s what I’ve found. Will try to repair it....
 
C66F4751-1D86-4E4D-8604-9D0DC01ED12D.jpeg
 
Ok, smoking gun there Sam. There’s more to this than meets the eye. Not sure if this is a known problem (did you read it?) or something that’s got shorted in the rebuild?

Once you’ve done what you need to with the transmission and got it filled back up, testing the alternator is easy for a basic test. Set your multimeter to DC volts and test across the battery terminals. After start you should see 14.4V no more. At the alternator terminal it may be a few tenths higher. Do the same on AC volts and you should get no significant reading. If you do get a voltage your diodes in your alternator are faulty but this usually means your battery will drain quickly. Higher volts will usually boil the battery.

On the blown track, simply clean up the copper track either side of the break and solder a piece of copper wire across. This can be bare solid of at least the same cross sectional area as the track.

Before you reconnect this, trace the terminal and the wire it connects to. See where it goes and check there is no damage. A damaged loom could be the cause of your problems. This could also be a route for the solenoid ground to return via something it shouldn’t and burn the track. It’s quite important to try and work out why this has happened so that no more damage is done. It’s great if you fix it, put it back and it all works but it’s peace of mind knowing that you’ve found what caused it in the first place and you’ve cleared that also.
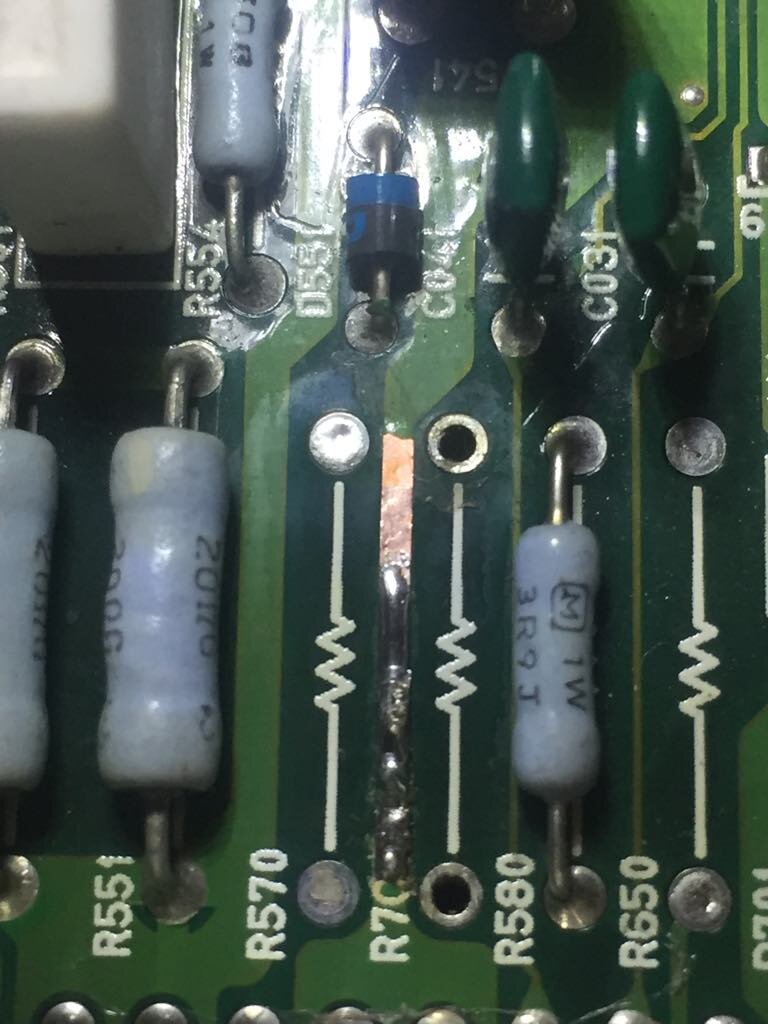
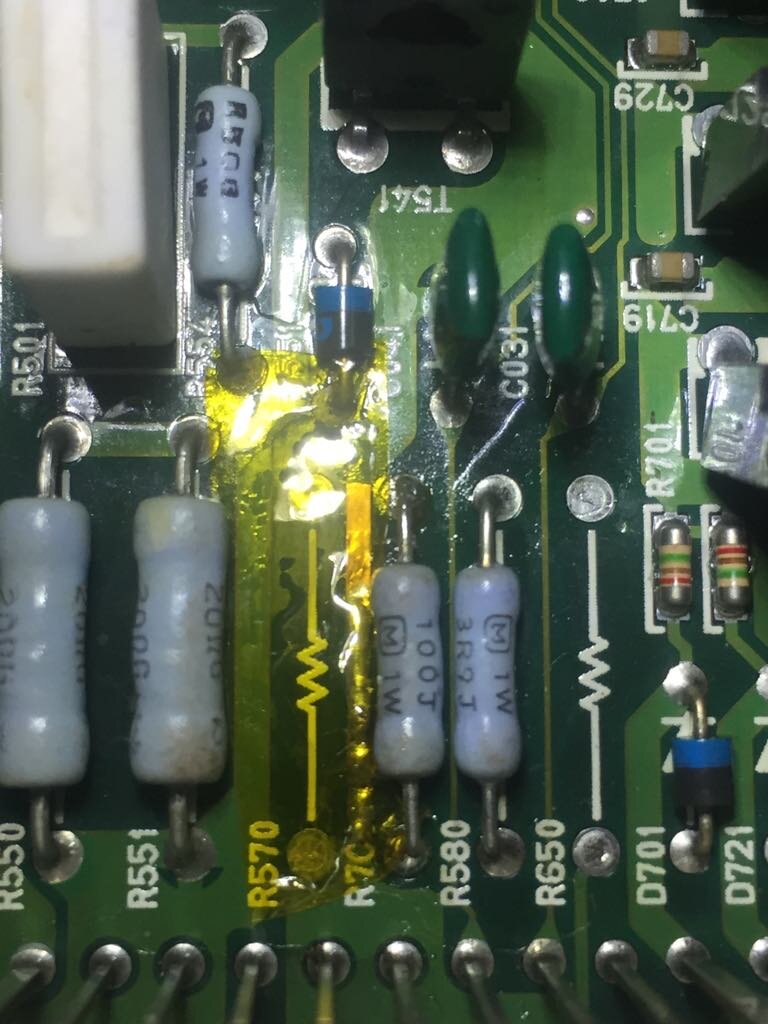
SC,no fault codes showed up. I'm thinking it was that short in the alternator fuse..
Ok so I repaired it as best as I could and put it back in. I was removing some bolts from the trans pan when I decided to wait and try it out first. So I put 2Qts of trans oil. Wouldn't you know it wont start now....Batteries are dead...Started fine a few days ago. Could of been that ground @Beau spoke of or alternator fuse.. I will trace it and see where it leads tomorrow. I will also check out that alternator.
By the way I put some kapton heat resistant tape over the track as I didn't have the correct UV paste to put over it.

ECU(repair2).jpg ECU(repair).jpg
 
Last edited:
Sounding more like an alternator diode fault as we go on. The fuse will not be the fault, rather an indication there is a fault which needs to be rectified (no pun intended :)), probably a shorted diode in this case. Though tempting, it’s rarely a good idea to simply replace a blown fuse and call it job done without doing some tests to find what has caused it to blow.

The track might be ok but really needs a strand of 1mm copper wire or similar laid on top well over the ends of the track and soldered rather than just solder (forgive me if that’s what you’ve done it just doesn’t look like it from the pic). Like the tape by the way, not 100% needed but good to have. Spray lacquer would do as the original purpose of the green in resisting solder in manufacture is passed.

The initial fuse blowing on the alternator should have raised the question ‘why?’, instead it was bridged, presumably with something that would not have fused, and the alternator, and its fault, were then reintroduced to the system, sending alternating current into the wiring and causing damage to electronic circuits.

To test for a bad diode, with engine at rest, disconnect the alternator main terminal and test on ohms between that terminal and the casing. Then reverse your test leads and test again. One way should show no connection. If both show a low reading you have one or more diodes gone short circuit.

As shown here, though they use the diode test setting on the multimeter which does the same thing.
SC, where the track was broken, I did put a copper strand the same size as the track then soldered it to the track. (Removed the copper from another motherboard and cut it to size) Might look like solder alone but I can assure you there is more there.
Got a jump start today and put the multimeter on the battery leads (engine running), showed only 13.76 volts. Revved the engine a bit to see if the voltage would go up but it didn't move. Disconnected the battery removing the connectors and the battery tested at 12.78 and 12.41 .
Will continue the test later. Its scorching out there...
 
Don't like the adverts?  Click here to remove them
Try the test on the alternator. That voltage is low and could also indicate a shorted diode. I suggest you disconnect your alternator ASAP and try the diode test at your leisure, to save your battery(ies) over discharging which will do them great harm.
 
Well I hope that fixes your problem although I still think your symptoms sounds more mechanical. As SC has said, it's good knowing what's caused that thing to burn out like that in the ECU so it doesn't happen again. 13.8 volts from these alternators sounds alright, a bit on the low side. I think last time I checked mine I was getting a solid 14.2.
 
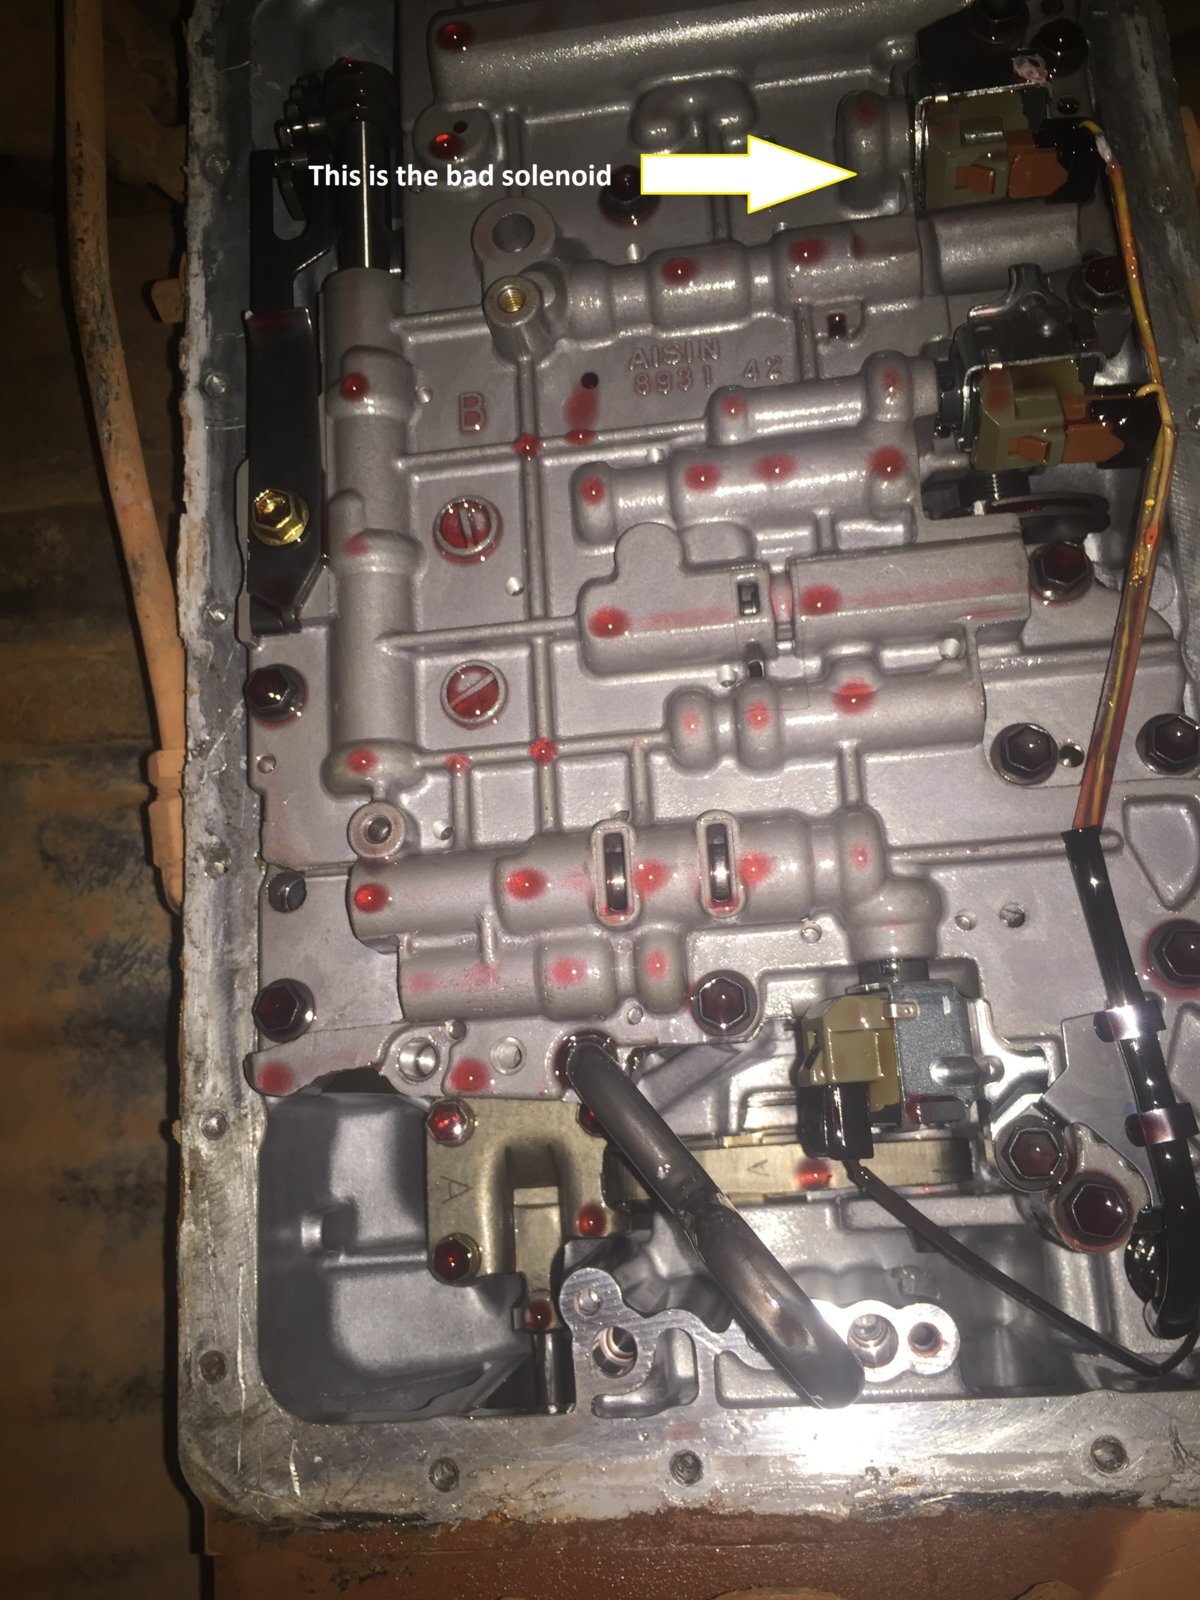
Ok Cruiserheads, here's what I've found under the trans pan. After removing the solenoids and testing them I found one of them that does not fire. (click)
Inside the pan did not have metal shavings or chips. But there was a black oil or something at the bottom.
Might be from the clutch pack? (it did slip while struggling to get into the yard.)..Don't know. Filter was also pretty dirty
So I will be replacing that solenoid and the filter.
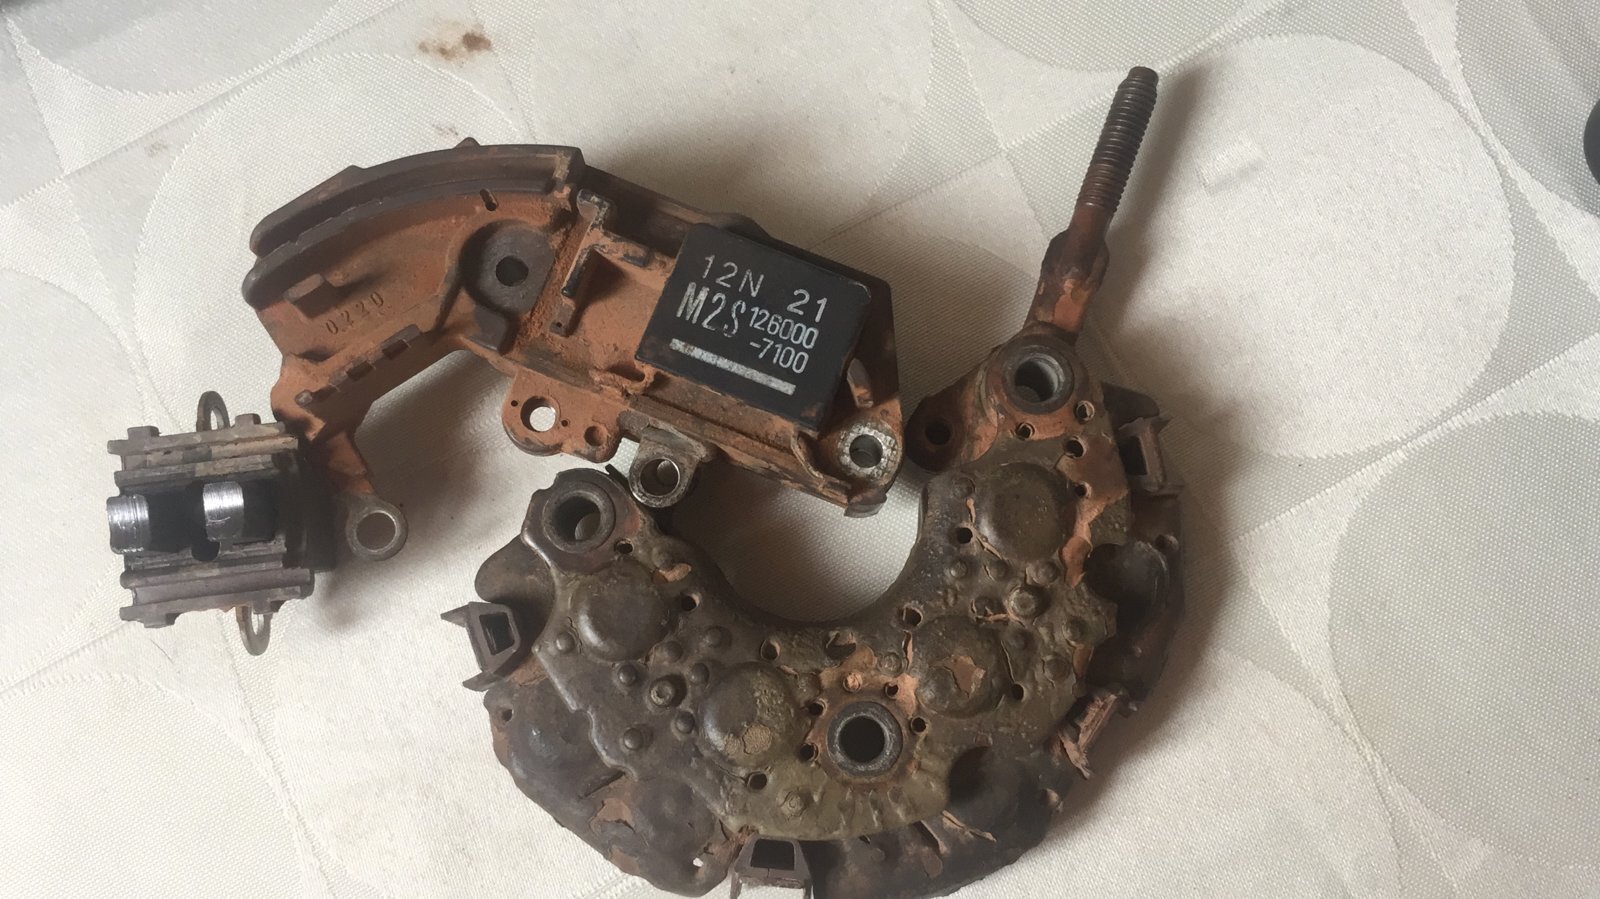
Also replacing the regulator, rectifier and brushes in the alternator.

Thank you Land Cruiser Club!!

GPSO9717[1].JPG IMG_0510.JPG FSVJ9665.JPG
 
Last edited:
Well I hope that fixes your problem although I still think your symptoms sounds more mechanical. As SC has said, it's good knowing what's caused that thing to burn out like that in the ECU so it doesn't happen again. 13.8 volts from these alternators sounds alright, a bit on the low side. I think last time I checked mine I was getting a solid 14.2.
Beau, I think it was that bridged alternator fuse. Strands of some gauge wire was used and it seems with the rough terrain it might have started breaking a while now. when it was down to a few strands it would cause a fluctuation of current from vibrations on the vehicle while off-road. Just a thought... Or could of been that earth wire you spoke of...
A while back I tested the batteries while the engine was running and saw 14.4..
So that fuse and earth wire might of done more damage than expected.
 
Last edited:
It’s the fuse blowing that’s of concern, your evidence if you like.

What results did you get with the diode test? You can test each one now you’ve replaced them and see if they’re dud.
 
It’s the fuse blowing that’s of concern, your evidence if you like.

What results did you get with the diode test? You can test each one now you’ve replaced them and see if they’re dud.
SC, that alternator fuse was already bridged when I got the car back after the rebuild. Also that earth wire @Beau pointed out was also cut.
As for the diode test. Guy in that video said, "just because it passes this test doesn't mean it's good". So I went further and disassembled the alternator and followed this guide.
And it seems a diode is faulty. So since i hope i don't have to take it out again. I decided to change the rectifier,brush,regulator.(completed today)
One place quoted me a price of $100 usd for the trans solenoid. I thought that was a bit high, if i don't get it elsewhere I'll buy it. Found the entire kit on ebay from the USA for $76usd....(3solenoids,filter,gasket) https://www.ebay.com/itm/Transmission-Solenoid-Set-A340E-A343F-TCC-Shift-Filter-Kit-For-Toyota-Lexus/132560777075?_trkparms=aid=111001&algo=REC.SEED&ao=1&asc=20160811114145&meid=20bfa2cdf78a463aac4f32e3e42f330b&pid=100667&rk=2&rkt=6&sd=113007027533&itm=132560777075&pg=2045573&_trksid=p2045573.c100667.m2042
 
Last edited:
SC, that alternator fuse was already bridged when I got the car back after the rebuild.
Yes, I did get this from your earlier post. What I’m saying is that a fuse blowing isn’t ‘the fault’. It is an indication that something else is wrong that needs finding and putting right. A bridged fuse is worse because it often means the fault that caused it to blow hasn’t been corrected and the bridge is unlikely to blow, in this case sending alternating current into your car’s electrical system to do all sorts of damage. It is likely responsible for some if not all of the damage you’ve sustained.
As for the diode test. Guy in that video said, "just because it passes this test doesn't mean it's good".
But he did say if it doesn’t pass the diode test the diode pack is faulty which is what was suspected here. My point being to test first and react on the results rather than blindly change components. In your case the diode pack is faulty and replacing both that and the regulator is a good move as your alternator is now refurbished. As long as the bearings are good, this should give it a new lease of life.
One place quoted me a price of $100 usd for the trans solenoid. I thought that was a bit high, if i don't get it elsewhere I'll buy it. Found the entire kit on ebay from the USA for $76usd....(3solenoids,filter,gasket) https://www.ebay.com/itm/Transmission-Solenoid-Set-A340E-A343F-TCC-Shift-Filter-Kit-For-Toyota-Lexus/132560777075?_trkparms=aid=111001&algo=REC.SEED&ao=1&asc=20160811114145&meid=20bfa2cdf78a463aac4f32e3e42f330b&pid=100667&rk=2&rkt=6&sd=113007027533&itm=132560777075&pg=2045573&_trksid=p2045573.c100667.m2042
Try and get genuine Toyota, you don’t want a repeat of this. Also if buying from abroad do you have import tax to factor into the cost where you are? This may be different depending on where you source the parts from. Amayama.com Partsouq or Megazip are genuine parts suppliers who ship all over the world.

You’re doing some good work here Sam chasing this one to ground.

I just hope the black in the oil isn’t an indication something has worn badly so I have my fingers crossed for you.
 
Last edited:
Yeah, as SC has said, I hope there isn't further damage done. In my opinion, I think there is from how the truck behaves.
 
Hey guys here's a little update. That solenoid that I was getting from shop is not the same as mine.
I have since ordered the correct solenoid and strainer.(after triple checking)
I found this very helpful. Mine does have a slightly different filter though but same principle.
Also if buying from abroad do you have import tax to factor into the cost where you are?
Import tax isn't that much on parts. And I usually use a drop shipper in the USA.
In your case the diode pack is faulty
It was definitely faulty..
I just hope the black in the oil isn’t an indication something has worn badly so I have my fingers crossed for you.
Well I really hope not, but after a closer look at the filter there is a chance of more. And Thanks. Positive Energy always helps.
I hope there isn't further damage done. In my opinion, I think there is from how the truck behaves.
I hope there isn't Beau.. We'll see when I get the solenoid and put it all back.
That solenoid could cause it to behave the same way.. Or at least that's what I've read.

Symptoms of Transmission Solenoid Problem

If you’re experiencing transmission solenoid troubles, it will become evident in one of four ways:
1) Delayed gear shifting
2) You can’t downshift, and your engine continues to rev even when applying the brakes
3) Your transmission gets stuck in neutral
4) Shifting gears become rough and choppy

I have experienced number 2,3..... 3 seems to be where I'm at right now.

Also found the bad solenoid like this.

Thank you all for your assistance.
 
Last edited:
Ok, Cruiserheads... I received the new solenoids and trans filter and installed.
These are the ones I put in. https://www.amazon.com/gp/product/B07F2H16CX/ref=ppx_yo_dt_b_asin_title_o00_s00?ie=UTF8&psc=1
The one that failed in my truck was the "Lock up/TCC Solenoid". (Video above to find a faulty one)
Hercoo solenoid kit A343.jpg

A few modifications before I could install this though. First and foremost, the bolt holes on these solenoids didn't quite line up 100%.. Had to open very little on one side to get it perfect.
Also the gasket did not fit my trans pan.. So I used "High Temperature RTV" (red) to seal it.

I put them in 2 days ago and my truck feels great! (so far) It shifted right in gear and test drive showed new power on acceleration.

The alternator seems to be preforming perfect...

So let's recap the work done:
ECU damage repaired
Alternator fuse changed
Alternator parts changed: Brushes,Diode Pack,Regulator.
Ground repaired.(Pic provided)
New battery connectors.
All transmission wiring contacts cleaned.
New transmission filter and solenoids.

NO CHECK LIGHT!!
And acceleration that pushes you back in your seat!
Makes me feel like,like!..

So right now things seem fine.... I'm getting a bit of a "hard start" though.
Seems to turn over to many times before it starts. Any ideas?..
 
Excellent work Sam. :clap:

Well done for chasing this to the bitter end and not giving up. I can uncross my fingers now. :icon-biggrin:

Hard start could be air being sucked in through a leaky fuel pipe or primer diaphragm, or could be one or more glow plugs failed. The plugs are easiest to check. First check you have voltage on the bus at that links the glow plugs with the key in the second position and the glow light on. If you have 12v or thereabouts, you then need to remove the busbar and test on ohms across each glow plug in turn. You should get very low resistance from the top terminal to the block.

As for fuel leaks, check along your fuel pipes for any sign. If nothing obvious, try running it from a can and see how it behaves.
 
Thanks SC, I will preform the test you've suggested. I did look for any leaks in the fuel line. But maybe I missed something I will check again.I did have the glow plugs and primer diaphragm in mind. And thank you very much for your assistance.
 
I think there’s a bend out the top of the tank that rusts and gets a pinhole in it.
One other thing to try is to try pumping the primer until hard just before starting.

Question, is it every start, or just cold start?
 
Back
Top