Don't like the adverts? Click here to remove them
You are using an out of date browser. It may not display this or other websites correctly.
You should upgrade or use an alternative browser.
You should upgrade or use an alternative browser.
Rusty HJ60 Restoration and Overland Build
- Thread starter OverlandMark
- Start date

OverlandMark
New Member
- Joined
- Oct 12, 2012
- Messages
- 48
Thanks...
I was wondering if i could pick everyones brain about the leaf springs.
The springs on the cruiser are crusty, the front ones look to have an arch shape about them but the rears look almost horizontal with the body weight on them. My initial thoughts are to change them all and looking at options, it's seems either replacement with expensive OME option or the Milner ones is the main choice.
Like everything you get what you pay for but also im looking at what works and what is replaceable when on the road should some thing break.
I spoke to Milner and they seem to be a 7 leaf affair, I wondered if they would mix with originals if we broke one? OME from what I have read are not mixabale? What is the likely hood of breaking springs? Obviously the milner ones come with no height lift and with no extra support for all the weight on the rear.
I have rear people having thr originals re worked but seems to me I read a lot about them going flat after a few months.
Given the trip we have in mind I would be grateful for a.few thoughts as I don't really want to get a few miles down the road and realise I guessed wrong.
Cheers
- Joined
- Nov 19, 2010
- Messages
- 6,240
- Country Flag

Hi Mark, if you want some Milner ones you can have 4 for £40 but I would be robbing you, the ride is appalling!
Give me a ring, I've had years of running 60's and found the best springs to be refurbed original ones or the latest OME ones.
The choice of damper makes a huge difference though with Bilstein being my favourites closely followed by DeCobaine.
Andy
Give me a ring, I've had years of running 60's and found the best springs to be refurbed original ones or the latest OME ones.
The choice of damper makes a huge difference though with Bilstein being my favourites closely followed by DeCobaine.
Andy

Hi Mark, if you want some Milner ones you can have 4 for £40 but I would be robbing you, the ride is appalling!
Give me a ring, I've had years of running 60's and found the best springs to be refurbed original ones or the latest OME ones.
The choice of damper makes a huge difference though with Bilstein being my favourites closely followed by DeCobaine.
Andy
From the above, Andy seems your best bet for advice.
I was going to suggest as in my previous comment (clean-up & grease) with added coil spring assisted shockers, such as spax which I've used on other cars before. They assist the spring and improve the damping to compensate. Never had a 60 though, so I'll hand back to Andy

Hiluxonian
Member
- Joined
- Nov 17, 2010
- Messages
- 131
I love the 60 series they're beasts I've got one waiting for me in a field been there a year now :") I'll collect in one day when I've made some space for it
I'll collect in one day when I've made some space for it
Keep up the good work
Keep up the good work
OverlandMark
New Member
- Joined
- Oct 12, 2012
- Messages
- 48
Hi Mark, if you want some Milner ones you can have 4 for £40 but I would be robbing you, the ride is appalling!
Give me a ring, I've had years of running 60's and found the best springs to be refurbed original ones or the latest OME ones.
The choice of damper makes a huge difference though with Bilstein being my favourites closely followed by DeCobaine.
Andy
Thanks Andy, sorry for slow reply. I will give you a ring very soon and pick your brain a little more on the subject.
Don't like the adverts? Click here to remove them
OverlandMark
New Member
- Joined
- Oct 12, 2012
- Messages
- 48
Thanks for the support,
Right things have been a little slow as i have been away but back into the swing now.
Ok so couple of sessions since the last update and some tonight.... few pics i guess

So this is first attempt, put the now also repaired front panel on loosely ( rubber mount holes had rotted out) just to have something to work the curve of the wing to... the over straight wing edge needs correcting and it coming round a little at the bottom but will come back to it

This and several other parts got bare metal'd to get rid of a little surface rust but in reality for no other reason than to make them look pretty

...satined off once dry

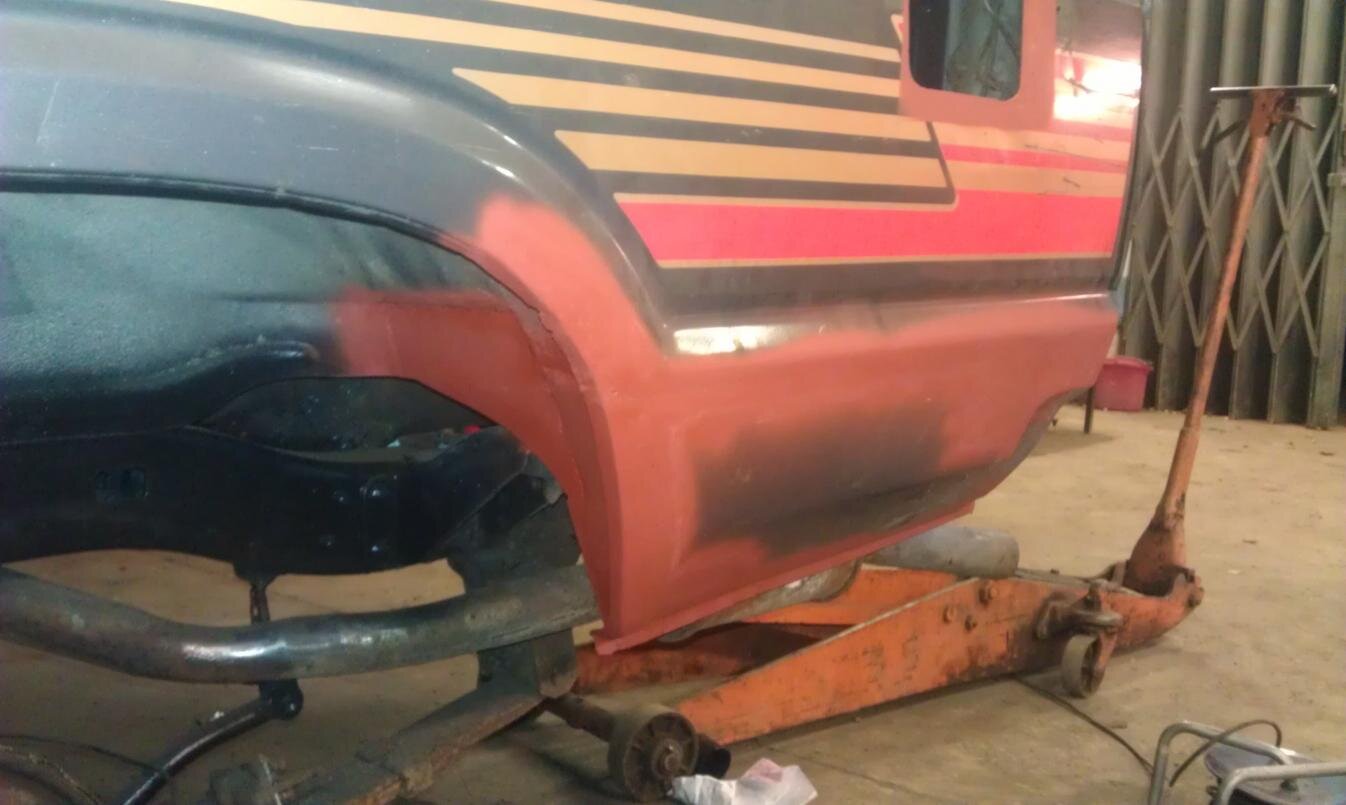
Then tonight...The outer and inner lower wing, i had a donor piece from the other dead 60 which filled some but not all of the wing side...glad to have had it though took away hours more fiddling. Repaired them as two parts so i can split inner and outer in the future if needs be.


So apart from a little redoing at the front and knocking a tiny bit of a shallow spot on the lower repair... the main rust gaps now have metal in again on this wing

more tomorrow
Cheers
Right things have been a little slow as i have been away but back into the swing now.
Ok so couple of sessions since the last update and some tonight.... few pics i guess
So this is first attempt, put the now also repaired front panel on loosely ( rubber mount holes had rotted out) just to have something to work the curve of the wing to... the over straight wing edge needs correcting and it coming round a little at the bottom but will come back to it
This and several other parts got bare metal'd to get rid of a little surface rust but in reality for no other reason than to make them look pretty
...satined off once dry
Then tonight...The outer and inner lower wing, i had a donor piece from the other dead 60 which filled some but not all of the wing side...glad to have had it though took away hours more fiddling. Repaired them as two parts so i can split inner and outer in the future if needs be.
So apart from a little redoing at the front and knocking a tiny bit of a shallow spot on the lower repair... the main rust gaps now have metal in again on this wing
more tomorrow
Cheers
Last edited:

OverlandMark
New Member
- Joined
- Oct 12, 2012
- Messages
- 48
Thanks
Does anyone know the paintcode colour of our landcruiser or where i can find it?
Cheers
Does anyone know the paintcode colour of our landcruiser or where i can find it?
Cheers
- Joined
- Nov 19, 2010
- Messages
- 6,240
- Country Flag
Toyota 153 Warm Grey.
Andy
Andy
OverlandMark
New Member
- Joined
- Oct 12, 2012
- Messages
- 48
Toyota 153 Warm Grey.
Andy
Many Thanks Andy
Sweet. 
Keep e'm comming!
Keep e'm comming!
OverlandMark
New Member
- Joined
- Oct 12, 2012
- Messages
- 48
Evening...
So 21 hours thrown at it this weekend, Friday to today .. few random pics not covering everything but most things
Door top done, will drop the glass out and do the inner later

Its straight its just the rubber that usually sits on the chrome has flopped down and makes it look a little curved

Got rear drum stripped, all new going in but not in yet


stripped and painted rear drum
.jpg")
Huge area of rust behind the land cruiser script, however i made a huge cock up and put too much heat in and distorted the rear quarter..... nightmare... except i realised we needed another fuel filler so i took a template from the other side and cut the slot... Distortion vanished the second the panel relieved and i have way of filling second tank

Distortion

So once i had got this lower corner done

I got rear panel painted so boot can go on perminantly. LC has to stay outside so has to be secure every night

.jpg")
got rear tailgate seam sealed and painted
 #
#
So many many hours work got the lower off cut grafted in, repaired because it had a lot of rust in it too. The rear body mount all repaired too as it was holed and all the inner arch repaired. Also stripped all the rust and crap off the frame inside this wheel arch and got that painted...


So this corner nearly done, did a little more work to the outside of the rear tailgate, you can see the new 2nd tank fuel filler which i will have to make the insides for

No filler at all just butt welded, hate the stuff ..

Cheers
Mark
So 21 hours thrown at it this weekend, Friday to today
Door top done, will drop the glass out and do the inner later
Its straight its just the rubber that usually sits on the chrome has flopped down and makes it look a little curved
Got rear drum stripped, all new going in but not in yet
stripped and painted rear drum
Huge area of rust behind the land cruiser script, however i made a huge cock up
and put too much heat in and distorted the rear quarter..... nightmare... except i realised we needed another fuel filler so i took a template from the other side and cut the slot... Distortion vanished the second the panel relieved and i have way of filling second tankDistortion
So once i had got this lower corner done
I got rear panel painted so boot can go on perminantly. LC has to stay outside so has to be secure every night
got rear tailgate seam sealed and painted
#So many many hours work got the lower off cut grafted in, repaired because it had a lot of rust in it too. The rear body mount all repaired too as it was holed and all the inner arch repaired. Also stripped all the rust and crap off the frame inside this wheel arch and got that painted...
So this corner nearly done, did a little more work to the outside of the rear tailgate, you can see the new 2nd tank fuel filler which i will have to make the insides for
No filler at all just butt welded, hate the stuff ..
Cheers
Mark
Attachments
Last edited:
Neil Stone
Well-Known Member
- Joined
- Feb 21, 2012
- Messages
- 229
Loving this thread !
Good luck with the rest of the renovation and alterations.
Keep the pictures coming
Good luck with the rest of the renovation and alterations.
Keep the pictures coming
OverlandMark
New Member
- Joined
- Oct 12, 2012
- Messages
- 48
Many Thanks,
Hope to have a little extra in the alterations very soon, little break from welding. Heating and cooling purchases this week means we now have a diesel eberspacher heading into the engine bay once i have made something for it to go on and a cooler to install in the back that will form part of the backup internal bed if the roof tent is not an option.
Probably get on that next couple of weeks.
Cheers
This car is going to look so good when you've done. Exellent stuff, this.
OverlandMark
New Member
- Joined
- Oct 12, 2012
- Messages
- 48
Yes, looking better every time.
How much is the renovation going to cost you, not including your labour time?
Gra.
Dont like to talk money but im keeping a proper track on costs so as you asked my estimated on the road renovation costs, all fully serviced, all painted underneath, new fluids through out, new brakes, 2x batteries, all welding done, waxoyled with an MOT'd is on target for around 1k (fingers crossed).... On top of that set for later on is then a radiator recore, front hub rebuilds, mastercylinder rebuild, alternator rebuild and a decent set of tyres. That should see it somewhere near and ready.
Cheers
Yes, looking better every time.
How much is the renovation going to cost you, not including your labour time?
Gra.
I like it! Good ol' Gra looking at the balance sheet as usual!
Not a criticism Gra, a very important factor that often gets overlooked when it's heads down to complete.
... and so far it doesn't look too costly (blood and sweat labour hours excluded of course) considering the car was a wreck "beyond help" by most people's standards.
A very brave and valiant project, which undoubtedly will pay off when finished. Well done...!
Similar threads
- Replies
- 1
- Views
- 278
- Replies
- 0
- Views
- 418
- Replies
- 1
- Views
- 446