Don't like the adverts?  Click here to remove them

Transfer box

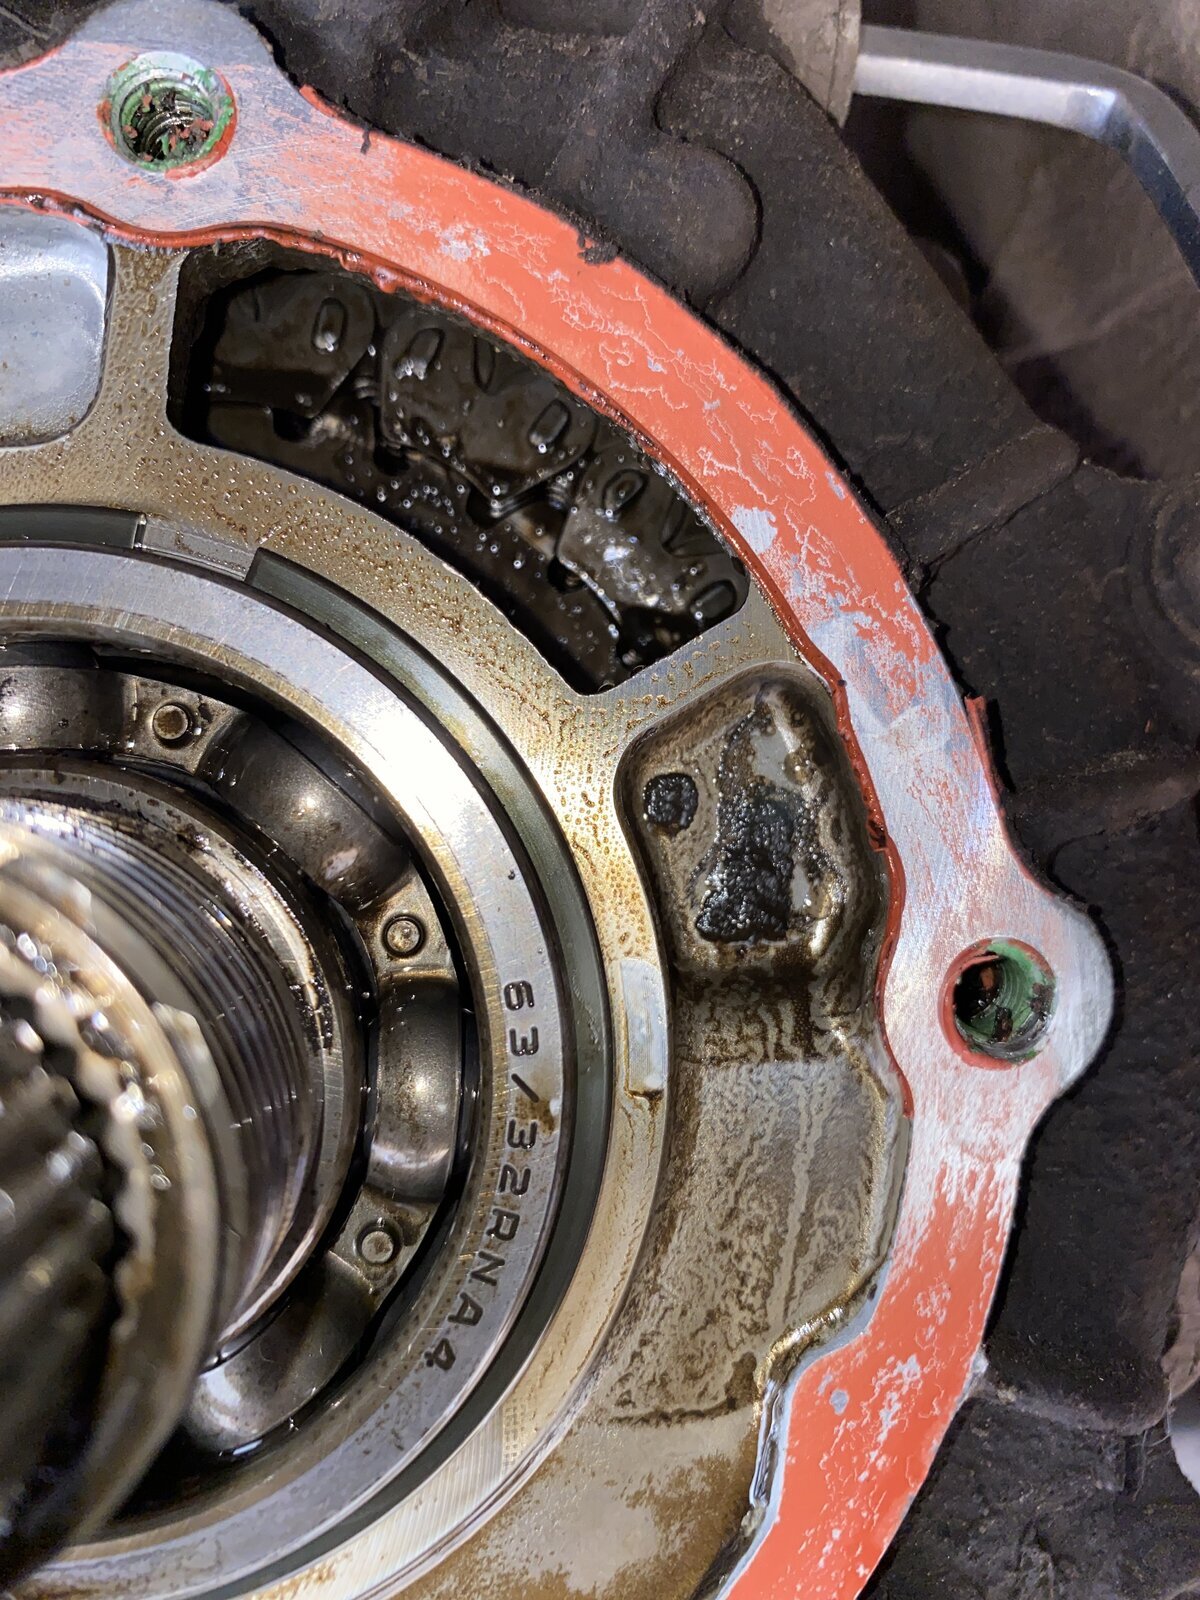
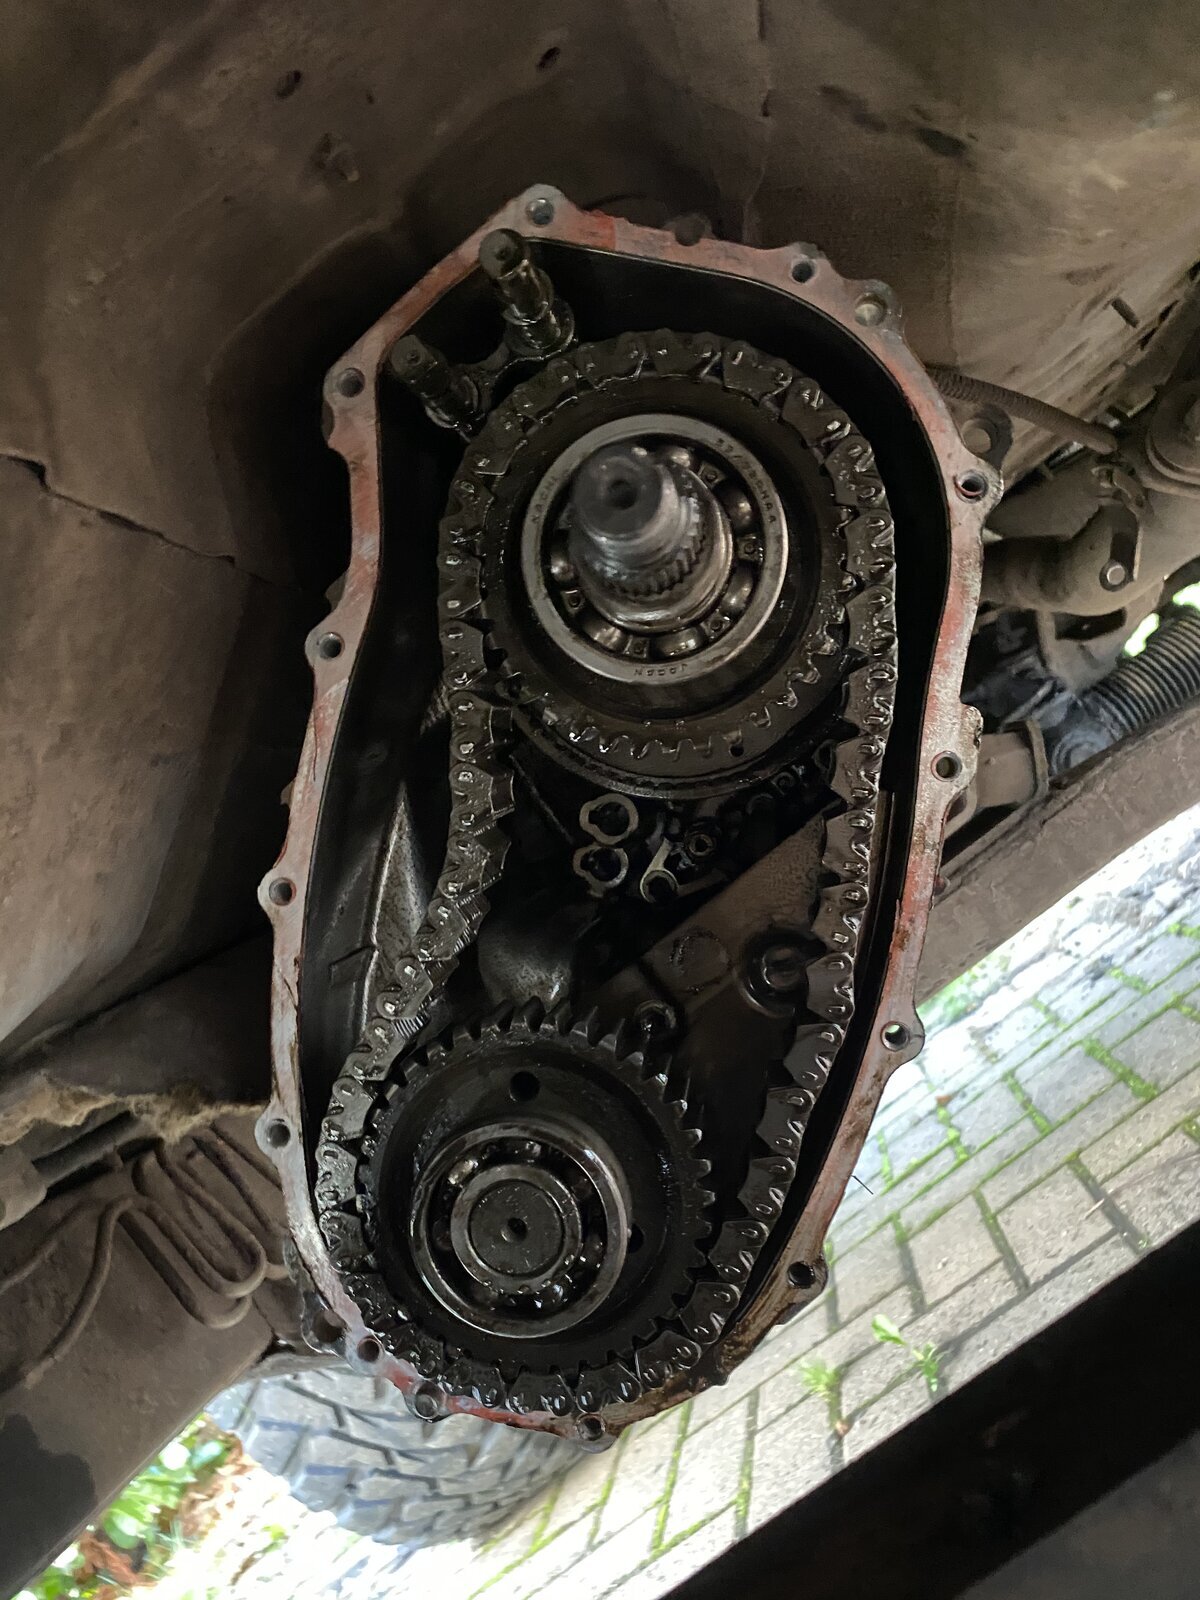
I just thought to check the chain while it’s on as it saves trying to remove the whole thing in case it turns out it’s okay haha that looks very confusing I think I’m biting off more than I can chew thinking of changing the chain an sprockets myself hahah

Hahah that sounds like me, I don’t know what I’m doing I just have to diy if things are too dear to go to a garage and hope it works when I’m done haha
 
Little update/beg for help haha

going to attempt to take the cover off the transfer case as I don’t have a good jack to take the transfer case off completely while it’s on the drive, so want to attempt it on the car.

to remove the pinion bolts? I’ve saw in shaynes thread that you have made a thing to lock the pinion, I don’t have anything suitable to make one, I have a compressor and buzz gun at my mums house, would that undo the bolts or am I going to have to try get a tool made to jam the pinion?
Thanks for any help

I’ve also found a seller who can supply me a chain if needed so hopefully it’s nothing to Major when the covers Off so that’s a bonus haha
 
Typically if you have a decent buzz gun, yes you can spin the companion flange nut off. The inertia of the gun and the mass of the gears means that it can defeat the friction. Now I can't recall completely what has happened to your T box, but if you can out the car in gear and chock it with the box locked then the companion flange won't turn in any case
 
Thank you for the quick reply Chris! That’s great thank you! I was going to just what you said but was worried the force from it being so tight might mash the gears up hahah

I’ll try it with the box locked first save me the hassle of getting the compressor haha

I’ll be sure to post pics and what I find when I “attempt” to strip down and see what I find
 
Well I dried removing one of the pinion bolts today...

Not a chance haha I managed to bend the tab out thinking that it’ll be easy but I broke my breaker bar so I’m hoping if I grab the compressor and buzz gun tomorrow it’ll come off ;)

pointless post but hopefully tomorrow brings abit more joy hahah
 
Guessing my chain is slack? I can Nearly lift it off the gear
 

Attachments

  • image.jpg
    image.jpg
    439.7 KB · Views: 94
Don't like the adverts?  Click here to remove them
Got case off an teeth on gears look okay? Chain looks very loose an a bit of play going to the gear for front prop shaft

also where does the ball I found go hahah there was 2 of them
 

Attachments

  • 74DBC17C-CF57-4A8C-BDBF-6C0C49C13462.jpeg
    74DBC17C-CF57-4A8C-BDBF-6C0C49C13462.jpeg
    329.9 KB · Views: 83
  • 09FABC8D-D2A8-42FE-8E80-F6FAA5A17BD4.jpeg
    09FABC8D-D2A8-42FE-8E80-F6FAA5A17BD4.jpeg
    515.9 KB · Views: 111
Last edited:
Bravo :clap: and its good to have my suspicions confirmed at long last :dance:

The ball bearing is mentioned a few times in my thread and i think Bob posted a pic of where it goes .
 
Thank you haha I didn’t think I’d get this far :tearsofjoy: glad it’s confirmed for you mate!

I stupidly never loosened the front prop shaft flange? (Don’t know what there called) and need to remove that side totake the bearing shop and see if they can match the bearing as there’s side to side play in it. So I’m stuck on what to do with that haha

thanks Shayne I’ll check it out again and see if I can understand it, and figure where they go, there is 2 right? :grin:I’m not technica at all so I’m well out my comfort zone doing this lol
 
I can only recall one little ball bearing myself ?

I'm wondering now how difficult it might be to get a new chain on there if its tight fitting which begs the question might it make more sense to just remove a few links from the old chain .
 
Oh dear:coldsweat::tearsofjoy: I’m worried ones fell out a bearing now hahah

I was looking at the chain but it looks like a bit of work to remove links.. I was tempted to do that as I love a cheap fix haha
The pins look hammered flat either side so I’m not sure how I’d go about knocking a pin out to remove a link or 2? I’ll have a better look tomorrow and look for a punch an see if I can do it:tearsofjoy: it’ll only get flung in the shed so might as well try lol
 
It's only a rivet and once its back in all the stress on it is at 90 degrees to the rivet flange , i don't see how it can fail once its back in so long as the pin can't come out .
 
I’ve ordered a new chain already, I’ll have a play with the old one or if your in the north west your welcome to have the old one?:tearsofjoy:

hopefully I can get the other pinion bolt off and then try get a new bearing, hopefully next week she’ll be back together

then it’s brakes and a lift kit, welding and the exhaust is getting a silencer as the straight pipe is too loud haha
 

Send calipers there and they come back new at a price that makes D.I.Y pointless , years later I do regret not paying extra for a premium finish though .
 
Couldn’t find anything on where the balls go in the case Shayne and the thread made by @BobMurphy tge photos don’t work anymore which is a shame :tearsofjoy:

my new chain has arrived and I’m getting a neighbour to try use a good buzz gun to get the Front prop flange bolt off as I’ve snapped 2 bars trying and I need to replace the bearings while it’s all apart

hopefully I’ll figure where the balls go and I’ll updatethe post with any news if it goes wel haha
 
1598988381580.png


Bob calls it a worm drive but the ball bearings all relate to that plastic wheel bit .
 
I'm a bit late to the party here, apologies (concentrating on the '100' !).

There are two balls in the output shaft, the first goes underneath the spacer on the outside of the Hi-Vo chain sprocket here:

DSCN6823.jpg


The second locks the worm gear that drives the speedometer drive - BUT - it goes into the recess on the inner face of the gear, not the shallow cut-out you can see from above (I'll look for a picture) . . .

DSCN7486.JPG


NOT into the notch you can see there- into the cut-out below it on the inner face !

Get back to me if you are stuck, but Shane seems to have everything in hand :icon-wink:.

I have two re-built (manual) Transfer Boxes sitting here - but they have cost me over £1,000 each in parts, so not cheap :doh:.

Bob.
 
Thanks @Shayne and @BobMurphy really appreciate your help and time!

ive managed to get the other flange nut off, took 15 seconds if that with a good cordless impact gun so I think I’ll have to invest in one :tearsofjoy:

stupidly messed with the other shaft with the gears on and pulled it half out:grin:
Managed to remove it but was left with 2 circlips?:disrelieved: And 3 metal rectangle things? Look like they slot into something on the shaft hopefully I haven’t broke them off:disappointed:
 

Attachments

  • 65FD738A-8352-4B5E-BBC6-E0FB80276839.jpeg
    65FD738A-8352-4B5E-BBC6-E0FB80276839.jpeg
    229.6 KB · Views: 69
  • 087D8632-8D54-4311-9B53-ED59ABA5B183.jpeg
    087D8632-8D54-4311-9B53-ED59ABA5B183.jpeg
    465.7 KB · Views: 68
  • 47D97122-F47C-4B6D-BE44-21BE7F6E68EE.jpeg
    47D97122-F47C-4B6D-BE44-21BE7F6E68EE.jpeg
    271.1 KB · Views: 72
stupidly messed with the other shaft with the gears on and pulled it half out:grin:
Managed to remove it but was left with 2 circlips?:disrelieved: And 3 metal rectangle things? Look like they slot into something on the shaft hopefully I haven’t broke them off:disappointed:

Ahhhh . . . You've removed the Synchromesh cone and its wedges (TBs for Auto boxes don't have them) . . A bit tricky to put back and keep in place whilst the shaft is assembled.

But you'll get there with care and (a lot of) patience.

While you're there - strip the centre diff out and look at the Planet gear teeth and bearings (DON'T try to take the bearings apart). Also, check that the teeth in the Anulus (the outer drum) are clear of 'bits'.

(Damn; It must be four years since I last worked on a Transfer box and I can't remember the details now - Old age doesn't come alone :doh:).

DSCN4840.JPG


The bronze toothed ring is the Synchro Cone. The three steel wedges & two springs are in behind it.

DSCN4845.JPG


DSCN4846.JPG


Looks simple and easy to install doesn't it . . . . :whistle:.


On to the Differential . . . . This is it:

DSCN4910.JPG


Nothing to it really :!:

DSCN4915.JPG


This is the bit that shatters under extreme load:

DSCN4919.JPG


Make sure that the teeth are clear of 'stuff' :icon-wink:

DSCN4920.JPG


When Centre differentials 'Give Way' :angry-screaming:

DSCN5571.JPG


Good luck with it.

Bob.
 
Thank you @BobMurphy that gear seems fine and the insides are all good so I think I was lucky with just needing bearing and chain!

I’ve had a bit of an issue with the bearings, all have been correct other than the one on the other shaft going to the front prop, I’ve been supplied one which is the same width, inner and outer diameter BUT it has a circlip I can remove the circlip but would it still be safe to use? :coldsweat:

I’m guessing the bearings need pressing on/off? Tried to pull one off earlier with a bearing puller and wasn’t having any of it haha

thank you for your help and time, really appreciate it!
 
Back
Top