Don't like the adverts?  Click here to remove them

Who is doing what maintenance today?

Bloody hell hope you don't burst into flame on the motorway Chas!!
It's only the tail section that was hitting which doesn't get too hot and I did remove the block of wood afterwards. The tube is now oval instead of round, just adds a bit more clearance.
 
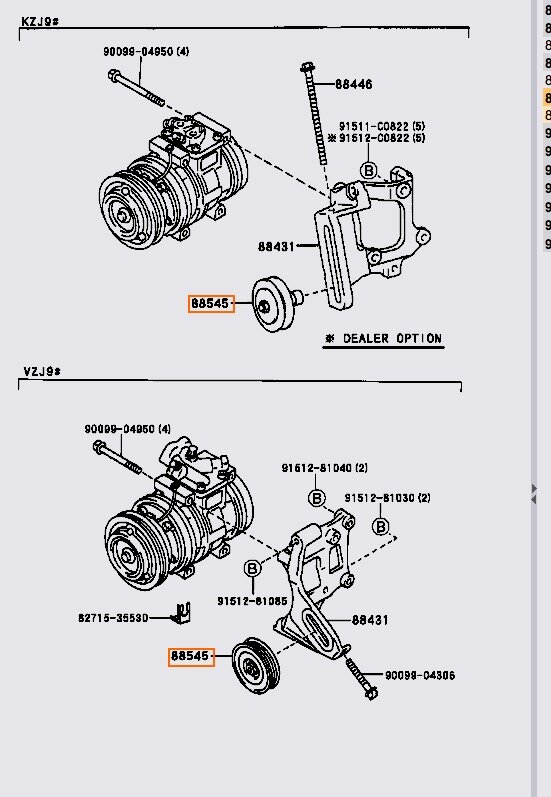
Changed the AC tensioner bearing today. I had one collapse on the green one so decided to check the grey one before Morocco. I wouldn't say it was knackered but it was quite dry and you could spin it and it ran for ages. I'd say no grease left inside.

There are dozens of choices so I went with the SKF metal shielded one http://simplybearings.co.uk/shop/advanced_search_result.php?keywords=SKF+63012Z

The old one is staked in but with a lathe, I had the tensioner off, stakes machined away, old bearing out and the new one in, back on the engine in under 10 mins. Yes, seriously. New one runs very very smoothly indeed. Much happier. No hiss or rattle at all. If you think that this is a single race bearing, under a hot bonnet, under load for 20 years and 200,000 miles it's not surprising that it was ready. Whilst not catastrophic, I'd urge anyone really to consider looking at the bearing in theirs. Slacken the belt off and spin it. It's not difficult. I had no warning that mine was going to go but it really did eat itself. If that belt had slipped into the fan on the M5 it might have been quite a mess. Less than £4 to rejuvenate.
 
There's another bearing that goes a bit dry on the A/C clutch. Also in constant use except when the A/C is on.
 
There is Frank. Never tried to get to that one before. Mine seems sound, it's perhaps a bit more manly that one. Have you swapped one out before?
 
There is Frank. Never tried to get to that one before. Mine seems sound, it's perhaps a bit more manly that one. Have you swapped one out before?

Hi Chris, my bearing is sounding abit rough and abit of play and wondered if it's the same bearing on my 95,if so I was wondering if this can be done without any machines or is it not possible,just I was told there expensive.
 
just to add to this a stainless sttel wire brush works alot better then a steel one for aluminium.

Cool. :icon-biggrin:

I sharpen mine to a point on the bench grinder, going with the grain.

I always put the tungsten in a cordless drill and allow the tungsten to spin flat out on speed 2 as I sharpen it.

You should be aiming for it to look like a sharpened pencil in scale.

Always give the alluminium a quick rub over with a wire brush before welding and its best to have a dedicated wire brush that you use just for that purpose. Then give it a wipe over with thinners. With TIG, and especially alluminium you want the metal to be spotlessly clean as any contaminates will cause problems.

Sometimes moving the earth lead to a different spot of what your welding can help give you a more stable arc.

Pre flow and post flow is very important with TIG. Give the peddle a quick press, with the torch away from the work piece to start with to ensure the tungsten has a good shielding of gas a few seconds before you actually start welding.

As you get to the end of the weld slowly back off the peddle (this will help prevent craters and pin holes) and then once the arc has been extinguished keep the torch in place for 5-10 seconds to allow post flow gas to continue to shield the weld pool as it cools.

As a general rule of thumb you want a second of post flow for every 10 amps your welding at.

Ensuring you have the correct gas pressure is also very important and will also help staberlise the arc.

What size tungsten and wire are you using?

1.6mm tungstens should be used with 1.6mm wire and 2.4mm with 2.4mm.

Using a 1.6mm tungsten will create a much smaller and narrower weld and will look a lot neater when say welding a tank/box etc. out of 2-3mm sheet. Using a 2.4mm tungsten wont look anywhere near as neat.

The angle of the torch/tungsten is also very important as is the angle of the filler wire, ideally the wire and tungsten should meet at 90 degrees and the tungsten should be angled at about 60 degrees to the work piece. :icon-ugeek:
 
Don't like the adverts?  Click here to remove them
Sag, I have a 95 and a 93 and the pulley is identical. In fact I have swapped them over in the past when doing the first bearing. Is is possible without machining? Personally I wouldn't. The bearing goes in from the front and is a good fit. There is then a cover plate over the top which is staked in every 90 degrees. Mu concern is that if you tried to press this out you could distort the pulley. It's thin. The back of the pulley only reveals the inner race so if you press hard against that all you'll do is push the inner race out. That's if it pops the cover plate off. Then you'll be left with the outer race stuck in the pulley. If you had a tiny Dremmel or something you could carefully grind away the staking I guess. 30 secs on a lathe is the precision way.

Sorry - just read you have a 95 - thought you meant the DATE not the model. You know I don't know. They ARE very expensive to buy. Silly money for the sake of a £4 bearing. Pulley is 88440-60040 and is not showing in the parts search on TOYO as being the same as a Colorado. But in principle I don't see why you can't do the same job. Get it off and let's see a pic. You could always pop it in a Jiffy Bag and send it to me with return post and I'll whizz it up and get the bearing out for you.
 
Hi Chris
thanks for a fast reply,I would be very greatful if I could take you up on your offer and use your services please Chris as not wanting to make a mess of it.
mamy thanks
Shaun
 
The mot took me by surprise this year, so I sent the truck in without looking over to hard. Failed on wiper blades and n/s/f brake hose.
Ordered the braided hose set from rough trax and changed all four. With the new wiper blades shes now passed. Not bad for 23 years and 330,000 miles.
I did have to make a slight adjustment to the new hoses on the front so they were not tight on full lock.

Cheers, Mark
 
Chris, assuming the belt is off you undo the central bolt and slide the outer clutch plate off just using screwdriver. It's on splines and may be rusted on. There is a shim up inside the tube you can loose. Next you take off the circlip on the main clutch and it should slide off the nose of the A/C pump. The circlip is wedge shaped in cross section and self tightens during use. There is no danger of damaging the pump or loosing the gas. My bearing had come loose on the nose and had badly worn the ally. I don't know why the wedge shim had not worked. Also like a fool I had used a puller on the main clutch after taking out the central bolt not realising the outer clutch plate had just rusted on the splines.. This procedure had sheared the front of the ally nose off around the circlip groove. I cheated on the lubrication. I used a syringe and large needle and managed the force the bearing full of thick oil. I managed to Loctite the bearing back on to the nose and it's been 2 years now without failure.

So from a maintenance point of view it's wise to change the bearing which looks as easy as the idler but you'll need a press. Also to check the bearing is tight on the nose and is assembled degreased and the wedge circlip is the right way round and forced into the groove in the pump nose. A loose bearing and worn nose might mean you have to buy a new pump or at least change the nose which involves stripping the old pump and finding the right nose.

Sounds complicated but very easy in hindsight :icon-cry:.
 
P.S. Reason I started all this was that I was looking at the pump with the A/C cutting in/out and noticed that with the A/C off the A/C pulley was spinning on a perfect axis but when the A/C cut in the pulley was spinning badly eccentric due to the wear on the nose of the pump. Took a while for the penny to drop as I've never had this before so best to check the operation of the clutch pulley from time to time.
 
I'll give it a wiggle Frank but it seems to be running 100% both on and off load. In fact it's remarkably smooth and quiet now

Shaun, does it look anything like this? We need to establish that we CAN get a bearing really. The part is 88440-60050 for the pulley

Screen Shot 2015-09-09 at 10.49.09.jpg
 
Guess what. Look at Roughtrax http://www.roughtrax4x4.com/air-con-tensioner-bearing.html

Same bearing as the 80 series. I posted a link earlier to Simply Bearings. Get one, post me the bits and I'll do yours for you. BTW the pic is wrong. That's a 100 series pulley. The 95 does NOT have a snap ring.The bearing should be 12 x 37 x 12 type 6301
 
Hi Chris it looks like the top diagram buddy,I've looked at the one from roughtrax but can't see if it's the same with the clip holding the bearing in as got a big washer type thing at back of nut on mine ,it looks like the washer is part of the pulley on mine not sure now though,
 
It's not the one in the pic from RT. Like I said, that's a 100 series. I know because I asked. The big washer thing is a cover. It comes off. Loosen the 14mm nut in the middle and see if the big washer jingles. If it does we're good to go. The bearing according to RT is the same. Don't order theirs though. Half the price from Simply Bearings.
 
Guess what. Look at Roughtrax http://www.roughtrax4x4.com/air-con-tensioner-bearing.html

Same bearing as the 80 series. I posted a link earlier to Simply Bearings. Get one, post me the bits and I'll do yours for you. BTW the pic is wrong. That's a 100 series pulley. The 95 does NOT have a snap ring.The bearing should be 12 x 37 x 12 type 6301


Chris when you do the Bearing for Sag let me know if its fairly straight forward. i have the bearing sitting in the garage for my collie. It doesnt need doing but i would like to change it before i drive to France next year.
 
Pretty sure it's the same as the 80
Less than 10 mins and back in the post
 
Is that a Chris ten minutes? using all the super dooper lathe etc:lol:

I have a vice and hammers, sockets, grinders :icon-twisted:
 
Well I think I was pretty clear that with a lathe it was 10 mins and without one I wouldn't attempt it.
 
Hi Chris
sorry for late reply just got back now so il take it off tomorrow buddy and have a look,it's so much appreciated for this really is.
 
Back
Top