Don't like the adverts? Click here to remove them
You are using an out of date browser. It may not display this or other websites correctly.
You should upgrade or use an alternative browser.
You should upgrade or use an alternative browser.
LJ70 Build Thread!
- Thread starter Ben
- Start date
warrenpfo
Well-Known Member
- Joined
- Jul 21, 2010
- Messages
- 2,895
Very nicely done Ben no half measures there. Have you got any closer pictures of the notching contraption setup on the pillar drill it looks adjustable in angle and height yet still looks to add support to the whole saw used. I take it it's a diy build but seems to do the job well.
- Joined
- Oct 13, 2010
- Messages
- 6,058
- Country Flag


Excellent jobs done there Ben, and the welding is coming along beautifully, practice makes perfect, eh? 
- Joined
- Oct 13, 2010
- Messages
- 6,058
- Country Flag
A few small projects.
Thanks guys.
Yeah getting better Clive but I still need lots more practice.
Little update...........................
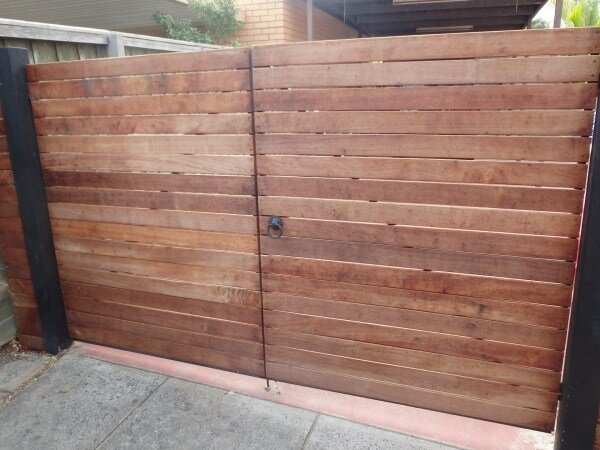
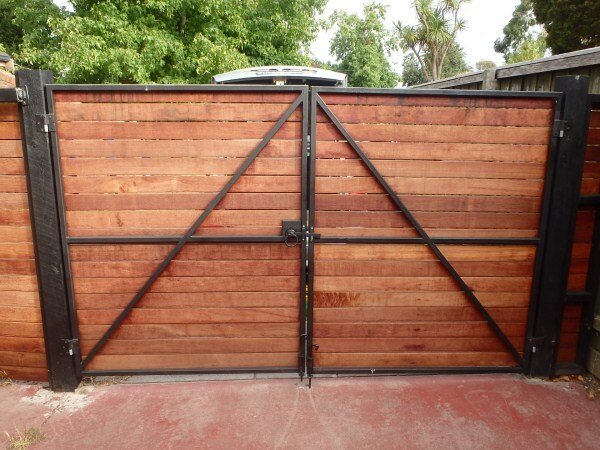
I wanted to lock my gates to keep my garage/workshop and LJ a bit more secure, but I didnt want to drill/bolt/weld anything to the gates as there nice and new.


This is what I came up with..........................


Annoyingly I welded this bit on slightly out of square by mistake.

But I decided to leave it as the lock would still work ok.


Got it electroplated.

So this bit pushes through the slats on the gate.


On the otherside/inside.

The other bit slots in.

Turns and padlocked.


My boss wanted me to make some drum lifters for the forklift to enable us to easily pick up 44 gallon drums. But we found some new ones available at one of our supplies at a great price so decided to just buy some instead.

But we wanted to make an attachment to slip over the forks, with the lifter attached below, to allow us to drive up to a drum and be able to pick it up without getting off the truck.
So I made these:


Got them powdercoated yellow.

I got my workbench back from the powdercoaters!
I had it done in the same blue as my big toolbox at work as one day it will come home.
It just squeezed into the Astra.


Its quite a heavy frame, maybe 60-70kg, but I can carry it easily enough.


The top on the other hand is bloody heavy! Maybe 150-180kg.

Now I havent got an engine crane like Chris used for moving his bench top, so I had a think how I could move it.
Then I remembered the pump up trolleys we have at work, so borrowed one of those.


I cut some squares of rubber to go under the feet to hopefully absorb some of the impact when hammering on the bench.


Bolted the top on.


I wanted to clean some of the mill scale and surface rust off the new top.

Belt sander worked quite well but I needed a lower grit belt really.

The next job was to bolt one of my most prized possessions on top of the bench.


My Record vice is the second biggest one they used to make (sadly Record went bust a few years ago. Irwin bought the name but all of their vices are now made in China and are of poor quality
  )
)
Mine is also a Heavy Duty one which Record made using a different mix to their normal vices and they are guaranteed to be unbreakable.
Not cheap though!
https://www.machinemart.co.uk/shop/product/details/irwin-record-t112-heavy-duty-quick-release-150
OK thats it for now.
But I have a very exciting update for you which I will try and get up soon involving a work trip I've just got back from to Big Desert national park.
Thanks guys.
Yeah getting better Clive but I still need lots more practice.
Little update...........................
I wanted to lock my gates to keep my garage/workshop and LJ a bit more secure, but I didnt want to drill/bolt/weld anything to the gates as there nice and new.


This is what I came up with..........................


Annoyingly I welded this bit on slightly out of square by mistake.
But I decided to leave it as the lock would still work ok.


Got it electroplated.

So this bit pushes through the slats on the gate.


On the otherside/inside.

The other bit slots in.

Turns and padlocked.


My boss wanted me to make some drum lifters for the forklift to enable us to easily pick up 44 gallon drums. But we found some new ones available at one of our supplies at a great price so decided to just buy some instead.

But we wanted to make an attachment to slip over the forks, with the lifter attached below, to allow us to drive up to a drum and be able to pick it up without getting off the truck.
So I made these:


Got them powdercoated yellow.

I got my workbench back from the powdercoaters!
I had it done in the same blue as my big toolbox at work as one day it will come home.
It just squeezed into the Astra.


Its quite a heavy frame, maybe 60-70kg, but I can carry it easily enough.


The top on the other hand is bloody heavy! Maybe 150-180kg.

Now I havent got an engine crane like Chris used for moving his bench top, so I had a think how I could move it.
Then I remembered the pump up trolleys we have at work, so borrowed one of those.


I cut some squares of rubber to go under the feet to hopefully absorb some of the impact when hammering on the bench.


Bolted the top on.


I wanted to clean some of the mill scale and surface rust off the new top.

Belt sander worked quite well but I needed a lower grit belt really.

The next job was to bolt one of my most prized possessions on top of the bench.


My Record vice is the second biggest one they used to make (sadly Record went bust a few years ago.
Mine is also a Heavy Duty one which Record made using a different mix to their normal vices and they are guaranteed to be unbreakable.
Not cheap though!
https://www.machinemart.co.uk/shop/product/details/irwin-record-t112-heavy-duty-quick-release-150
OK thats it for now.
But I have a very exciting update for you which I will try and get up soon involving a work trip I've just got back from to Big Desert national park.
Attachments
Last edited:
Don't like the adverts? Click here to remove them
Paddler Ed
Well-Known Member
Looks good... your locking system was a bit more hi-tech than my window locks I've just sorted; 12mm dowel for the runner and 9mm dowel for the top of the window...
Love the vice Ben, I had a smaller Record, but it was very tough, picked it up rusted for a tender and brought it up like new. Sadly left behind at the last move.

- Joined
- Oct 13, 2010
- Messages
- 6,058
- Country Flag
Thanks guys.
I think every man needs a decent vice! Its quite possibly the most important tool in the workshop/garage!
Little update..............................
I had to do some work on a brand new Jimny this week, one of 2, with the next one coming in next week for the same treatment.


I'm not sure I like the new Jimny's as much as the older ones. I preferred the grill of the older ones, although I do like the bonnet scoops.

The auto box seems good.

I'm not too keen on the fact it has no transfer lever though and is all electronic to switch to 4wd and low range.

I quite liked the grey Suzuki alloys.

Anyway........................
My first job was to fit a 2" suspension lift.
Rear first.

Then the front.


The next job was to fit new wheels and bigger tyres.


The guards needed trimming.


Nothing like taking an angle grinder to a brand new car!


With the trimming all done it was time to test the tyres cleared on full articulation.


I then had to give another customers Vitara the same treatment.


I got my shear/guillotine bolted down to the new bench.


Now the garage/workshop is pretty much setup I decided to make a start on some of the jobs on LJ.
I need to either finish my panhard rod drop bracket, or turn my spare panhard rod into an adjustable one.


But I decided first I should make my top spring mounts/adapters as hopefully they will drop the rear down a bit. So I want to order some 80 series bump stops to fit inside my springs.
Another job, which I've been meaning to do for ages is to replace the dodgy looking ply wood center console/arm rest with a nice alluminium one.
When I originally built the ply wood one I simply didn't have access to big guillotines, folders and couldn't weld alluminium.


Pulled the old one out.


And had a measure up of the space.


I could then make a cardboard mock up.


I needed to trim the end of the OEM gear stick surround console.


I had to reduce the width of the front tray as there wasn't enough clearance for the handbrake lever.

I will take the cardboard mock up to work and cut, fold and weld some alluminium together. I will then get it powder coated grey and source some grey vinyl and foam to make the arm rest/hinge up lid.
I employed LJ to do some gardening today............................
I wanted to remove an old tree stump to make mowing the lawn easier and the obvious choice was the Warn 8274!


Paddler Ed
Well-Known Member
I think every man needs a decent vice!
I think we all have one of those... it wears a Toyota badge...

On the wheel arches; how do you ensure they are the same on both sides? Guess work or a carefully measured process/templates/scribe?
I think there was at least one production car where the sides were different due to the design buck being shaped slightly differently!
- Joined
- Oct 13, 2010
- Messages
- 6,058
- Country Flag
I managed to spend some time on the center console project today!
Only 20mins on my lunch break and an hour after work but I got quite a bit done.
Cut some 2.4mm alluminium.

Folded it.


Cut and folded another piece.


The little return on the top is where the piece of stainless steel piano hinge will be bolted on for the lift up arm rest lid.


Next I needed to weld them together and I wanted to use my TIG!
I hadnt actually done any alluminium TIG welding before and I was a little bit apprehensive. Its crazy really that I havent done any before now as I've had the welder for a few months now and one of the reasons it was so expensive is because of its advanced featured designed specifically for alluminium and magnesium!
So I cut some 40mm strips of alluminium to practice on and clamped them together to simulate an outside corner fillet.


It took a bit of time to work out how to set the machine up properly.


I could then have a practice.........................
Only my stainless steel filler wire was in the same tube as my alluminium filler wire and I discovered you cant weld alluminium with stainless steel filler rod! 
I obviously picked up one piece of alluminium rod though as I did get one tiny bit of almost good welding!


Realising my mistake I sorted all the filler rod out and separated the alluminium and stainless to ensure no more mistakes are made.

With a bit more practice on scrap pieces I sort of got the hang of it.


I then felt ready to have a go on the center console.
Now some of the welding wasnt perfect as it is definitely harder to weld than steel. It was difficult to judge when the alluminium was hot enough to introduce the filler rod into the weld pool. With steel you can see how hot its getting as it starts to glow red when it gets very hot, where as alluminium doesn't really change colour when heated, so it goes from being solid, to you blowing a hole in it without much warning!
Once I'd got the weld pool going it was as easy as welding steel, and the weld pool traveled along quite nicely and I was able to keep dipping the filler rod in.

Horrible blob on one of the corners!
This was caused by trying to introduce the filler rod before the metal was heated fully and the weld pool had formed properly. This meant the torch/tungsten ended up melting the filler rod rather than the hot base metal/weld pool. Also as soon as the tungsten touched the alluminium it then became contaminated as did the weld pool.

Nice seam!


I almost got this main section fully welded and I really enjoyed it! I think I'm going to really enjoy being a full time TIG welder when I eventually move on to my next company of employment!
I ran out of time at work so I brought it home to test fit it in LJ.

It fits perfectly!

I could then accurately measure up for the front tray which will fit nice and snugly up against the plastic gear shift surround.

I'm also going to add a couple of double 12v USB sockets and 12v cig sockets.
The top will also be made from alluminium and upholstered with 100mm of foam on top and covered in grey vinyl. I'm also toying with the idea of making it lockable as it would be handy to be able to have a nice secure box in the cab.
Only 20mins on my lunch break and an hour after work but I got quite a bit done.
Cut some 2.4mm alluminium.

Folded it.


Cut and folded another piece.


The little return on the top is where the piece of stainless steel piano hinge will be bolted on for the lift up arm rest lid.


Next I needed to weld them together and I wanted to use my TIG!
I hadnt actually done any alluminium TIG welding before and I was a little bit apprehensive. Its crazy really that I havent done any before now as I've had the welder for a few months now and one of the reasons it was so expensive is because of its advanced featured designed specifically for alluminium and magnesium!
So I cut some 40mm strips of alluminium to practice on and clamped them together to simulate an outside corner fillet.


It took a bit of time to work out how to set the machine up properly.


I could then have a practice.........................
Only my stainless steel filler wire was in the same tube as my alluminium filler wire and I discovered you cant weld alluminium with stainless steel filler rod!
I obviously picked up one piece of alluminium rod though as I did get one tiny bit of almost good welding!


Realising my mistake I sorted all the filler rod out and separated the alluminium and stainless to ensure no more mistakes are made.

With a bit more practice on scrap pieces I sort of got the hang of it.


I then felt ready to have a go on the center console.
Now some of the welding wasnt perfect as it is definitely harder to weld than steel. It was difficult to judge when the alluminium was hot enough to introduce the filler rod into the weld pool. With steel you can see how hot its getting as it starts to glow red when it gets very hot, where as alluminium doesn't really change colour when heated, so it goes from being solid, to you blowing a hole in it without much warning!
Once I'd got the weld pool going it was as easy as welding steel, and the weld pool traveled along quite nicely and I was able to keep dipping the filler rod in.

Horrible blob on one of the corners!
This was caused by trying to introduce the filler rod before the metal was heated fully and the weld pool had formed properly. This meant the torch/tungsten ended up melting the filler rod rather than the hot base metal/weld pool. Also as soon as the tungsten touched the alluminium it then became contaminated as did the weld pool.

Nice seam!


I almost got this main section fully welded and I really enjoyed it! I think I'm going to really enjoy being a full time TIG welder when I eventually move on to my next company of employment!
I ran out of time at work so I brought it home to test fit it in LJ.

It fits perfectly!

I could then accurately measure up for the front tray which will fit nice and snugly up against the plastic gear shift surround.

I'm also going to add a couple of double 12v USB sockets and 12v cig sockets.
The top will also be made from alluminium and upholstered with 100mm of foam on top and covered in grey vinyl. I'm also toying with the idea of making it lockable as it would be handy to be able to have a nice secure box in the cab.
Last edited:

Looks great Ben!
All good stuff Ben.
Just a thought, if your bench is free-standing, won't it fall over when you pull on the guillotine handle? You could mount it lengthways I suppose, if it does...
Just a thought, if your bench is free-standing, won't it fall over when you pull on the guillotine handle? You could mount it lengthways I suppose, if it does...
I had cross members under my bench Ben so I could fill it with all the off cuts of pipe and tube etc. It doesn't move at all now and it's easier than bolting it down. Must weigh 500kgs. I made up a very short earth lead too with a magnetic contact which sticks to the table. When I want to move the welder outside, I leave the magnet on and swap the earth to a traditional clamp.
- Joined
- Oct 13, 2010
- Messages
- 6,058
- Country Flag
Sounds good Chris.
Trouble is I built mine for TIG welding which normally involves sitting at the bench on a stall, as its much easier to do with your elbows resting on the bench, that way you can keep the torch and filler rod nice and steady and at the perfect angle and distance from everything. So I wanted to keep it open in order to easily be able to sit at it with my feet controlling the foot pedal.
Hoping to bring the welder home soon, just want to design and build a nice trolley for it to go on first, with big gas bottle on the back, hooks on the sides or front for the torch, earth clamp and foot pedal to be hung off and storage for the different packs of filler rod some where.
I will then get it powdercoated in the same blue as the bench.