Don't like the adverts?  Click here to remove them

LJ70 Build Thread!

Work is progressing well on LJ.

The roof rack is at the powder coaters and should be ready this morning.

The roof rack mounts are at the electro platers with the 2 little awning spacers and they will be going to the powder coaters next.

The rear side panels with storage boxes are all welded up and will be going for powder coating this morning.

I'm taking the rear bar into work today to get it welded up ready for shot blasting, electro plating and powder coating.

I've made a start on the front axle rebuild but I want to pick up some new kingpin bearings today, the others arnt that old but they are a little rusty and worn.

The alternator is completely knackered! :thumbdown:

Its blown every single diode on the positive side. Were not sure why whether its from lots of winching, welding on LJ without disconnecting the batteries or what. It was only a cheap one from the alternator-and-starter-motor company and the auto electrician at work reckons the components in it arnt up to the 120amps its rated at.

Anyway.................................

Sourcing an upgraded 120amp alternator over here is hard and expensive (can get the standard 70-80amp ones easily).

So I'm now going to see if I can get an 80 series one to fit. There much cheaper, very easy to get hold of and I can get a reasonably good quality one for a lot less than the price of a 1KZ-TE one. :icon-biggrin:
 
There was a post on one of the 4x4 Facebook pages that had managed to modify a Land Rover Discovery alternator to fit the 2L lump; not sure if that's worth investigating for yours or not? 120A out the box, and it's not Lucas so there's no voodoo or prince of magic needed...
 
Ben, is 120 Amps really necessary? Surely for winching and high demand once you have a good Battery in place that will take the beating... The alternator will be running 24/7 anyway, will the extra 40 amps make a noticeable difference?

The 1KZT-E ones are 80 amps. 1KZ-T are 70 I believe. Both interchangeable. Internals of the alternator could also possibly be changed to produce a higher amperage?
 
Thanks Ed but I don't want to adulterate my Toyota with any lamerover parts! :lol:

Ben, is 120 Amps really necessary? Surely for winching and high demand once you have a good Battery in place that will take the beating... The alternator will be running 24/7 anyway, will the extra 40 amps make a noticeable difference?

The 1KZT-E ones are 80 amps. 1KZ-T are 70 I believe. Both interchangeable. Internals of the alternator could also possibly be changed to produce a higher amperage?

Probably not...................

But the way I look at it is if I'm going to replace a part and I have the option to put on an uprated/more powerful/stronger etc. part on then I should. :think:

I have also completely flattened both batteries before winching, my uprated 8274 high mount is ridiculously quick and powerful and that comes at a cost! :icon-twisted:

Ideally I should be running yellow Optimas like CJ but I want to wait for my current batteries to wear out first. :icon-biggrin:

Pulling a late one tonight and in the middle of the front axle rebuild, just come in for dinner. :sleeping-sleep:

Once thats done I'm going to look at fitting an old 80 series alternator that my boss has lent me. Then I will look for the highest amp 80 series alternator I can find. :icon-cool:

A few more things came together on the build today. :dance:

Dropped the rear side panels with storage boxes off at the powder coaters at 9.30am along with the electro plated roof rack mounts and awning spacer mounts and by 12 they were all ready in satin black along with the roof rack. :clap:

And all for the pricely sum of $50! :icon-surprised: :clap:

I picked up new Koyo kingpin bearings and stainless steel button head bolts for the rear panels. Also had all the VDO gauges and bits delivered. :icon-cool:

With just over 3 weeks left till the trip and only 2 free weekends its going to be bloody close as theres heaps still to do but I will get there.

Also spoke to the auto electrician and hes going to have LJ for a few days in about 10 days time.

Need to source an LED light bar for the front and some LED spots for the back, a Piranha super loom, fuse box, anderson socket and plug, some of those USB sockets and some of the LED strip lighting for the interior. :icon-biggrin:

Will get some pics up Friday night hopefully. :thumbup:
 
:icon-surprised:

Going to need some work mate! :lol:

Whats your plans for it? :think:


Going to gal the chassis (same as the one I just finished which was a 40 series chassis with 80 series suspension all round), drop a 12HT diesel with 5 speed and a 43 series fibreglass sports tub. Same as the sister build below.

RollCage4.jpg
 
Don't like the adverts?  Click here to remove them
OK the front axle is rebuilt so thats most of the messy work over now, apart from the rear wheel bearings that I want to change before the trip.

The 80 series alternator bolts straight onto the 1KZ-T block but the belt tensioner bracket wont work and will need changing. I'm going to have a look at the one on my bosses 80 tomorrow and see if the 80 series belt tensioning bracket will also work on the 1KZ-T block, otherwise I will make one. :icon-ugeek:

Going to gal the chassis (same as the one I just finished which was a 40 series chassis with 80 series suspension all round), drop a 12HT diesel with 5 speed and a 43 series fibreglass sports tub. Same as the sister build below.

View attachment 14901

Awesome! :dance:

That will be a great project Rob. :thumbup:
 
Best of luck with the big trip Ben, reminds me of my rallying days a build or rebuild would always mean 20 hour days for the last couple of weeks before the event!
 
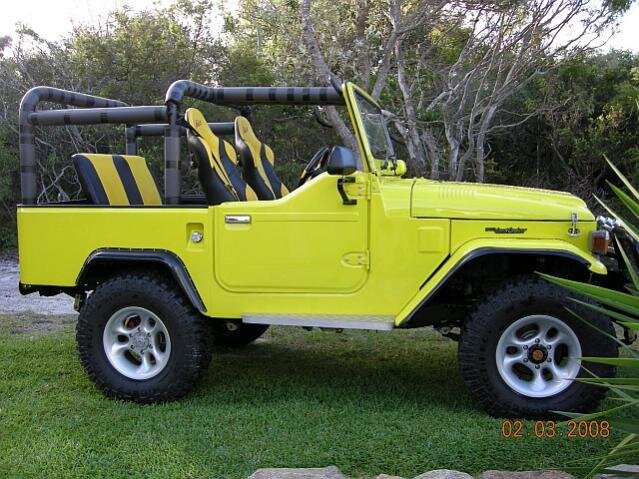
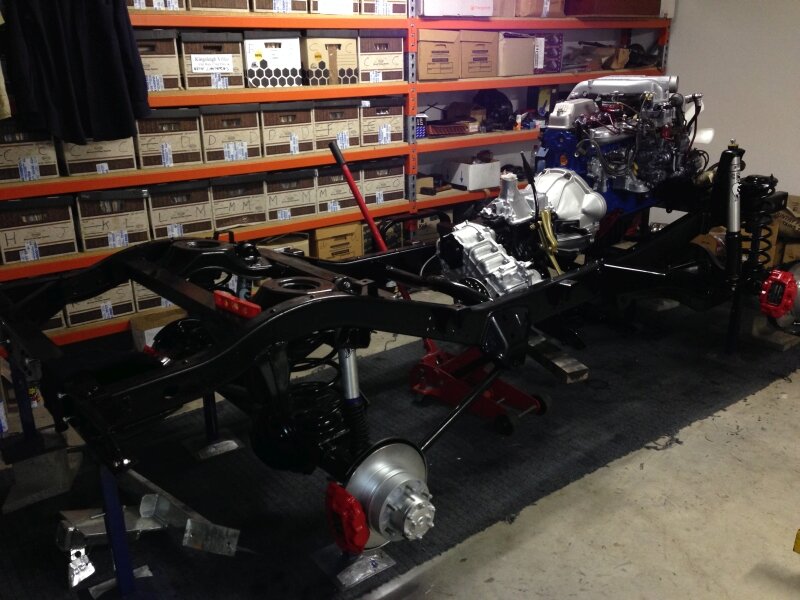
Thanks Ben, its currently sitting on this chassis which has 2H, 4 speed, disc brakes all round, 89" wheel base. Built this chassis in 2007/2008.


MotorChassis.jpg

In the next week or so will move it to the new 40 series chassis, 80 series suspension all round, 4 disc brakes, 5 speed on a 12HT, Lokka rear diff & e-locker front diff, 92" wheel base.

IMG_1617.jpg

I can then start on the RJ70.

PS. You 70 is coming along nicely, you should have a great holiday?
 
Best of luck with the big trip Ben, reminds me of my rallying days a build or rebuild would always mean 20 hour days for the last couple of weeks before the event!


Thanks Mike. :thumbup:

Yeah things are ridiculously busy trying to get everything ready for the trip, every day is a 14-16 hour working day! :sleeping-sleep:

Still got heaps to do as well.

Tomorrow night Piranha stay open till 9pm so I've got 5 hours to use the workshop and get as much done as possible!

Need to finish the wheel bearing press tool and get the rear wheel bearings changed, finish the rear bumper so it can go for shot blasting, electroplating and powdercoating and make the rear shock adapters.

Then I can measure up and order the new rear shocks. :icon-biggrin:

Thanks Ben, its currently sitting on this chassis which has 2H, 4 speed, disc brakes all round, 89" wheel base. Built this chassis in 2007/2008.


View attachment 14925

In the next week or so will move it to the new 40 series chassis, 80 series suspension all round, 4 disc brakes, 5 speed on a 12HT, Lokka rear diff & e-locker front diff, 92" wheel base.

View attachment 14926

I can then start on the RJ70.

PS. You 70 is coming along nicely, you should have a great holiday?

WOW you've got some lovely projects! :drool: :clap:

Thanks. I'm sure all the hard work will be worth it as it will be an amazing trip and hopefully LJ will be 100% reliable. :thumbup:
 
Will have to look through the emails and have a look, but I'm out of time for today. :thumbdown:

I know were driving to Adelaide then heading North through the Flinders and then crossing the Simpson the harder way! :icon-cool:

Hopefully Tony or Chris will spot this and post up with more details. :pray:
 
OK another busy week on the build...............................

Monday night I carried on with the front axle rebuild and copied an idea I'd seen Trev post of using a couple of screws to pull out oil seals. :clap:

Nothing like winding screws into perfectly good, expensive genuine oil seals. :icon-rolleyes:

P8250003_zps552f11f7.jpg

P8250004_zpsd23e12d7.jpg

With the oil seal out I could remove the bearing and clean all the old grease off everything. I used petrol for this as it works really well.

P8250005_zpsc38d2dfa.jpg

P8250006_zpsda12b809.jpg

Lots of cleaning later.

P8250008_zpsf20ec102.jpg

P8250007_zps45b15700.jpg

Spotlessly clean bearings.

P8250009_zps7e584373.jpg

Out with the marine grease from the company that employ people who are colour blind! :lol:

P8250013_zps438fc07c.jpg

Bearings nicely packed and in waiting for the new seals to go in behind them.

P8250010_zpsba3f2ea6.jpg

P8250014_zpsb8ae125e.jpg

Driven in using a proper seal fitting tool.

P8250015_zps0404d3db.jpg

I havent moaned about the horrible Melbourne weather for a while..........................

Freezing cold foggy mornings have become the norm lately. :thumbdown:

P8260016_zpsdd4be2da.jpg

P8260018_zpse2064385.jpg

Had my deserts pass delivered for the trip! :icon-cool:

P8260031_zpse540c40d.jpg

Along with the VDO boost and pyro gauges and fitting kits.

P8260030_zps1cc08737.jpg

I got the storage boxes welded onto the back of my panels.

P8260029_zpsfde3e47e.jpg

Picked up the roof rack brackets and awning brackets from the electro platers.

P8260032_zps07ccc38b.jpg

Dropped it all off at the powder coaters and a few hours ready it was all ready along with the roof rack, and all for the pricely sum of $50 so £25 ish. :clap:

Got everything back from the powder coaters.

P8260034_zps6e648877.jpg

P8260036_zps601ad304.jpg

Sat roughly in position.

P8260039_zpsa7aade01.jpg

P8260040_zpse5e93b1c.jpg

P8260041_zpsdcc5087d.jpg

Picked up the new king pin bearings as the old ones were a bit rusty and didnt look too great.

P8260035_zps35a110b9.jpg

Tuesday night I finished the front axle rebuild.

P8250011_zps583e725d.jpg

The half shafts needed pulling out so I could clean all the old grease off and repack them.

P8260042_zps01089aed.jpg

P8260043_zps9c2a567d.jpg

Lots of old grease to clean out.

P8260044_zps8dce06c3.jpg

Pulled the old seals out.

P8260045_zpsd53692ac.jpg

P8260046_zps1adb04ad.jpg

Fitted new genuine seals.

P8260047_zps3d6e4726.jpg

Re-greased and fitted the cv.

P8260048_zpsd5ade5f7.jpg

New kingpin bearings needed packing with grease next.

P8260049_zpsaad477f0.jpg

P8260051_zpsec187905.jpg

P8260052_zps82934e1b.jpg

P8260053_zps3f567d86.jpg

I found that the easiest way to fit the king pin bearings is to fit the bottom one in the hub.

P8260055_zps32540140.jpg

And fit the top one in the top of the ball.

P8260058_zps9111cef9.jpg

And then put the swivel hub on at an angle and then tap the top cap/arm into the top kingpin bearing.

P8260059_zps2fc15976.jpg

Dust shield next.

P8260060_zps83f38d8e.jpg

Hub next.

P8260061_zps690d12a8.jpg

I used my rough/work shop copy of the FSM, a spring gauge and torque wrench to properly pre load and tension the wheel bearings.

P8260062_zps6bd869b2.jpg

P8260063_zps553fce76.jpg

Brake caliper next along with new tie rod end.

P8260064_zps1e36bcd5.jpg

P8260065_zpsae8c7d5e.jpg

Other side.

P8260066_zpsc24c476b.jpg

I mentioned that I'm going to fit an 80 series diesel alternator as there much cheaper than 1KZ-T ones and much easier to get hold of. The 80 series is a hugely popular vehicle in Australia, and rightfully so given the fact it is widely regarded as the best 4wd ever built. Anyway......................this means 80 series parts can be obtained all over the country without too much hassle, meaning if I'm some where remote in the future and need one it will be a lot easier to find than a 1KZ-T one. :icon-cool:

So this is my bosses old alternator that I've borrowed to see if I could make it fit.

P8260069_zpsfa3c8862.jpg

Comparing it to my 120 amp 1KZ-T alternator.

P8260070_zpsfb62b947.jpg

Very slightly different mounting position but not enough to be an issue.

P8260071_zps3520362c.jpg

Main difference is where the belt tensioner bolts on.

P8260073_zps3f4995ed.jpg

Bolted straight on.

P8260074_zpsbffb96a4.jpg

And I can even use the standard belts as they fit on OK and dont take much to tension them up.

P8260075_zps597b5b43.jpg

My belt tensioner wont work as standard but I could modify it.

P8270082_zps23c2e097.jpg

I made a start on finishing off the rear bumper next.

I want to fit some of these lights, there not cheap but there really good quality and fully water proof, submersible to 3 meters.

P8270091_zps2aa09f3e.jpg

P8270092_zpsd4eb76f6.jpg

P8270093_zpseb606edf.jpg

Got the bumper on the bench ready to fit the lights.

P8270094_zps963d99b1.jpg

Worked out where to put them.

P8270095_zpsfac29b4f.jpg

P8270097_zps699e91d3.jpg

P8270098_zpsda670ed9.jpg

P8270099_zps5b005a08.jpg

We will come back to the bumper shortly as I wanted to crack on with the rear wheel bearing press tool I was making.

P8280106_zps86c0589c.jpg

I made the bottom bolt on plate.

P8280107_zpsa6cddf65.jpg

P8280108_zps723916c1.jpg

Checked it fitted on the hub.

P8280109_zps72759173.jpg

P8280110_zpsc07723eb.jpg

Positioned it ready for welding and welded it on.

P8280111_zps31475dd3.jpg

Removed the circlip from the half shaft.

P8280112_zpsf32a5b89.jpg

P8280113_zpsa28fad8e.jpg

And bolted the press tool on.

P8280114_zps120b30b5.jpg

On to the press.

P8280115_zps98a4a02b.jpg

P8280117_zps219d7211.jpg

It moved a bit but it bent my 6mm plate like a banana! :doh:

P8280118_zps34b13243.jpg

P8280119_zps48005266.jpg

Cut some gussets.

P8280120_zps54c8f45c.jpg

Hammered the bottom flat again and positioned the gussets ready for welding.

P8280121_zps5fe00c2c.jpg

Welded them on.

P8280122_zps6bd80bd3.jpg

P8280123_zpsd01af123.jpg

And tried again.

P8280124_zpsc6b0a2f4.jpg

P8280125_zpse0acddb9.jpg

P8280126_zps4c96f88b.jpg

It got the half shaft separated from the bearing but badly bent the press tool again. :thumbdown:

P8280128_zps248c2f6a.jpg

P8280129_zps51ed41ba.jpg

Not good!

P8280130_zpscf6fda87.jpg

Used the press to straighten the tool.

P8280133_zps27bf6922.jpg

P8280134_zpsd695db8a.jpg

P8280135_zpsa9b213e1.jpg

Put so much pressure on it the RSJ sections on the press were bowing!

P8280136_zps01d63bf6.jpg

P8280137_zps909aa6a4.jpg

P8280138_zps24ac5176.jpg

P8280139_zps6a3e3f7c.jpg

I rescued the first piece of 6mm plate that I'd drilled the holes in the wrong place, out of the scrap bin and cut the corners out to make the hole spacings work.

P8280140_zps495447b0.jpg

Clamped it on to the tool.

P8280141_zps41292c92.jpg

And would the amps right up on the welder.

P8280142_zps8641c8ec.jpg

P8280143_zps3995b3eb.jpg

P8280144_zpse1cfd800.jpg

Bolted onto the other half shaft.

P8280145_zpsa3f3870c.jpg

This one pressed off without any bending of the press tool. :dance:

P8280146_zpsc6ecba93.jpg

P8280147_zps5770f646.jpg

P8280149_zps536cbb54.jpg

P8280150_zpsf6b66836.jpg

Needed to press the actual bearings out of the backing plates next.

P8280151_zps9338ccb4.jpg

P8280152_zps7a443828.jpg

Removed the handbrake mechanism.

P8280153_zps36c55e52.jpg

P8280154_zps61a52acd.jpg

P8280156_zpsba0c7caf.jpg

The bearings pressed out very easily.

P8280157_zps3fa47f3f.jpg

P8280158_zps521486de.jpg

P8280159_zps94a421d7.jpg

I put all of that to one side for now and I will come back to it another day.

P8280160_zps218b624b.jpg

Back to the rear bumper.

P8280161_zpsf988ee6d.jpg

Cut a piece of 6mm steel to weld in for one of the mounting brackets to bolt to.

P8280162_zps88ac71af.jpg

Welded it in and also welded up some more holes.

P8280163_zps807b909d.jpg

P8280164_zpsb2da73b1.jpg

Added some holes for the electro plater so the liquid will all drain out when he dips it.

P8280165_zps579d541d.jpg

Needed to finish fitting the lights.

P8280166_zps3c940006.jpg

44mm hole saw, slow speed on the drill and plenty of cutting fluid and I soon had some holes for the lights.

P8280167_zpsfffdd1bd.jpg

P8280168_zps5f8ba421.jpg

Needed to add a hole behind one of the lights for the wires.

P8280169_zps97f173d3.jpg

P8280170_zpsdf6b79d2.jpg

Should work well.

P8280171_zps4165458a.jpg

Other side didnt need drilling for the wires as it falls in one of the weight saving cut outs I added.

P8280172_zps2ed6ad65.jpg

P8280173_zps2c94b03e.jpg

P8280174_zpsc8f61ca8.jpg

P8280175_zps349bce68.jpg

Marked and drilled holes for the mounts.

P8280176_zps22dc7ed0.jpg

P8280177_zpsc62a3da5.jpg

Had to finish welding the arm.

P8280178_zps12c38030.jpg

P8280179_zpsc164bd07.jpg

Bolted the arm back on as I had forgotten to add a support for the arm when its in the closed position.

P8290180_zpsf6daadd8.jpg

P8290181_zpsbf333aa0.jpg

Cut a piece of 8mm.

P8290186_zpsea7748a5.jpg

Thought about putting it near this end of the arm but decided it would be too close to the latch handle.

P8290187_zpsb286290c.jpg

So put it in the middle where the main weight of the wheel will be.

P8290189_zps87c9804a.jpg

P8290190_zps8b6714c2.jpg

Fully welded it and then actually cut it down a bit. It will have a piece of black nylon on top of it when finished.

P8290191_zps0e6018c8.jpg

Today I dropped the bumper off at the shot blasters and I will pick it up next week and take it to the electro platers and then the powder coaters. Should have it back by the end of next week hopefully. :icon-smile:

Today I borrowed the 60 series from work and bought my roof rack home. If the rack was bigger in any way it wouldn't fit in the 60, its so tight getting it in and out.

P8290203_zpse001d1af.jpg

P8290205_zps6a72157f.jpg

I siliconed the rubber strips on to the bottom of the feet.

P8290207_zps0fbde11d.jpg

And bought home some more alternator tensioning brackets. An 80 series one and a Suzuki one.

P8290204_zps70c3da0f.jpg

Comparing my old bracket with the 80 one.

P8290206_zps9a17612d.jpg

Neither will bolt straight on and work, so I'm going to have to design and make something as my new 80 series alternator should be here any day now. :think:

OK so I still need to...............................

-Fit the starter motor when I get it back from being rebuilt.
-Fit the new alternator and design and fit a tensioning bracket.
-Clean the engine and try and find the oil leak, if there is one.
-Design and make rear shock, bottom mount adapters and fit new shocks.
-Fit the new drawer fronts, latches and side storage fronts which I'm thinking will be on magnets.
-Fit the rear bar when its back from the powder coaters.
-Fit the roof rack and awning.
-Weld in the pyro sensor into the exhaust down pipe.
-Fit the dash pod with pyro and boost gauges and plumb in the boost gauge.
-Fit the rear side panels with storage boxes and drill holes for the 12v cig sockets and Engal socket.
-Press the new rear wheel bearings onto the spare half shafts, fit the half shafts and re-bleed the brakes and adjust the handbrake.
-Polish the new paintwork.
-Load LJ for the trip.

I have one weekend left which is next weekend, the one after she will be with the auto electrican, the following weekend is the trip!

No pressure then! :|
 
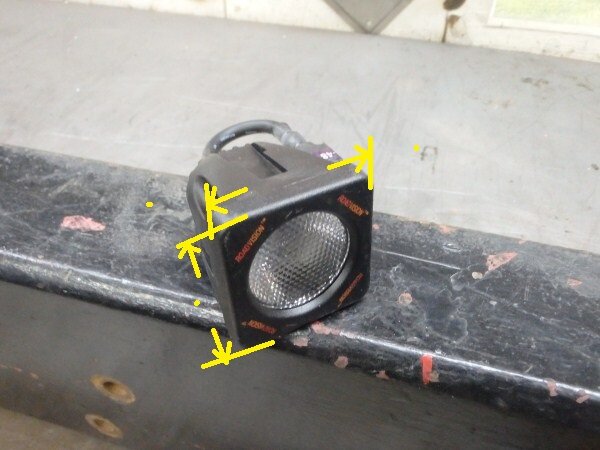
Hi Ben, would you be able to give me these measurements, I have a new ARB bulbar for my 40 that has two square holes in it and I am wondering if these will fit?
P8280166_zps3c940006.jpg
 
Great work as always Ben.....getting there fast.

Could you advise as to your Bearing press tool as i am in the market for one and you seem to have used yours a fair bit.

Lastly i see you did not fill your Knuckle with grease rather just the cv. Was this intentional as i am doing mine at the moment and have no plans to fill the knuckle just the cv and a bit of grease here and there.
 
You are a dedicated worker and very innovative Ben.
 
So your wheel bearing is just a single sealed standard roller bearing?

Mine is a 3" wide double taper bearing which it tensioned by a beveled spring washer and held together by the spacer and the c clip!

make sure the new c clips and good and fit tight round the shaft as some of the cheaper ones once spread to fit on don't spring back enough and are loose as that's all that holds the shaft in!
 
Will have to look through the emails and have a look, but I'm out of time for today. :thumbdown:

I know were driving to Adelaide then heading North through the Flinders and then crossing the Simpson the harder way! :icon-cool:

Hopefully Tony or Chris will spot this and post up with more details. :pray:

Ben, it's probably easiest for readers to check out the Blog site we created.

'The Trip' page details the route and where we will be each day, and with regular blog updates happening they can follow your progress and that of LJ.
Just mind it is a blog site in Wordpress which can be a little slow. Grab a coffee....

Here's the link: http://uk-oz.com
 
Thanks guys. :thumbup:

Rob I will measure the lights for you when I'm back in work on Wednesday. :icon-wink:

Warren this is what you want:

http://www.ebay.co.uk/itm/Professio...t=UK_Hand_Tools_Equipment&hash=item20ca5a8772

Great tool to have. :clap:

Thats interesting Rich, yours has rear disc brakes doesnt it? :think:

I'm going to convert mine to rear discs after the trip. :icon-biggrin:

Thanks for the heads up on the circlips. :thumbup:

I have decided that on the RJ70 chassis rebuild I am going the leave it as drum brakes rear, the reason is the rotors rust to badly on the beach. I am going to galvanised the drums and backing plates as much of the other parts as I can. The speed limit on the beach is only 80kph anyway and with a 43 series fibreglass sports tub there not much weight in it.
 
Back
Top