Don't like the adverts? Click here to remove them
You are using an out of date browser. It may not display this or other websites correctly.
You should upgrade or use an alternative browser.
You should upgrade or use an alternative browser.
Project 80: Codename Grey Ghost
- Thread starter Chris
- Start date
Ben, making it longer certainly hasn't shown any detrimental effects at all. In fact it's driving beautifully. I didn't over do it though. I went exactly one hole width which was 18mm. I am guessing that it gives you slightly more then 18mm at the other end due to geometry or Voodoo at least. Cured it certainly. There is probably a region where more lift is actually a bad thing as the axle pivots down and back. Once you get into bigger lift, then the centre line of the tyre is below the point where it can rub. But you need lift to get the tyres in. Of course I have these silly wide things on with mental off set too. So I guess I have made it hard for myself. Some 35's on say a 285 with a std off set are probably not an issue.
Compressor seems a good thing but not suprised about the mark up Ben. Someone must be getting rich off us.
Compressor seems a good thing but not suprised about the mark up Ben. Someone must be getting rich off us.
Update time. Had a bit of a mare wiring in my Carling switches. I decided to daisy chain some of the connections and after a day of sheer frustration discovered the problem. The ARB Carling switches work the opposite way around the the genuine Carling switches. Well who knew. WTF? So I wired it all up, then ripped it all out and did it again.
I looked at where I could put switches and I looked at where I wanted them. Seemed that the armrest console would be the best for these. There are quite a few ways to mount these switches but I opted for the single variant. The coin holders weren't far off the right size. Quick whizz and they were in. Just need to clean up around the inserts where I bedded them in with sealant once it's fully dried.
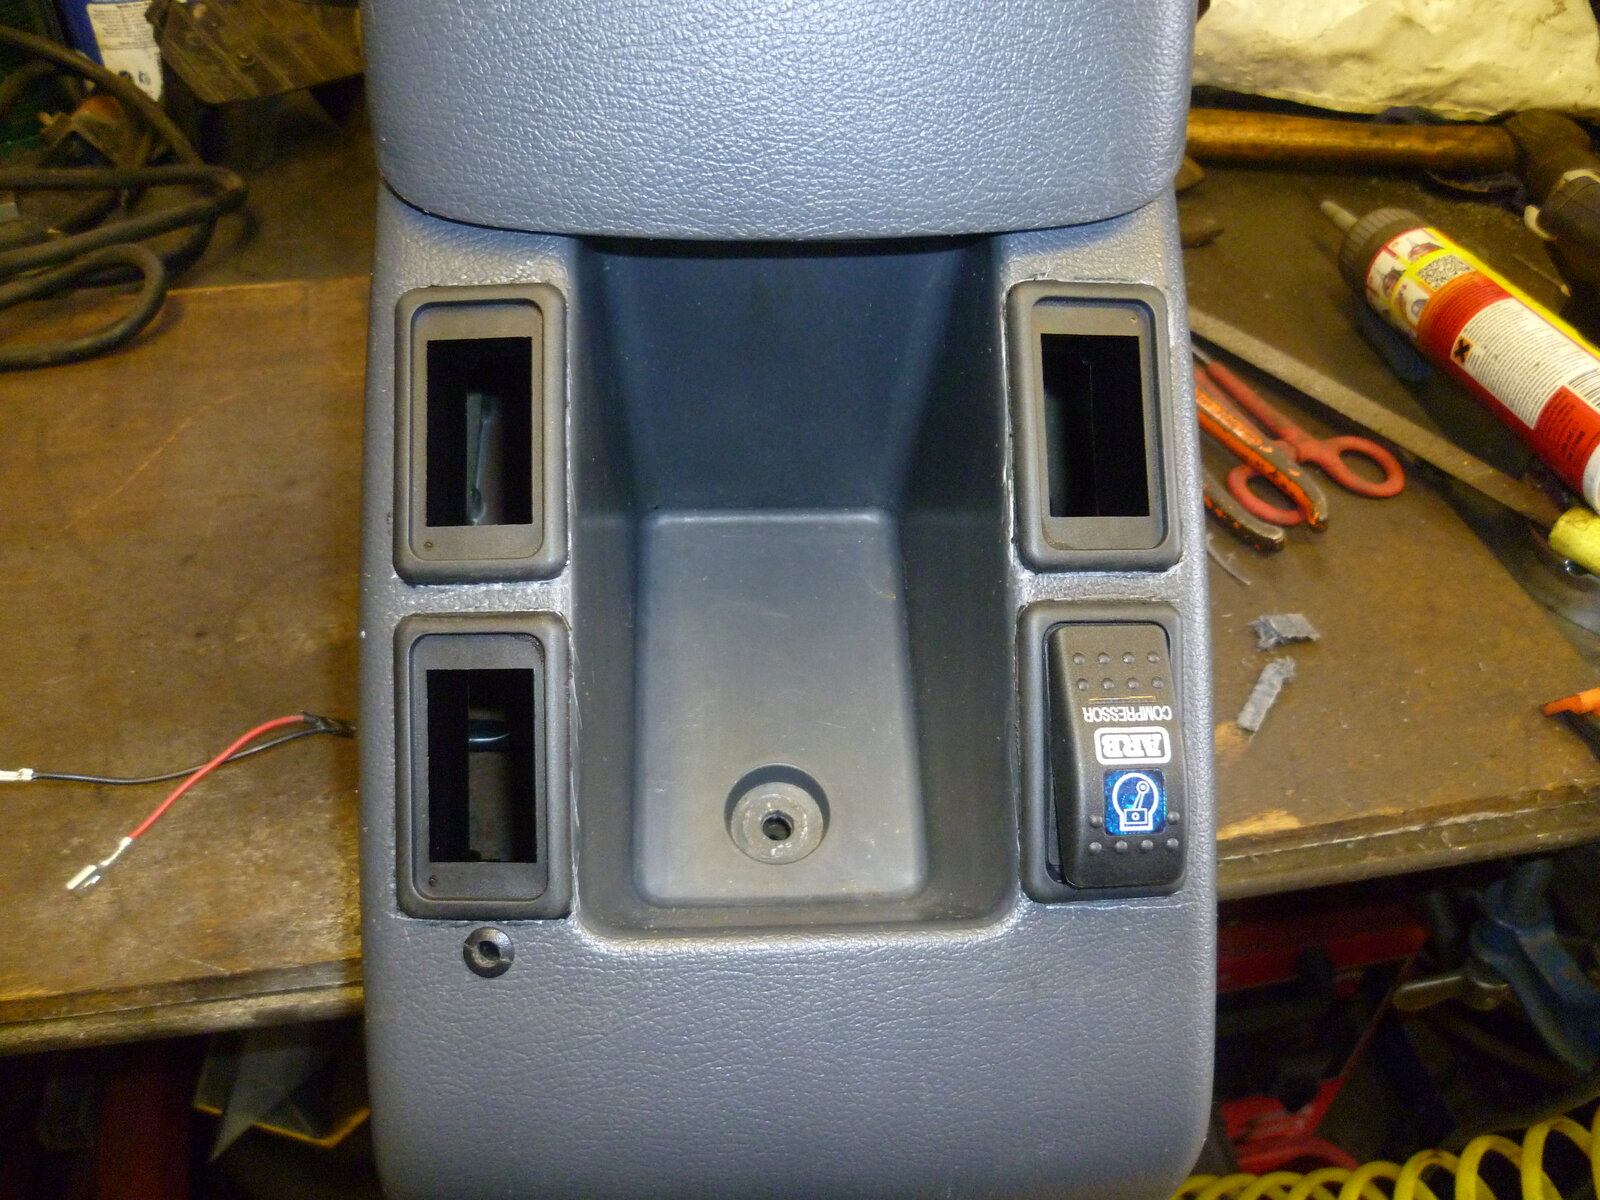
Next job was to run a multi core cable from the fuse box under the bonnet into the dash. I decided that I don't want to continually tap into dash board wires and also have numerous cables back and forth through the bulkhead. This cable has 6 single strands and also 2 pairs of twin strand all inside the sheath. So in simple terms I have brought in Live, Acc and Ign from the engine bay but can also send power back to run things like spotlight relays etc
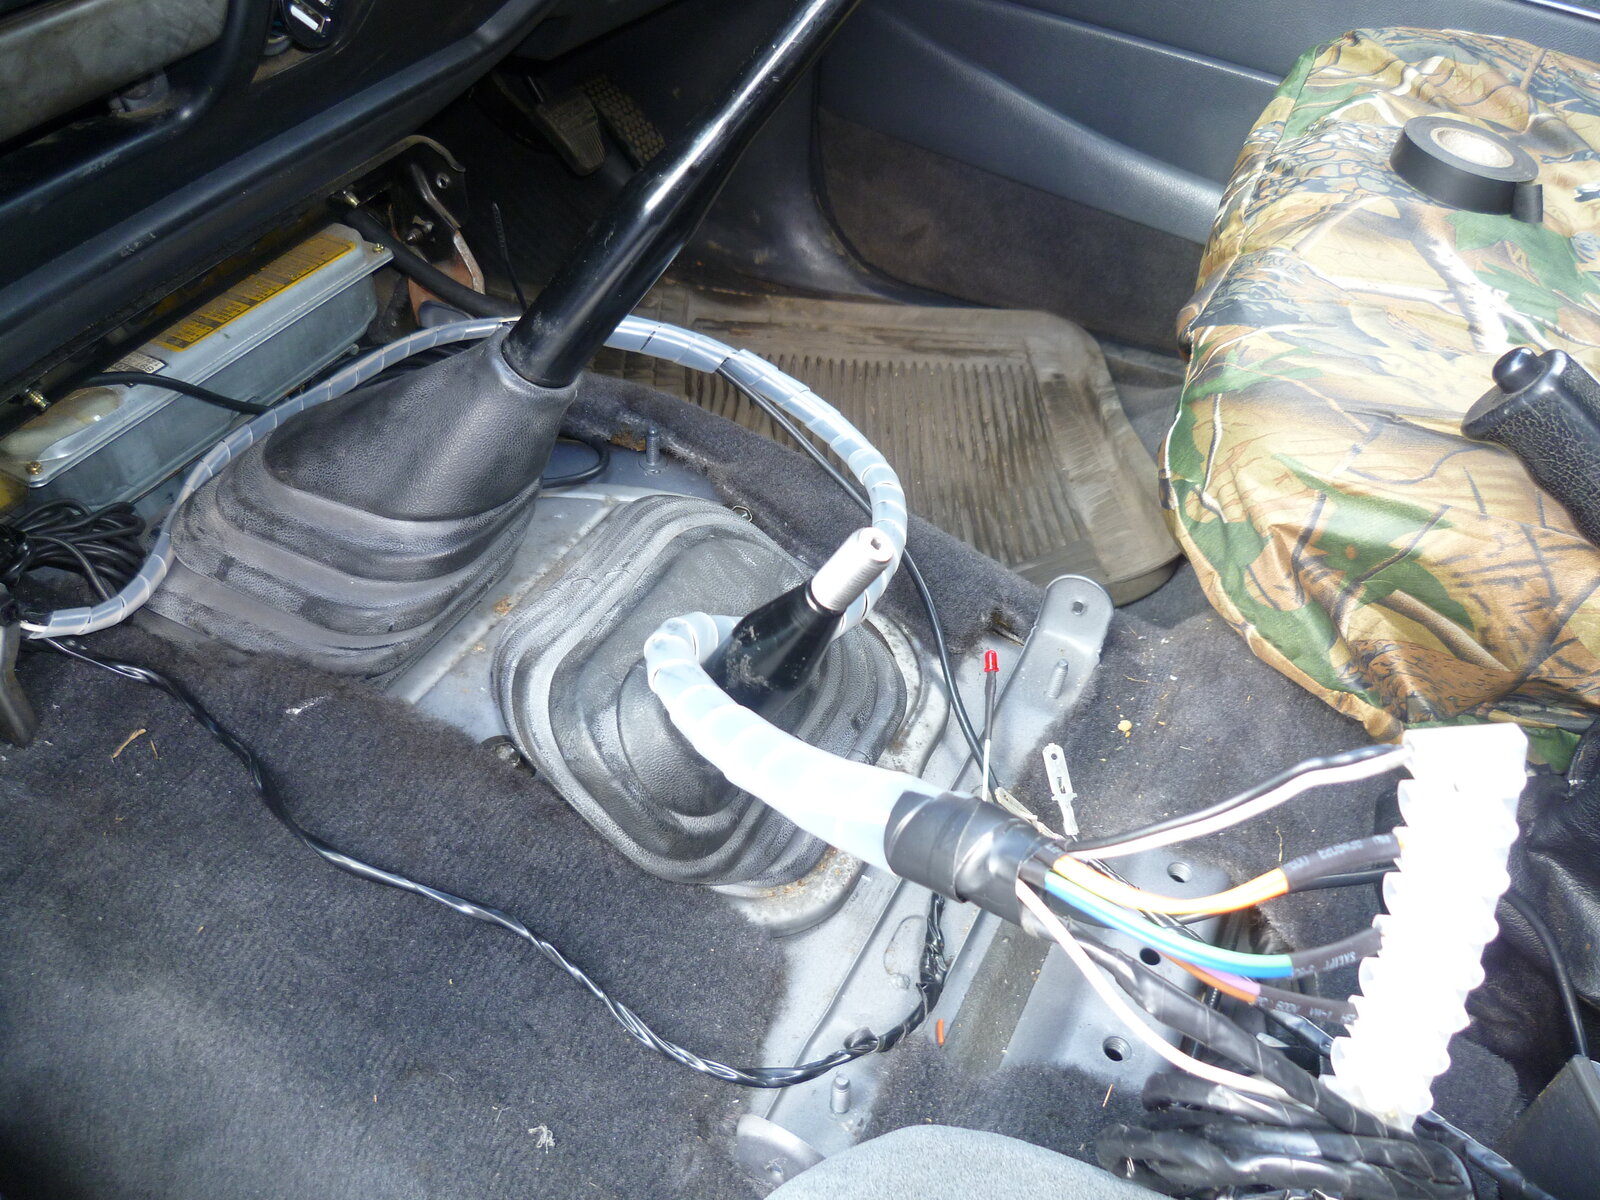
Got the switches in. There is the blue ARB one, which I might swap for a std Carling at some point. One for my spots, a spare at present and a red topped one for the inverter. I went with the optional wiring blocks and snap fit spade terminals. Which is great seeing as though the ARB ones don't work with those. Grrrr.
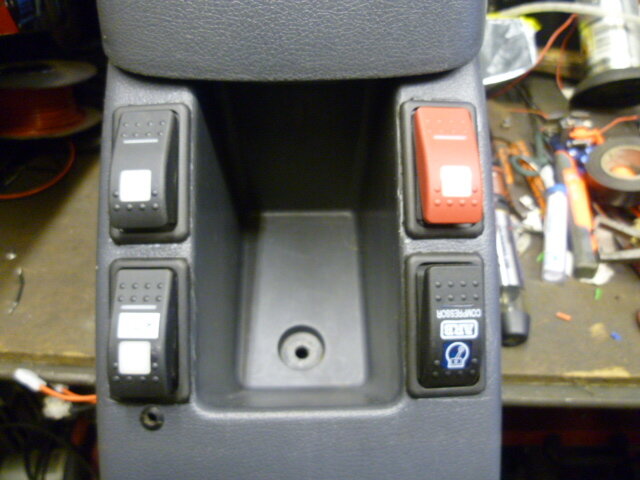
Actually got the current wife to cut some little rubber mats to go in the bottom of the boxes too which finishes it off nicely. I robbed the arm rest top out of the off roader too so that instead of the tray on the centre box I have the additional storage compartment.
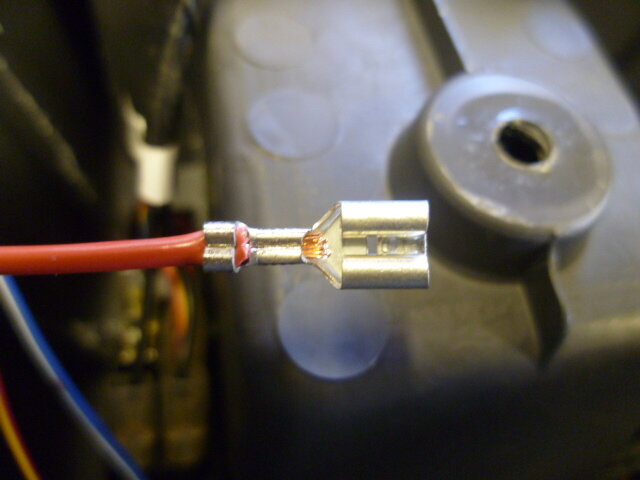
Tried to make a tidy job of it all. I am aware of how rough some driving can be, although I may never make it there in this truck, I figured that in my mind, 'Expedition Prepared' meant more than a snorkel and roof tent. No Scotchlocks, none of those awful crimped connectors that pull out. Proper wire, secured so that it doesn't come apart. Connectors crimped and soldered with heat shrink on all exposed sections.
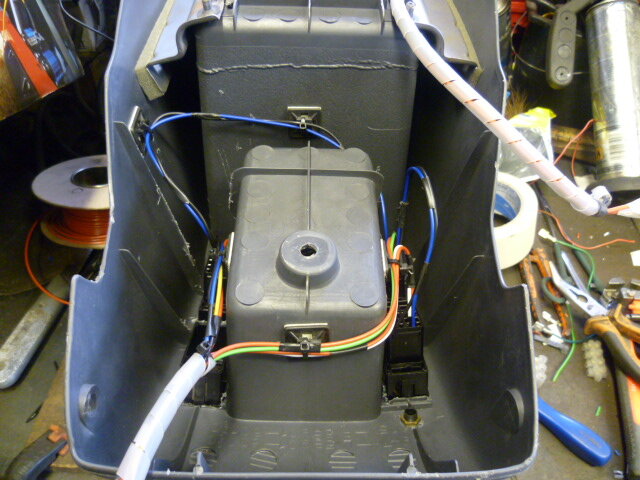
BTW if you still use those horrid insulated terminals in little packets you really should treat yourself to a proper roll crimp tool that not only crimps the wire but the outer sheath too. Factory job.
Here is the finished job. Looks Like about half an hour's work doesn't it. Odd that.
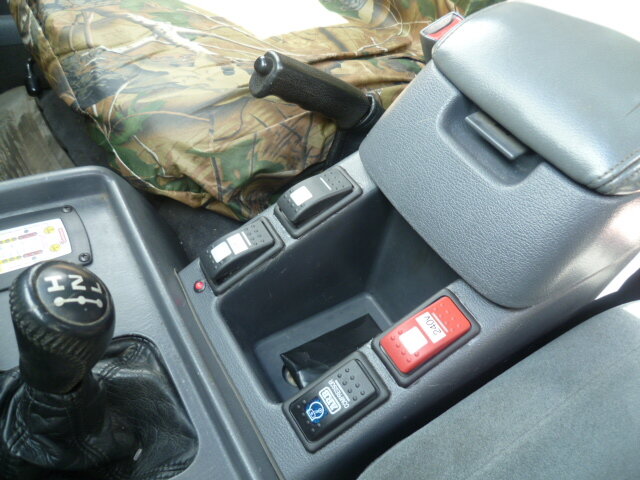
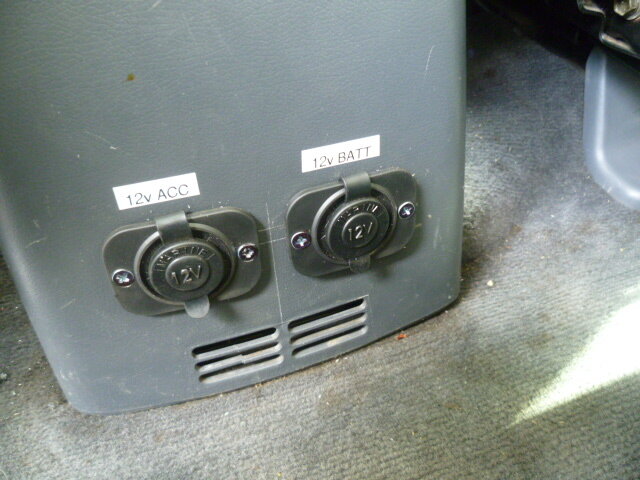
Also put in two 12v ciggy lighter sockets. One on Acc and the other perm live. Just to give choices for running and charging devices etc
Had 5 seasons in one day today. Been a nightmare. Working away all week this coming week, but week after there might well be a new addition to show you. Having something custom built. Top secret.
I looked at where I could put switches and I looked at where I wanted them. Seemed that the armrest console would be the best for these. There are quite a few ways to mount these switches but I opted for the single variant. The coin holders weren't far off the right size. Quick whizz and they were in. Just need to clean up around the inserts where I bedded them in with sealant once it's fully dried.

Next job was to run a multi core cable from the fuse box under the bonnet into the dash. I decided that I don't want to continually tap into dash board wires and also have numerous cables back and forth through the bulkhead. This cable has 6 single strands and also 2 pairs of twin strand all inside the sheath. So in simple terms I have brought in Live, Acc and Ign from the engine bay but can also send power back to run things like spotlight relays etc

Got the switches in. There is the blue ARB one, which I might swap for a std Carling at some point. One for my spots, a spare at present and a red topped one for the inverter. I went with the optional wiring blocks and snap fit spade terminals. Which is great seeing as though the ARB ones don't work with those. Grrrr.

Actually got the current wife to cut some little rubber mats to go in the bottom of the boxes too which finishes it off nicely. I robbed the arm rest top out of the off roader too so that instead of the tray on the centre box I have the additional storage compartment.
Tried to make a tidy job of it all. I am aware of how rough some driving can be, although I may never make it there in this truck, I figured that in my mind, 'Expedition Prepared' meant more than a snorkel and roof tent. No Scotchlocks, none of those awful crimped connectors that pull out. Proper wire, secured so that it doesn't come apart. Connectors crimped and soldered with heat shrink on all exposed sections.

BTW if you still use those horrid insulated terminals in little packets you really should treat yourself to a proper roll crimp tool that not only crimps the wire but the outer sheath too. Factory job.

Here is the finished job. Looks Like about half an hour's work doesn't it. Odd that.

Also put in two 12v ciggy lighter sockets. One on Acc and the other perm live. Just to give choices for running and charging devices etc

Had 5 seasons in one day today. Been a nightmare. Working away all week this coming week, but week after there might well be a new addition to show you. Having something custom built. Top secret.
Didn't take as long the second time though Ben. Once I'd figured out that ARB switches are made upside down for the Australian market. 
I eventually bought one of those 12 bench powerpacks so that I could have a constant supply to run and test things. Makes it easier when you can simulate the set up off the vehicle
I eventually bought one of those 12 bench powerpacks so that I could have a constant supply to run and test things. Makes it easier when you can simulate the set up off the vehicle
Nice work Chris, very tidy and "proper! " Well worth the effort! 
I'm growing to hate that blue ARB compressor light on my dash. Thankfully it's out of my sight-line and tends to act more of a footwell illuminator, but it's so effin bright!
I'm growing to hate that blue ARB compressor light on my dash. Thankfully it's out of my sight-line and tends to act more of a footwell illuminator, but it's so effin bright!
Don't like the adverts? Click here to remove them
Doodle
Well-Known Member
I had wondered why the switch for the compressor didn't illuminate...I quickly found out when I went to install another ARB switch for the freespool 
Now have red illumination for winch switches (freespool & winch control), and green for lighting.
Now have red illumination for winch switches (freespool & winch control), and green for lighting.
When I got the ARB compressor unit, it had a huge loom that included the connections and wiring for their front and rear lockers. This was all one loom. I could have coiled it all up somewhere but I actually unpicked it all and separated the sections. So in effect, all the ARB switch is doing is firing the built in relay on the pump. The illumination can be daisy chained from the others and earths aren't a problem. So on balance I think I will swap this for a std Carling switch when I get around to it. They do some cool variations including one with a safety lock on the toggle. Somehow it offends my sense of order that three go one way and one the other.
Opposing switches are not in accordance with the 'elf 'n safety manual, eh Chris? 
Matt Wright
Well-Known Member
Looking SO good Chris, I am going ot hound you till you make it to rough ground for a big adventure once the truck is "done"  Ruby is still going strong here! With "winter" approaching, it should mean some cooler weather with puddles and more interesting trails to take her on (almost boring driving on most of them in the dry, the 80 drives them like they're tar..) Keep up the thread!
Richard Jackaman
Well-Known Member
- Joined
- Apr 6, 2010
- Messages
- 246
BTW if you still use those horrid insulated terminals in little packets you really should treat yourself to a proper roll crimp tool that not only crimps the wire but the outer sheath too. Factory job.
View attachment 12413
Chris can you post a pic of the crimp tool as I'd like to get one and can't decide on which model. Does it crimp the joint and the insulation in one go?
Last edited:
Richard Jackaman
Well-Known Member
- Joined
- Apr 6, 2010
- Messages
- 246
Looks like it has replaceable jaws as the ones in the picture seem to be for insulated terminals. Can you remember where you got it?
I was reading about soldering the joints and the consensus was not to as it can seep up under the insulation making the joint rigid and prone to fracture.
I was reading about soldering the joints and the consensus was not to as it can seep up under the insulation making the joint rigid and prone to fracture.
Look again Richard. That's the correct tool.
Solder creeping up the wire making it rigid? Well if they say so. I've never seen that and I have done hundreds of these.You'd have to go some to get it to get past the crimp. These pliers really crunch down.
Solder creeping up the wire making it rigid? Well if they say so. I've never seen that and I have done hundreds of these.You'd have to go some to get it to get past the crimp. These pliers really crunch down.
Richard Jackaman
Well-Known Member
- Joined
- Apr 6, 2010
- Messages
- 246
Internet trickery.....how dare you. So it's the vehicle wiring products one...Thanks
Similar threads
- Replies
- 29
- Views
- 1K


