Don't like the adverts? Click here to remove them
You are using an out of date browser. It may not display this or other websites correctly.
You should upgrade or use an alternative browser.
You should upgrade or use an alternative browser.
Project 80: Codename Grey Ghost
- Thread starter Chris
- Start date
Well the main bit is done and covered Yogi. All I have to do now is run the output from the tank to the heat exchanger and back up to where I want the tap / shower head. If I want cold water then I just leave the rear heater slide on cold and if I want warm then I put it on full hot. Not sure how much water I will waste waiting for the warm water to come around. But, as the water tank won't actually be for drinking, I guess I can send the water back until it runs warm. I have been thinking about flow diverter valves and all sorts, but I shall just plumb it in straight for now to prove the concept. I also have to wire in the Kenlowe pump under the bonnet. It's just on a flying lead at the second but works a treat. This allows me to circulate hot engine water without the engine running.
There is some testinig to do yet with flow rates. If I leave the cold water standing in the heat exchanger really gets it very hot then when I draw water off the first bit is boiling then it settles down. Not sure how that will affect having a shower where we turn the water on and off. There may be a few squeals. Having hot water virtually on tap is quite a luxurious thing. OK you have to time it right. Middle of the night there won't be any. But after a day's drive there will be loads. I need to make a pick up pump that is self priming with a roll of flat hose and a filter on the end so that I can take advantage of any water around. If I can keep the tank filling then the amount of hot water would only be limited by how much diesel you had.
There is some testinig to do yet with flow rates. If I leave the cold water standing in the heat exchanger really gets it very hot then when I draw water off the first bit is boiling then it settles down. Not sure how that will affect having a shower where we turn the water on and off. There may be a few squeals. Having hot water virtually on tap is quite a luxurious thing. OK you have to time it right. Middle of the night there won't be any. But after a day's drive there will be loads. I need to make a pick up pump that is self priming with a roll of flat hose and a filter on the end so that I can take advantage of any water around. If I can keep the tank filling then the amount of hot water would only be limited by how much diesel you had.
Great work Chris, glad to see it coming together as you had planned... 
Don't like the adverts? Click here to remove them
Well after three days of frankly f**** about outside in the rain, sun, puddles, sweat, grease, oil, water down my neck and diesel up my sodding sleeve, I have called it a day. Three days to fit a sodding tank is ridiculous. And it's still not done. Ben would have had this done before second breakfast. I've just been thwarted by stupid things like putting tools down and not finding them again, failing eyesight which means I have to wear glasses for close stuff, running out of Jub clips, connectors, heat shrink etc. Been to Maplins and Halfwits twice in two damn days. Seriously it's not that hard a job, I have just been working against it. Never even got close to plumbing in the shower.
So here is the rest of the tank thing so far. It all works and the truck runs fine, but I did find that without the pump running, the engine wouldn't pull fuel through it. So the build changed slightly to make sure the pump supply was 100% solid. I have made up a by pass kit that with nothing more than screwdriver, I can bypass the whole lot and run as standard. It's just 6" of spare pipe and a barbed straight connector.
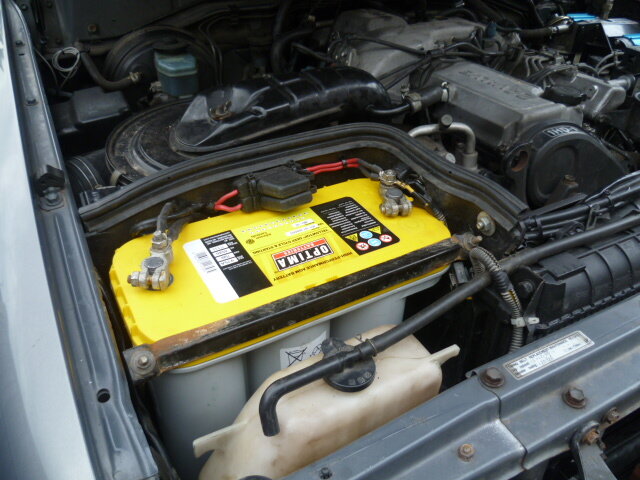
Before all that though, I dropped the front aux battery in. Got a great deal on the second Yellow top. They must have been having a sale. Before I could drop it in, the Missus decided to go to Devon for a few days and needed to power the Waeco fridge. I lent here this battery and a little loom for the cig plug. It was fully charged, ran the fridge for three days and came back with 12.53v still showing. I do like them. It dropped straight in no problems and immediately read higher in the LED meter inside than the previous battery ever did.
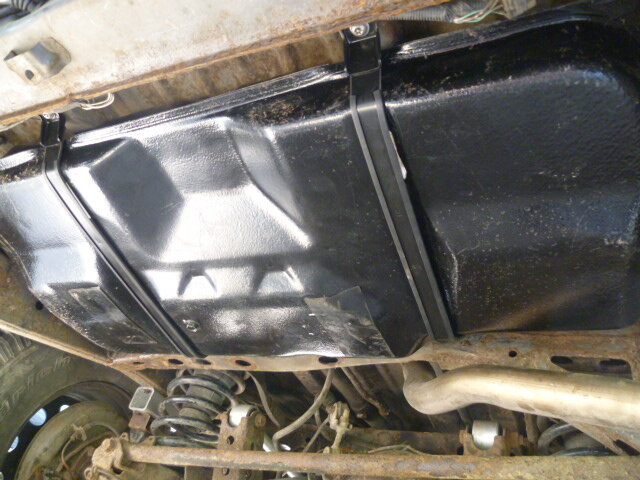
OK, fitting the tank up into the floor was easy as I'd already got the straps sorted. I have not sorted a gauge yet. A chap in Capetown is making one for me. So at the second there is just a cable hanging loose.
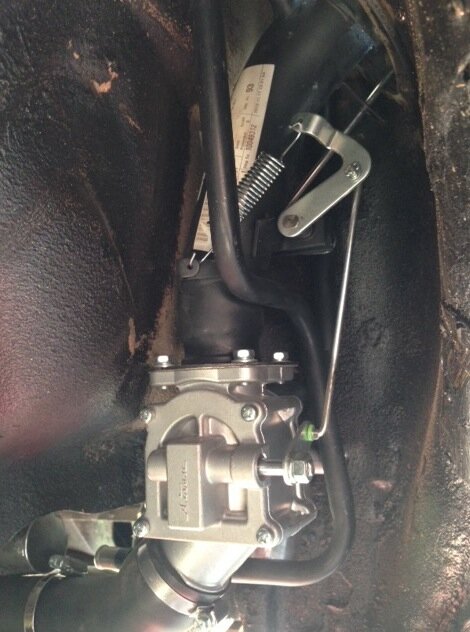
Next I put the filler neck in. This was pretty easy. I did make two simple brackets secured with Rivnuts at 90 degs to each other into the arch. Crikey that made it very solid. The sub tank filler went on fine but the main tank pipe needed a bit of a trim. I think that when these are fitted for the Aus market, it's unlikely that Mr T takes the OEM pipe into the fitting shop and uses a hacksaw to randomly shorten it so that it fits. I guess a proper short pipe makes a beautifully neat and easy job. I figured I could either take the metal pipe off again or simply cut an inch off the rubber hose .....Heads or tails?
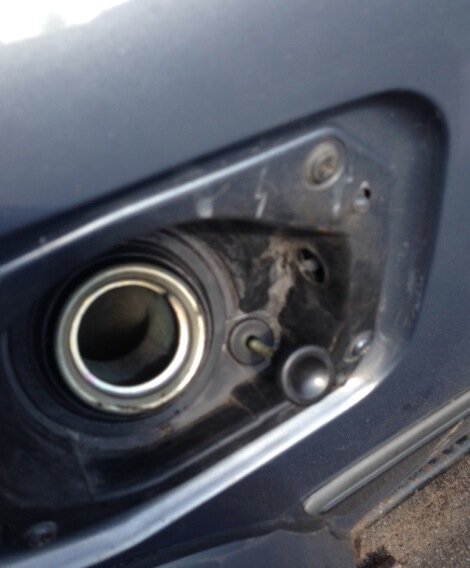
Putting the neck through the body was easy too. A bit of lining up to be done to get it just right, but no major issues. Just needed to make sure the flap in the neck could operate through its full range.
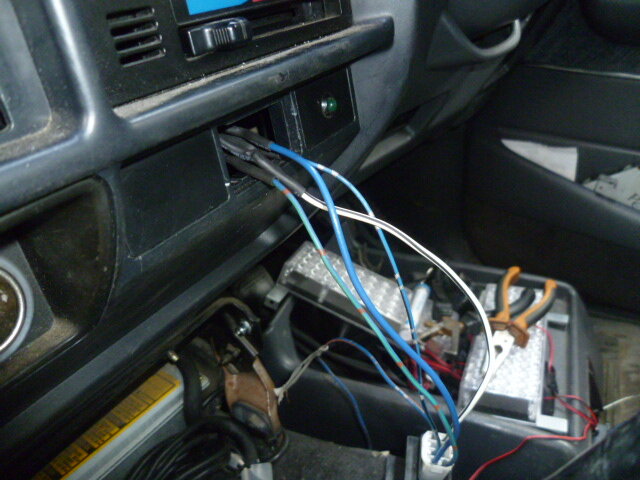
Now when it came to the dash switch, I did a lot of thinking. I did away with my rear heater so I figured I might be able to use some of that plug. I rummaged in my spares box and found a loom plug that would fit the sub tank switch and robbed out the illumination, power, earth, feed out and connected them into the new plug. hey Presto, after what seemed like only hours, it was all done. Just need to run the positive feed down through the tunnel to the solenoid loom and it will all fire up. I have done a flying lead test and it's all fine. For interest's sake, the two solenoids only pull 1.6 amps between them. The pump pulls a bit more but still only a couple of amps max so there's no need for enormous cables.
Can't recall if I have already posted this bit. I had to make my own mounting plate for all the gubbins.
Remarkably it looks like a CC of JW's.
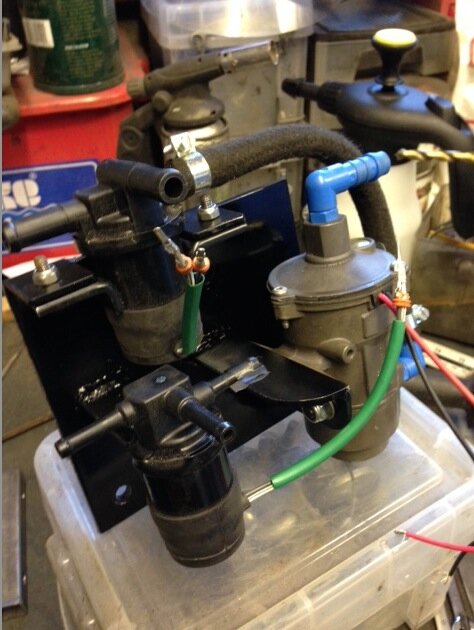
Only difference is on mine that the whole plate is mounted on three big bobbins and the individual components are hard mounted.
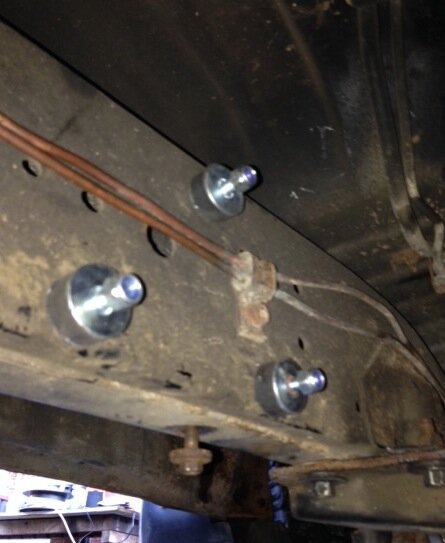
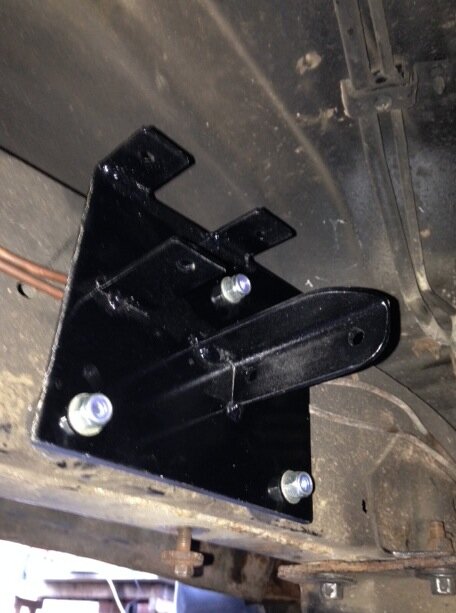
Here's the panel all plumbed in. I used new hose although I would have preferred the braided stuff, it's all my factor had in stock. And he did me a deal. Yes, before someone spots it, a PO must have replaced the brake lines at some point. They ain't pretty but they not corroded either!
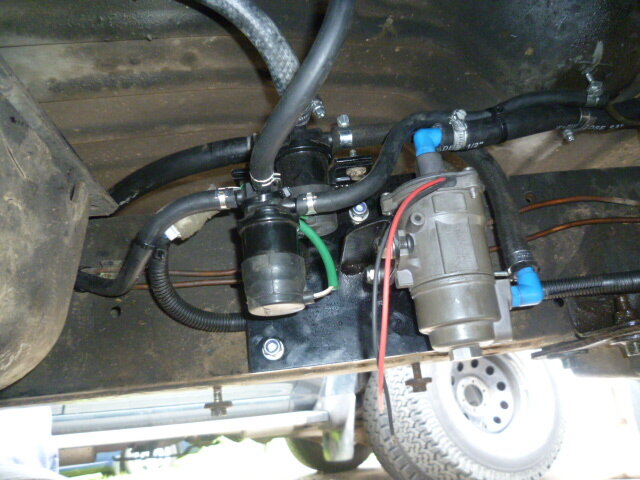
The bash plate nicely covers the underside at this point so it should be away from sources of damage and be quite sheltered too.
All I have to do now, yes, ALL I have to do now - Jeez, if wire in the solenoid feed, the pump power - which only comes on with Ign so it's not ticking away all the time the keys are in the Acc position like that last one. Oh the change over solenoids also cancel when you turn the key off too. I don't want those energised all the time it's parked.
I did also manage to wire in the Kenlowe pump to one of the console Carling switches before I ran out of patience. So that's another thing ticked off.
I am getting closer but with a camping weekend coming up, I am going to have to do some evening stints.
So here is the rest of the tank thing so far. It all works and the truck runs fine, but I did find that without the pump running, the engine wouldn't pull fuel through it. So the build changed slightly to make sure the pump supply was 100% solid. I have made up a by pass kit that with nothing more than screwdriver, I can bypass the whole lot and run as standard. It's just 6" of spare pipe and a barbed straight connector.
Before all that though, I dropped the front aux battery in. Got a great deal on the second Yellow top. They must have been having a sale. Before I could drop it in, the Missus decided to go to Devon for a few days and needed to power the Waeco fridge. I lent here this battery and a little loom for the cig plug. It was fully charged, ran the fridge for three days and came back with 12.53v still showing. I do like them. It dropped straight in no problems and immediately read higher in the LED meter inside than the previous battery ever did.

OK, fitting the tank up into the floor was easy as I'd already got the straps sorted. I have not sorted a gauge yet. A chap in Capetown is making one for me. So at the second there is just a cable hanging loose.

Next I put the filler neck in. This was pretty easy. I did make two simple brackets secured with Rivnuts at 90 degs to each other into the arch. Crikey that made it very solid. The sub tank filler went on fine but the main tank pipe needed a bit of a trim. I think that when these are fitted for the Aus market, it's unlikely that Mr T takes the OEM pipe into the fitting shop and uses a hacksaw to randomly shorten it so that it fits. I guess a proper short pipe makes a beautifully neat and easy job. I figured I could either take the metal pipe off again or simply cut an inch off the rubber hose .....Heads or tails?

Putting the neck through the body was easy too. A bit of lining up to be done to get it just right, but no major issues. Just needed to make sure the flap in the neck could operate through its full range.

Now when it came to the dash switch, I did a lot of thinking. I did away with my rear heater so I figured I might be able to use some of that plug. I rummaged in my spares box and found a loom plug that would fit the sub tank switch and robbed out the illumination, power, earth, feed out and connected them into the new plug. hey Presto, after what seemed like only hours, it was all done. Just need to run the positive feed down through the tunnel to the solenoid loom and it will all fire up. I have done a flying lead test and it's all fine. For interest's sake, the two solenoids only pull 1.6 amps between them. The pump pulls a bit more but still only a couple of amps max so there's no need for enormous cables.

Can't recall if I have already posted this bit. I had to make my own mounting plate for all the gubbins.
Remarkably it looks like a CC of JW's.

Only difference is on mine that the whole plate is mounted on three big bobbins and the individual components are hard mounted.


Here's the panel all plumbed in. I used new hose although I would have preferred the braided stuff, it's all my factor had in stock. And he did me a deal. Yes, before someone spots it, a PO must have replaced the brake lines at some point. They ain't pretty but they not corroded either!

The bash plate nicely covers the underside at this point so it should be away from sources of damage and be quite sheltered too.
All I have to do now, yes, ALL I have to do now - Jeez, if wire in the solenoid feed, the pump power - which only comes on with Ign so it's not ticking away all the time the keys are in the Acc position like that last one. Oh the change over solenoids also cancel when you turn the key off too. I don't want those energised all the time it's parked.
I did also manage to wire in the Kenlowe pump to one of the console Carling switches before I ran out of patience. So that's another thing ticked off.
I am getting closer but with a camping weekend coming up, I am going to have to do some evening stints.
You sound at the end of your tether Chris.
Take heart though, it may be simple on paper, but that little lot would have had me floored. I may have got as far as getting the tank mounted, but that would have been the end of it for me.
Take a breath and press on, it'll be all over and working like a Swiss one soon!
Take heart though, it may be simple on paper, but that little lot would have had me floored. I may have got as far as getting the tank mounted, but that would have been the end of it for me.
Take a breath and press on, it'll be all over and working like a Swiss one soon!
Three days is so long to do so little Clive. And there is more needs doing. Time is so precious and I just want to get this finished so I can enjoy it. Since I first got Lil Blue so many years ago, I have spent just about every spare moment working on successive Cruiser projects and frankly I am bolloxed.
Beau
Well-Known Member
- Joined
- Jan 28, 2011
- Messages
- 2,014
- Country Flag
Chris, 3 days isn't Bad! I spend a good 4 evening/nights fitting my Aux Tank! And even then I finished off the wiring in Paris! Nice clean job though, it'll be worth it in the end. Nice plumbing down there, looks the business 
IMO, that's why commercial garages avoid "one offs" like the plague and stick to the routine stuff with book times and labour rates they can sustain.
The vast majority of car users can't do these things and find it too expensive to pay someone else, so go without.
I wouldn't benefit enough from an aux tank, the main reason I wouldn't fork out so much to get one.
'Tis a lovely piece of work though Chris, pity it's all hidden
The vast majority of car users can't do these things and find it too expensive to pay someone else, so go without.
I wouldn't benefit enough from an aux tank, the main reason I wouldn't fork out so much to get one.
'Tis a lovely piece of work though Chris, pity it's all hidden
AndyCook
Well-Known Member
Looks like it was a pig of a job to fit that tank and plumbing.
I was thinking of getting an aux tank for hilux, frogs island selling a couple off cheap. But I read the fitting instructions and lost the will to do it
I will get a larger replacement main tank instead at somepoint, 150 or 170l I think it is
Sent from my iPad using Tapatalk
I was thinking of getting an aux tank for hilux, frogs island selling a couple off cheap. But I read the fitting instructions and lost the will to do it
I will get a larger replacement main tank instead at somepoint, 150 or 170l I think it is
Sent from my iPad using Tapatalk
- Joined
- May 26, 2014
- Messages
- 4,812
- Country Flag
nice job mate, all of that pipework is a pain int it?
the newer filler neck that you have is a bit more compact than the older ones.
does that electric pump make a difference?
the newer filler neck that you have is a bit more compact than the older ones.
does that electric pump make a difference?
The only twatty part is fitting the tank strap mounting points. I wouldn't do that again. I'd make a whole different mounting. The plumbing of the pipes is easy too. Cut the originals in one easy place and shove two new hoses on and clamp them. It goes on like this; they are all relatively easy bits. But there is lots of it!!
Tonight the skies cleared and I got the dash switch wired in and pushed back into place and also nearly got the shower pump sorted. I am waiting for a new solenoid to run the fuel pump as the Albright one I had in stock didn't seem to want to play without getting so hot you couldn't touch it.
The pump is a strange thing. I ran it to see how much it pumped and from a hose into a bucket, it's not a huge amount. But it IS the right pump. You do not want high pressure high volume here. It's a helper pump. I ran the engine tonight with no pump and this time it was happy. Had a few leaks earlier and I think that was the issue. Fired the pump up and it was no different. But, that was only idling and revving. it wasn't driving. When I fitted the aux fuel filter, the IP struggled to draw through both at higher revs. it was a bit strangled. So, hopefully the pusher pump will combat that. When the pump was running free it was pulling about 2 1/2 amps, when it was under load, that dropped to less than 1 amp. I messed about with it and it seems that the more you ask of it, the harder it works. But the less power it consumes? Eh?
So engine running, clicked over to sub tank, clonk, brmm brmmm brmm cough, choke. Dead. Yay, not a problem - the sub tank is empty you see. Now the beauty of the pusher pump is that you give it a second when you go back to the main tank and there is a whoosh, gurgle, glug glug glug, turn the key and vroom, it is all bled for you. It's a handy thing to have if you need to siphon off some fuel for some reason. Take the hose of the filter and switch to Ign and fuel comes out. You could send that straight to another tank, jerry can or even with a hose back into you won fuel tank if you wanted some amusement.
I think that it takes some of the strain of a 20 year old IP. ON the old Silver off roader, when that was pointing vertically, the IP was trying to lift fuel several meters. It did struggle a bit at times. I fitted the same Walbro pump and never had another problem. I looked at the OEm hose sizes and thought, hmm 12 mm hose but there are restrictions in the change over system. The solenoids diameters are quite small. That is going to place more burden on the IP, especially when you clog it for an over take or something. So the pump seemed to be the right thing. The extra filter also holds quite a bit of fuel so if you have to boot it, there is quite a bit sitting on demand before any starvation kicks in.
Who knows!
hopeless wanderer
Well-Known Member
- Joined
- Aug 21, 2014
- Messages
- 863
- Country Flag
Well after three days of frankly f**** about outside in the rain, sun, puddles, sweat, grease, oil, water down my neck and diesel up my sodding sleeve, I have called it a day. Three days to fit a sodding tank is ridiculous. And it's still not done. Ben would have had this done before second breakfast. I've just been thwarted by stupid things like putting tools down and not finding them again, failing eyesight which means I have to wear glasses for close stuff, running out of Jub clips, connectors, heat shrink etc. Been to Maplins and Halfwits twice in two damn days. Seriously it's not that hard a job, I have just been working against it. Never even got close to plumbing in the shower.
So here is the rest of the tank thing so far. It all works and the truck runs fine, but I did find that without the pump running, the engine wouldn't pull fuel through it. So the build changed slightly to make sure the pump supply was 100% solid. I have made up a by pass kit that with nothing more than screwdriver, I can bypass the whole lot and run as standard. It's just 6" of spare pipe and a barbed straight connector.
Before all that though, I dropped the front aux battery in. Got a great deal on the second Yellow top. They must have been having a sale. Before I could drop it in, the Missus decided to go to Devon for a few days and needed to power the Waeco fridge. I lent here this battery and a little loom for the cig plug. It was fully charged, ran the fridge for three days and came back with 12.53v still showing. I do like them. It dropped straight in no problems and immediately read higher in the LED meter inside than the previous battery ever did.
View attachment 14883
OK, fitting the tank up into the floor was easy as I'd already got the straps sorted. I have not sorted a gauge yet. A chap in Capetown is making one for me. So at the second there is just a cable hanging loose.
View attachment 14884
Next I put the filler neck in. This was pretty easy. I did make two simple brackets secured with Rivnuts at 90 degs to each other into the arch. Crikey that made it very solid. The sub tank filler went on fine but the main tank pipe needed a bit of a trim. I think that when these are fitted for the Aus market, it's unlikely that Mr T takes the OEM pipe into the fitting shop and uses a hacksaw to randomly shorten it so that it fits. I guess a proper short pipe makes a beautifully neat and easy job. I figured I could either take the metal pipe off again or simply cut an inch off the rubber hose .....Heads or tails?
View attachment 14886
Putting the neck through the body was easy too. A bit of lining up to be done to get it just right, but no major issues. Just needed to make sure the flap in the neck could operate through its full range.
View attachment 14888
Now when it came to the dash switch, I did a lot of thinking. I did away with my rear heater so I figured I might be able to use some of that plug. I rummaged in my spares box and found a loom plug that would fit the sub tank switch and robbed out the illumination, power, earth, feed out and connected them into the new plug. hey Presto, after what seemed like only hours, it was all done. Just need to run the positive feed down through the tunnel to the solenoid loom and it will all fire up. I have done a flying lead test and it's all fine. For interest's sake, the two solenoids only pull 1.6 amps between them. The pump pulls a bit more but still only a couple of amps max so there's no need for enormous cables.
View attachment 14889
Can't recall if I have already posted this bit. I had to make my own mounting plate for all the gubbins.
Remarkably it looks like a CC of JW's.
View attachment 14892
Only difference is on mine that the whole plate is mounted on three big bobbins and the individual components are hard mounted.
View attachment 14894 View attachment 14896
Here's the panel all plumbed in. I used new hose although I would have preferred the braided stuff, it's all my factor had in stock. And he did me a deal. Yes, before someone spots it, a PO must have replaced the brake lines at some point. They ain't pretty but they not corroded either!
View attachment 14890
The bash plate nicely covers the underside at this point so it should be away from sources of damage and be quite sheltered too.
All I have to do now, yes, ALL I have to do now - Jeez, if wire in the solenoid feed, the pump power - which only comes on with Ign so it's not ticking away all the time the keys are in the Acc position like that last one. Oh the change over solenoids also cancel when you turn the key off too. I don't want those energised all the time it's parked.
I did also manage to wire in the Kenlowe pump to one of the console Carling switches before I ran out of patience. So that's another thing ticked off.
I am getting closer but with a camping weekend coming up, I am going to have to do some evening stints.
Ah now that filler is a clever thing
Graham
Well-Known Member
.Ah now that filler is a clever thingI had an ahem "friend" who has unlimited access to duty free Diesel and used to fill his tank up for 30pounds a few years ago, The worry always was that if those lovley men who occasionally stop you and "dip" your tank looking for signs of a red dye caught him they would take his car and possibly shoot his gran or something like that... I guess if you concealed the toggle, if dipped they would get fuel from the law abiding, extortionate duty and taxation tank and they would be none the wiser
Hmmmm
I think the "tank dip" is just step 1.
They then swirl a cotton bud, inside your exhaust pipe to collect a sample of the soot.
Then burn the cotton bud off in some flame with a catalyst.
Depending on the colour of the flame,,,,,,,,,,,,
Gra
Similar threads
- Replies
- 9
- Views
- 325
- Replies
- 16
- Views
- 294
- Replies
- 11
- Views
- 549


